background image

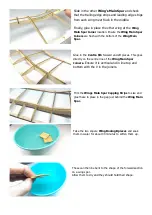
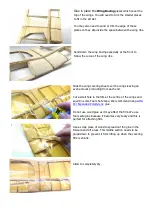
Glue in place the


Wing Boxing 

pieces which cover the 

top of the wings. You will need to trim the smaller pieces 
to fit in the aft slot. 
 
You may also need to sand or trim the edge of these 
pieces so they slip inside the space between the wing ribs. 


Sand down the wing boxing especially at the front to 
follow the curve of the wing ribs. 


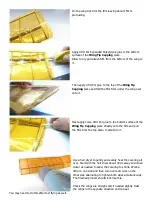
Slide the wing covering sheet over the wings leaving an 
even amount protruding from each end.  
 
Cut a small hole in the film at the centre of the wings and 
squirt in some Foam Safe Glue. We recommend using 

UHU 

Por Expanded Polystyrene

 glue. 

 
Do not use wood glue as it may affect the film. We use 
foam safe glue because it becomes very tacky and this is 
perfect for attaching film.  

 
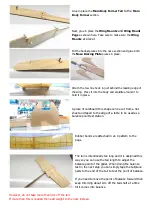
Use a scrap piece of wood to spread out the glue in the 
forward and aft areas. This middle section needs to be 
glued down to prevent it from lifting up when the covering 
film is shrunk.  


Allow to completely dry. 


Summary of Contents for FreeSpirit

Page 1: ...truction is very straight forward The covering material for the wings is heat activated shrink film and because it is supplied as a tube and simply slips over the wing there is very little gluing required This bird can be flown as a hand launch glider or a towline glider and it s built up wing structure gives great lift and aerodynamic properties Additional Items You May Need Foam safe glue Wood G...

Page 2: ...the sheets until they are needed Main Body Former Tail Wings Main Spars Wings Leading Edge Spars Wings Trailing Edge Spars Ribs and Half Ribs Wing Main Spar Joiners Wing Mounts Wing Tips Capping Centre Rib Tailplane Vertical Stabiliser Wings Main Spar Capping Strips Nose Bracing Plates Rubber bands Wing Mount Pegs Wing Boxing Main Body Former Forward Wing Braces Towline Hook Ballast ...

Page 3: ...nkles The Wing Sections Lay the Wing Main Spar on the work surface and glue in place the 2 Ribs in these slots toward each end Ensure these are level and the Wing Main Spar is vertical and allow it to dry Make sure the ribs form a 90 degree angle with the Wing Main Spar Alternate to the other wing and do the same Note Check that the rib direction on each wing is correct so you are making one left ...

Page 4: ...ork bench will ensure the leading edge part is pressed well up against the ribs for gluing Allow to dry before continuing Glue in place the Wing Tips Capping pieces in place with the thicker end toward the leading edge of the wings Pin around it to keep it in place while it dries Glue in place the Wing Main Spar Joiners on either side of one of the wing s main spars Ensure the bottom of the joiner...

Page 5: ...tre Rib forward and aft pieces This goes directly on the centre line of the Wing Main Spar Joiners Ensure it is vertical and in line top and bottom with the V in the joiners Trim the Wings Main Spar Capping Strips to size and glue these in place in the gap just behind the Wing Main Spar Take the two square Wing Boxing Bpieces and soak them in water for about 30 minutes to soften them up These can ...

Page 6: ...sheet over the wings leaving an even amount protruding from each end Cut a small hole in the film at the centre of the wings and squirt in some Foam Safe Glue We recommend using UHU Por Expanded Polystyrene glue Do not use wood glue as it may affect the film We use foam safe glue because it becomes very tacky and this is perfect for attaching film Use a scrap piece of wood to spread out the glue i...

Page 7: ... the Wing Tip Capping piece directly onto the film and pull the film from the top down to attach to it Use a hair dryer to gently and evenly heat the covering all over Start with the hair dryer about 30cm away and move closer as needed to allow the covering to shrink Work a little on one side and then turn over and work on the other side alternating to tighten both sides simultaneously The finishe...

Page 8: ... from a flat sheet and taped to the edge of a table to be used as a balance point test station Rubber bands are attached in an X pattern to the pegs The tail is intentionally too long and it is designed this way so you can use the tail length to adjust the balance point of the glider When doing the balance test in the next step you can simply tape the tailplane parts to the end of the tail to test...

Page 9: ...der the trailing edge of the wings to achieve a good flight path If the glider turns left or right too much check that one wing is not twisted and if so then reheat it while twisting it gently and slightly back the opposite way See a test flight video on Youtube Link Copyright MicronWings 2015 All rights reserved This manual is for personal use only No unauthorized copying or digital distributing ...

Reviews: