background image

micro

HAM © 

2016


All rights reserved

ROTATOR TAB

The Rotator tab allows configuring the internal rotator control interface for your particular rotor hardware.  

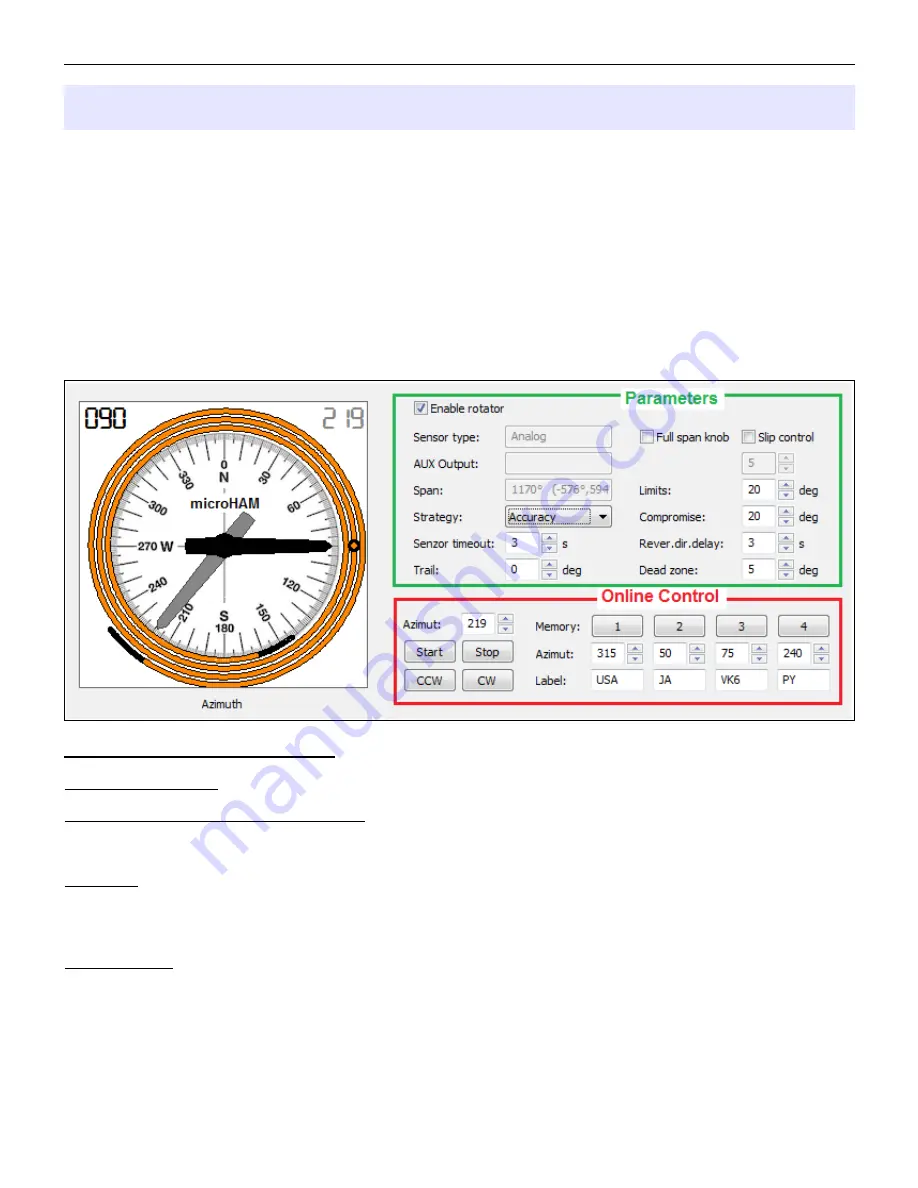
To the left side of the Rotator tab is an azimuth circle with direction needle and orange line around the circle. 
The orange line displays the operating range of the rotor; the black areas at the ends of the 

spiral

 are the portion 

of the operating range that is protected by the software limits.   The black circle on the spiral shows the current 
azimuth in relation to the full operating range.  The picture below demonstrates a rotor with multi-turn capability – 
in this case slightly over three turns.  

The current azimuth is displayed numerically in upper left corner and indicated by the black needed.  The “target” 
azimuth is displayed in the upper right corner and indicated by the gray needle.  When the rotor reaches the 
target value, the current and target values will be the same and the black needle will cover the gray one.  

The right side of the Rotator tab contains controls for configuring the rotor interface and controlling its operation.

Rotator control parameters

ENABLE ROTATOR:

  enables the rotor interface.  

ROTATOR CONTROL ALWAYS ACTIVE:

  enables control of rotator, even if none is present on the current 

band. See description of this feature in OPERATING STATION MASTER chapter, under Antennas 
with Rotator heading.

SENSOR:

  displays the type of position feedback sensor.  Options are: 

Analog

 if the position feedback is a 

potentiometer or variable voltage position signal or 

Pulse

 for pulse (magnetic/reed switch) feedback. 

The sensor type is chosen during the calibration process and can not be changed directly.  The 

sensor must be connected as described in the “Connecting the Rotator” section of this manual. 

AUX OUTPUT:

 displays the function of the AUX relay.  Options are 

Speed, Brake,

 or 

None.

  Aux relay function 

is set during the calibration process and can not be changed directly.    When set to 

Speed, 

the rotor 

interface energizes the the Aux relay once the antenna has moved a preset distance and releases 
the relay a predetermined distance before the target.  When set to 

Brake,

 the rotor interface 

energizes the Aux relay before the rotor stats its movement and holds the relay for the “Brake tail” 
period after the antenna reaches its target. 

39

Summary of Contents for STATION MASTER

Page 1: ...microHAM 2016 All rights reserved STATION MASTER microHAM fax 421 2 4594 5100 e mail support microham com homepage www microham com Version 2 1 10 June 2016 1 ...

Page 2: ... Ports CAT 2nd CAT 21 Ports Rotator 2nd Rotator 23 Ports Auxiliary 23 Ports Control 24 Ports iLINK 24 Antenna Switching PTT Sequencer Tab 25 Antenna Switching PTT Sequencer Outputs 25 Antenna Switching PTT Sequencer Antennas 28 Antenna Switching PTT Sequencer Virtual Rotators 31 Antenna Switching PTT Sequencer Antenna Groups 32 Antenna Switching PTT Sequencer PA Sequencer 34 Antenna Switching PTT ...

Page 3: ...Receive only antenna support Optical isolation from computer PS 2 keyboard or keypad with dual control of Station Master and microHAM keyer Integrated chokes and filters for maximum RFI resistance Metal Aluminum case powder coated and silk screened Free no time limit firmware software upgrades via Internet Radio control Integrated level converter for CI V FIF 232 IF 232 or RS 232 Up to 57600 Baud ...

Page 4: ...azimuths Automatic azimuth control from logger Virtual Rotator Control Unlimited number of antennas can be joined to Virtual Rotator Programmable azimuth ranges for each Virtual Rotator antenna Automatic azimuth control from logger Unlimited number of Virtual Rotators per Band Power Amplifier Control Automatic tuning for CI V controlled automatic amplifiers Icom PW1 Expert SPE Automatic band switc...

Page 5: ...nged and will be applied on next transmission cycle 4 BUSY LED lights when BUSY condition happens transmission is allowed LED flashes when BUSY condition happens transmission is inhibited 5 FUNC MENU Short press and release opens Function list Press and hold for more than one second opens Menu list 6 ENCODER Rotary encoder with push button Function vary on configuration and antenna selection 7 YES...

Page 6: ...rt DB9 female jack See Appendix Connectors for details 5 PA DB15 female jack for connection with Power Amplifier Compatible with microHAM CAT cables See Appendix Connectors for details 6 PORT A DB25 female jack for antenna switch connection See Appendix Connectors for details 7 PS 2 MiniDIN6 for PS 2 keyboard or PS 2 keypad 8 INHIBIT Power inhibit output for Yaesu transceivers RCA jack TIP Signal ...

Page 7: ...13 ROTOR DB15 female for connection with Antenna Rotator See Appendix Connectors for details 14 PORT B DB25 female for antenna switch BPF and or sequencer connection See Appendix Connectors for details 15 PTTIN PTT input for connection with PTT output from transceiver or PATTT from microHAM keyer Active when grounded RCA jack Tip signal Shell ground 7 ...

Page 8: ...microHAM 2016 All rights reserved 4 Block Diagram Station Master block diagram 8 ...

Page 9: ... INHIBIT signal from of the Radio 2 to the SM associated with Radio 2 IMPORTANT Connecting INHIBIT is best way to prevent hot switching 4 Connect a 13 8 to 16V DC supply to the DC 13 8V jack Be sure to observe the proper polarity Do not turn on Station Master at this time Locate the USB cable but DO NOT connect it to the USB jack of Station Master at this time Connecting Station Master with microH...

Page 10: ...larity Do not turn on Station Master at this time 7 Locate the USB cable but DO NOT connect it to the USB jack of Station Master at this time Connecting Station Master without a microHAM keyer 1 If you are not using microHAM keyer connect the appropriate CAT cable optional accessory for your transceiver from the CAT jack of Station Master to the computer control port of your radio 2 Connect an RCA...

Page 11: ...1 790 811 850 940 950 FIF 232 levels Yaesu FT 100 736 747 757GXII 767 817 840 857 890 897 900 980 990 1000 1000D CI V levels Icom all radios except 7700 78xx when using the DB9 RS 232 jack TenTec all radios with 3 5 mm jack NOTE the CAT interface is not configured at the factory 7 Connect a 13 8 to 16V DC supply to the DC 13 8V jack Be sure to observe the proper polarity Do not turn on Station Mas...

Page 12: ...router_release_xx_xx exe xx_xx is version and choose Run as administrator to start installation The Windows setup utility will start and ask into which folder Router and its supporting files should be installed Note unless you have a very strong reason to install Router elsewhere please accept the default location When the Router installation is completed click Finish to launch Router for the firs...

Page 13: ...is then configured as required by the application logging control or digital mode software Station Master Status When the USB driver is installed correctly and Station Master is turned on Router will show a device tab with a GREEN beside the device name When Router shows a YELLOW X instead of a green it means the USB driver is correctly installed but Station Master is not turned on When Router sho...

Page 14: ... when creating virtual ports in Router the ports can overlap and will not work properly when you connect such device WARNING Before you begin to create virtual ports attach all external devices you are using with computer and allow them to connected to the system Restart Router and then create virtual ports Virtual ports are created and deleted from the Virtual Port menu Create Creates virtual COM...

Page 15: ...ata output BCD codes can be customized for driving antenna switches or bandpass filter control Options Digital Band Map Not used with Station Master Options Audio Devices Not used with Station Master Options DVK Not used with Station Master Options USB Noise immunity selects how many times an undelivered USB packet will be repeated before the USB device is disconnected from the operating system Re...

Page 16: ...ers refer to Setup Guide documents available in Router Help menu Use Help Download Documents first if Help Setup Guides are not available or incomplete There are three ways to apply a preset once it is created 1 Click on Preset and select it from the pull down menu 2 Click on a preset button To have buttons visible in Router Preset Show Buttons must be checked When the settings from a preset are a...

Page 17: ...r from a template tpl file When clicked Router will open a standard File dialog the default location is C Documents and Settings All Users Application Data microHAM cfg and the desired template can be chosen When Router loads a template it looks for an html or txt file with the same name as the template in the same directory If such file is found it is displayed TIP Templates are a powerful tool f...

Page 18: ...on After clearing the memory upload the Antenna Switching and the Rotator configuration data by by pressing the Store button on the appropriate tabs in Router VIRTUAL PORT MENU It is necessary to create a number of virtual serial ports COM ports in order for a Windows application logging control or digital mode program to access microHAM devices Create Creates virtual COM ports It is possible to s...

Page 19: ... html Show Tooltips When checked small single line help is displayed below the mouse cursor Update Router Download and install the most recent version of Router IMPORTANT Whenever it is possible always perform Router upgrade here About Shows the Router s internal version number DEVICE CONFIGURATION TABS There are six 6 tabs for configuring Station Master Each tab controls part of Station Master s ...

Page 20: ...ation software Station Master has six channels each channel provides an indication of the settings applied by the application and current state e g or or off CAT uses RxD and TxD 2nd CAT virtual fork for the main CAT channel Rotator uses RxD and TxD 2nd Rotator virtual fork for main Rotator channel Auxiliary uses RxD and TxD Control uses RxD and TxD NOTE Do not assign virtual ports to the channels...

Page 21: ...w what radio CAT protocol is being used To select the radio click the Set button Choose your radio in the Radio combo box Then select communication speed in the Baud rate box IMPORTANT The baud rate must be supported by your radio NOTE When StationMaster is connected to microKEYER II MK2R or MK2R via iLink and set as coupled see the iLink chapter below radio is connected to and CAT decoding will o...

Page 22: ...ftware Y connector that allows a second application to share control of the radio Router monitors when data is sent from each application and routes the radio s responses to the correct virtual port IMPORTANT Both applications must use same communication parameters baud rate data length parity and number of stop bits for proper operation Neither CAT port has priority Polls commands from each appli...

Page 23: ...nterface Controls for the monitor include Start Stop Clear and Save The Rotator Protocol Monitor should not be used under normal conditions However for debugging purposes it may be useful to Start a capture and close the window When a problem occurs the window can be opened and the Rotator Port log Saved for analysis The monitor log is circular only the last 20 kilobytes or so will be saved in ord...

Page 24: ...ative control data Control Port are transfered between Station Master and the keyer to synchronize operations NOTE If Station Master is not physically connected to a microHAM keyer over iLINK port or coupling is unwanted even when the devices are physically connected select none in the coupling box The CAT and 2nd CAT ports operate differently depending on the type of microHAM interface being used...

Page 25: ...DOES NOT automatically store those settings to the Station Master When you wish to configure Station Master from a file you must load the file into Router and then Store the settings to Station Master Save To File Saves the current settings displayed in Antenna Switching PTT Sequencer to a file on the computer NOTE If you want to save Station Master s current operating configuration you must click...

Page 26: ...puts are voltage sourcing In the SNK position the common terminal is connected to Station Master s ground these outputs are sinking switch to ground PORT B Contains six 6 outputs with single common terminal B1 B6 and four 4 outputs B7B10 with isolated contacts The common terminal of relays B1 B6 can be configured for internal or external power and source sink operation by using the PORT B jumpers ...

Page 27: ...or each antenna single antenna virtual rotator or antenna group selection Filter class BPF BPF outputs operate based only on the operating frequency and are used primarily to control switchable multiband band pass filter or coaxial stub filters A BPF output is active whenever the operating frequency falls within the defined band regardless of current antenna selection and or transceiver RX TX stat...

Page 28: ... display and for further configuration LABEL Short antenna abbreviation up to 5 characters long for SM display in compressed mode A1 10 B1 B10 The outputs from PORT A and or PORT B defined as ANT outputs on the Outputs tab are shown here in columns automatically sorted from A1 to A10 B1 to B10 Only ANT class outputs are shown Select those outputs that must be active when particular antenna is chos...

Page 29: ...he serial port A valid CAT setting has to be present on PORT tab and this setting has to be saved as default prior using this option This replicates a similar functionality of the microHAM Band Decoder CI V port When Serial port function is set to CI V SM simulates Icom s CI V transceive function and broadcasts the chosen frequency in Icom format at RS232 levels even when the transceiver connected...

Page 30: ... s native protocol Controlling a SteppIR antenna with SM has three advantages over controlling SteppIR by transceiver frequency only Station Master adjusts the SteppIR only when that antenna is selected This means that when you jump from one band to another but you have selected the SteppIR antenna for use on only one band or not at all the SteppIR elements stay on last used frequency and do not m...

Page 31: ...pin 5 but it is important to add jumper short between pins 4 and 8 on UltraBeam cable end Do Not connect to any other pin doing so will cause the UltraBeam Controller to operate improperly Baud rate in Router MUST be set to 19200 bps other speeds will not connect controller There are no special settings in controller menu required NOTE Station Master can control only ONE SteppIR or UltraBeam anten...

Page 32: ...eviously defined on the Antennas Tab are available IMPORTANT Azimuths for the antennas must be sequential and must cover the full 360 degrees without holes or overlaps ANTENNA GROUPS This tab allows joining several antennas into a group There are uses for antenna groups First antennas in a group can be selected manually using the rotary encoder on the front panel of Station Master Second antennas ...

Page 33: ... a group by clicking the Add button Antennas can be removed from a group by selecting the antenna orange background and clicking Remove The order of antennas inside the group can be changed by selecting a particular antenna and clicking the Up Down buttons NOTE The order of antennas in the group is the order they will appear on the rotary encoder and in the automatic scan 33 ...

Page 34: ...tput is frequency dependent Station Master permits selecting which power amplifier operation on a per band basis PA On is set on the Bands tab CI V pin 5 Icom format and level compatible output signal for automatic control of a power amplifier or antenna tuner using the Icom interface The proper Baud Rate and CI V Address for the amplifier or tuner should be set at the bottom of this tab see your ...

Page 35: ...ead time operate delay tail time release delay and output polarity can be set independently for each output Sequencer output level and polarity A LOW output indicates that the relay contact is OPEN A HIGH output indicates that the relay contact is CLOSED When the polarity of a sequencer output is normal the INVERTED box is not checked the output is LOW whenever it is disabled for particular band o...

Page 36: ...out a microHAM keyer Station Master monitors the PTT output of the transceiver This means that the radio has already switched to transmit and can be generating power before Station Master has switched receive to transmit be sure that the SM is connected according to the installation instructions use zero 0 lead time for all sequencer outputs set the INHIBIT INH time slightly longer that Switch Del...

Page 37: ... the number of bands that can be defined but the bands can not overlap New bands can be created using the Add button and existing bands can be deleted by selecting the desired band orange background and clicking the Remove button The minimum and maximum frequencies of previously defined bands can be edited by double clicking on the frequency field Bands are automatically sorted by ascending freque...

Page 38: ...and IC4 KL require a 1 of 10 BCD decoder and voltage converter to supply the correct Band Select voltage for each band microHAM does not currently offer an interface for the Icom IC 2KL and IC 4KL PA When checked the POWER SW signal on PA port is active sourcing 12V The Power SW signal can be used by amplifiers that support external control to turn the amplifier on only for the bands on which it i...

Page 39: ... the rotor interface and controlling its operation Rotator control parameters ENABLE ROTATOR enables the rotor interface ROTATOR CONTROL ALWAYS ACTIVE enables control of rotator even if none is present on the current band See description of this feature in OPERATING STATION MASTER chapter under Antennas with Rotator heading SENSOR displays the type of position feedback sensor Options are Analog if...

Page 40: ...ate value if the rotator coasts after the CW or CCW relay is released and overshoots the target The controller will turn off the motor early to allow the rotor to coast to the target DEAD ZONE Sets the value in degrees by which a new azimuth must differ from the current heading before the controller will move the antenna If the current azimuth is 270 degrees and the dead zone is 10 degrees a new h...

Page 41: ...le only fills the Rotator tab and DOES NOT store settings into the Station Master To load settings from file and store them to the Station Master click the Store button after settings are loaded to the Router SAVE TO FILE Saves all parameters to the file on computer Connecting Rotator The ROTOR port connects to external rotator hardware There are three 3 SPDT relay contacts for controlling CW and ...

Page 42: ...et to protect motor supply with fuse The fuse will protect relays contacts as well Commercial rotators can be connected two ways Rotators with external control port as Yaesu DXA or DXC series can be connected as shown here Commercial rotators without external control ports will require connections inside original controller Please refer to the manual of your rotator or ask us for help 42 Simplifie...

Page 43: ...ntil the sensor value shows 0002 is in range 0001 0003 and click next If rotator has PULSE sensor click next step 7 Turn the rotator fully clockwise CW If your rotator does not have hardware limits turn it to the desired maximum clockwise If your rotator uses pulse counting do not turn it CCW at all as this will result in an inaccurate pulse count and effect the calibration 8 If rotator has an ANA...

Page 44: ...ccurately as possible If you have multi turn rotator and you turned the rotator more than 360 deg you must enter cumulative angle value For example if you turned rotator exactly one and half turns counter clockwise enter 540 deg 180 360 15 Click Finish The new calibration values are automatically stored to Station Master Rotator Quick Calibration Due to their nature PULSE sensor rotators need occa...

Page 45: ...mLock LED followed by three digits enters rotator target azimuth To cancel entry press Enter these keys have the same function as rotary encoder on SM front panel is one step CW one step CCW and Enter replaces an encoder push Keys 0 9 on numeric keypad and additional shift functions are user configurable The key is used as a shift key Individual keys can be configured to be forwarded to Keyer conn...

Page 46: ...controls the LCD contrast Light sets the LCD backlight brightness Report time sets the length of time that transient status change reports remain visible Set Strings set the Welcome Message to be displayed when SM is initialized Set Defaults returns the display to factory settings IMPORTANT The settings on this tab are valid only when Station Master is connected to microHAM Router In order to func...

Page 47: ...layed Enable sleep mode If Station Master is connected to a microKEYER II it will follow the MK II sleep status NOTE Sleep control has no function if Station Master is not used with an MKII Enable button beep When checked SM will generate short beeps on each button press Enable alarm beep When checked SM will generate three short beeps in an alarm condition IMPORTANT The settings on this tab are v...

Page 48: ...t transmission When a new TX antenna is selected but not yet applied the selected antenna is displayed with REQ prefix NOTE RX antennas may selected during transmit the same as TX antennas selected during receive by pressing the knob When a RX only antenna selection is selected a negative R or T with black background is shown on the LCD Antennas with a rotator When the current band includes an ant...

Page 49: ...Virtual Rotator When antenna selection defined as a Virtual Rotator is selected the rotary encoder may be used for azimuth control Turning the encoder CW and CCW sets the antenna azimuth VR or V centered vertically on the LCD indicates that a virtual rotator or an antenna from the virtual rotator is being used Don t forget Computer control of the azimuth is active only if the selected antenna has ...

Page 50: ...result of a footswitch or hand mic PTT f5 PA standby When YES KeyOut is not generated and Key in is ignored regardless of the flags set in Router f6 PA OFF When YES POWER SW output on PA connector is kept off regardless of the per band PA flag settings in Router and KeyIn input is ignored NOTE If Rotator control always active is enabled in Router two consecutive short presses on the FUNC button wi...

Page 51: ...OUT OF BANDS Operating frequency is outside any defined band Transmitting is not allowed but antenna selections can be changed NO ANTENNA A virtual rotator is set to an azimuth for which no antenna is defined The virtual router definition must be fixed in Router iLink DOWN a microHAM keyer connected to the iLINK port is not responding BUSY Indicates various busy conditions Busy conditions are usua...

Page 52: ...is needed for controlling the receive preamplifier Six additional outputs are used for controlling a six band bandpass filter The Station Master is configured to support these requirements Outputs tab These feedlines are connected to the antenna switch Port 1 Vertical Port 2 80m Dipole Port 3 80m 4SQ Port 4 40m Inverted V Port 5 40m 3el Yagi Port 6 SteppIR Port 7 12m 5el Yagi Port 8 Receiving 4SQ ...

Page 53: ...o be activated when the operating frequency is within selected filter pass band regardless of which antenna is selected To accomplish this the filters must be controlled with BPF class outputs The preamplifier in the receive four square must be turned off during while transmitting and when operating on bands above 40m To do this the preamplifer power should be controlled by a SEQ output Antennas t...

Page 54: ...r each direction with different settings for B7 and B8 Controls for the receive 4SQ are identical to the 80m 4SQ other that using outputs A8 B9 and B10 instead of A3 B6 and B7 Because this antenna is receive only and it can not be used for transmitting all four entries are marked as RX ONLY and Station Master will not allow it to be used for transmitting In addition the receive 4SQ includes a prea...

Page 55: ...ally or by logger In this example each 4SQ has been defined as separate Virtual Rotator and because the receiving 4SQ antennas were previously marked RX Only the RX4QS virtual rotator was automatically set as RX only The antennas making up each virtual rotator are added one by one and their operating azimuth adjusted based on their location directional pattern and known performance The NW azimuth ...

Page 56: ...so possible to be called by DX which must be received on the 4SQ The vertical antenna has been assigned twice at the top of the group to extend the initial receive time on vertical The same technique can be used for any antenna in group if unequal times are required for the antennas The 80m CW group is intended primarily for DX in the NW direction Again the receive 4SQ has priority and is doubled ...

Page 57: ...Hibit signal is set for a 30ms delay to provide a small margin of safety and prevent the transceiver from generating any RF during the SWITCHING DELAY of the antenna switch which uses relays specified for 26ms switching times Output A10 controls preamplifier power for the receive 4SQ It is set to 0ms LEAD time in order to disable the preamplifier any delay The TAIL delay has been set to a safe 20m...

Page 58: ...ting bandwidth of the antennas 160 Meters The frequency range is 1 820 2 000 MHz with four antennas selections the vertical for transmit the receive 4SQ the previously defined 160m group and the 80m dipole as an extra receive only antenna The PA BCD code is set to 1 even though it is not required Remote PA and KEYOUT are enabled the 160 M BPF is selected B1 and the sequencer output is enabled for ...

Page 59: ... V The PA BCD code is set to 3 Remote PA and KEYOUT are enabled the 40m BPF B3 is selected and the sequencer output preamplifier power enabled 40 Meters US band The frequency range is defined as 7 100 7 300 MHz and three antennas are added 3el Yagi Vertical and receiving 4SQ with virtual rotator The PA BCD code is set to 3 Remote PA and KEYOUT are enabled the 40m BPF B3 is selected and the sequenc...

Page 60: ...m BPF B6 is selected and the sequencer output is disabled RX 4SQ preamplifier OFF all the time 6 Meters The frequency range is defined as 50 000 54 000 MHz with one antenna selection the SteppIR The PA BCD code is set to 10 Remote PA and KEYOUT are DISABLED the BPF outputs are cleared to bypass the BPF and the sequencer output is disabled RX 4SQ preamplifier OFF all the time VHF UHF and SHF bands ...

Page 61: ...he application Since both the logging program and microHAM Router are real time applications system performance will be dependent on both CPU speed and the amount of available RAM While microHAM Router may run on slower computers the minimum tested system is a 1 8 GHz Core2Duo processor Windows 7 1 GB RAM CD ROM and USB 1 1 port Whether Router can run as designed on slower machines with less memor...

Page 62: ... up to 9600 baud PA CI V open collector bus max 40mA up to 9600 baud All relay outputs 30VDC 48VAC max 2A External PORT A power max 24V 1 3A External PORT B power max 24V 1 3A PS 2 consumption max 200mA at 5V Rotator analog input 10K ohm max 12V Rotator pulse input active when grounded max 24V 5mA Rotator reference output 9V max 20mA PA Keying output open collector max 45V 800mA PA Keying input ac...

Page 63: ...mage caused by improper or abnormal use failure to follow instructions improper installation lightning or excessive voltage The product will be either repaired or replaced at our discretion The only cost will be the cost of return shipping Cables are warranted against defects in materials and workmanship for a period of 60 days microHAM USB Device Router the software is provided as is without guar...

Page 64: ...evice may not cause harmful interference and 2 this device must accept any interference received including interference that may cause undesired operation European Union Declaration of Conformity microHAM s r o declares that the products Product Name STATION MASTER Conforms to the following Product Specifications EN 55022 1998 Class B following the provisions of the Electromagnetic Compatibility D...

Page 65: ...ted 15 NC Not connected 16 NC Not connected 17 NC Not connected 18 EXT PWR GND Power ground Connect return of external PORT A common power to this pin 19 CONTROL GND Power ground Connect control cable shield to this pin 20 PORT A1 PORT A1 output 21 PORT A2 PORT A2 output 22 PORT A3 PORT A3 output 23 PORT A4 PORT A4 output 24 PORT A5 PORT A5 output 25 PORT A6 PORT A6 output SHELL GND Connected to t...

Page 66: ...ally Open 14 NC Not connected 15 NC Not connected 16 NC Not connected 17 NC Not connected 18 EXT PWR GND Power ground Connect return of external PORT B common power to this pin 19 CONTROL GND Power ground Connect control cable shield to this pin 20 PORT B1 PORT B1 output 21 PORT B2 PORT B2 output 22 PORT B3 PORT B3 output 23 PORT B4 PORT B4 output 24 PORT B5 PORT B5 output 25 PORT B6 PORT B6 outpu...

Page 67: ...F Pin Label Description 1 12 OUT 12V output max 200mA Output depends on main SM power 2 CW NC Relay output for CW direction normally closed 3 CW COM Relay output for CW direction common 4 AUX NO Relay output for AUX output normally open 5 CCW NC Relay output for CCW direction normally closed 6 CCW COM Relay output for CCW direction common 7 REF 9V reference output max 20mA 450 ohm 8 ANALOG GND Ana...

Page 68: ...V OUT 5V output max 200mA 5 CLOCK TTL iLINK CLOCK line 6 IC Internally connected to pin 6 of another iLINK jack SHELL GND Connected to the system ground and case PS 2 MINIDIN6 Pin Label Description 1 DATA TTL PS 2 DATA line 2 RESPAD Input for resistive keypad max 5V 1mA 3 GND Connected to the system ground and case 4 5V OUT 5V output max 200mA 5 CLOCK TTL PS 2 CLOCK line 6 NC Not connected SHELL G...

Page 69: ...interface Source QRG Specifies the frequency for the SDR to track Where two sources are shown e g VFO A VFO B the first source will be sent to the SDR in Receive and the second source in Transmit Offset Frequency offset between the transceiver frequency and the frequency sent to the SDR This is useful when the transceiver is used as an IF with a transverter Default is 0Hz resolution is 1Hz Track m...

Page 70: ...he TX check box designates the port as a bidirectional port the TxD line is active connected If the TX box is unchecked the port is a receive only listen port like the listen leg of the Y cable used between a computer serial port and transceiver for devices like a SteppIR controller AT Auto tuner or some automatic power amplifiers Bridges straight extender cable allow connecting any two existing p...

Reviews: