background image

Commonly used remote control keys in all menus 


POWER

 : Turn ON/OFF the power of MG725.   


HOME

 : Go to the main menu


SETUP

 : Go to setup menu. The details are explained in 8. Setup system 

configuration 


VOL(+/-)

 : Adjust the volume in iPod, Photos, Music and Videos menu. 


MUTE

 : Mute the audio. Press it again to cancel the selection.   


  : Start playing a highlighted file. Press it once more to pause playback. 


 / 


(Previous / Next)

 : Go to previous page/ next page when file browsing. 

Go to previous file/next file when playback. 


6.1 iPod 

mode 

You can enjoy itunes™ music, which is downloaded by Apple™ itunes™, in iPod 

mode. 

*. Apple™ and itunes™ is a registered trademark of Apple Computer. 


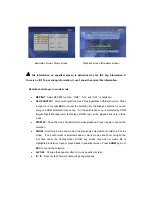
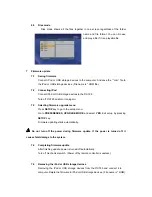
Example of iPod library screen                 Example of play list screen 


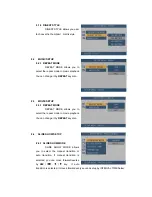
Example of playback screen 

Summary of Contents for MG725

Page 1: ...MG725 User s Guide iMedia Dock MicroGEM Corporation ...

Page 2: ... 5 2 iPod installation and removal 10 5 3 Remote control battery installation 10 5 4 Power connection 11 5 5 Video connection 11 5 6 Audio connection 12 6 Operation of MG725 13 6 1 iPod mode 14 6 2 Photos mode 15 6 3 Music mode 16 6 4 Videos mode 18 6 5 Files mode 19 7 Firmware update 19 8 Setup system configuration 20 8 1 PHOTO SETUP 20 8 2 MUSIC SETUP 21 8 3 MOVIE SETUP 21 8 4 SLIDE SHOW SETUP 2...

Page 3: ...ntrollability of iPod function through remote control 9 MG725 decodes and plays multi format music photo and video files stored in iPod or USB storage devices 9 MG725 supports hot plug functions letting the user connect and disconnect iPod or USB storage devices easily 9 MG725 can be used as a battery re charger for iPod even when its power is off Standby Mode 9 Even when MG725 power is turned off...

Page 4: ...f Opening or removing covers may expose you to dangerous voltages or other hazards Foreign object Do not insert a foreign object into the system It may damage the system and be harmful to user Shock or sudden impact Do not apply excessive pressure on the system It may damage the system Water and humidity Do not let liquid enter the system as it may touch dangerous voltage points or short electrica...

Page 5: ... limits are designed to provide reasonable protection against harmful interference in a residential installation This equipment generates uses and can radiate radio frequency energy and if not installed and used in accordance with the instructions may cause harmful interference to radio or television reception which can be determined by turning the equipment off and on The user is encouraged to tr...

Page 6: ... Dimension W X H X D 100mm X 28 mm X 80mm Net weight 193g Operating temperature 5 50 Operating humidity 0 90 RH External interface 30pin iPod dock connector Standard A Type USB connector Supported external device 3rd gen 4th gen iPod iPod mini iPod photo iPod nano video iPod iPod shuffle USB MP3 player with USB port USB memory stick USB card reader and USB HDD DivX is a registered trademark of Div...

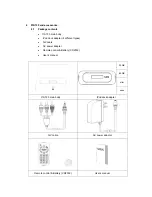
Page 7: ...MG725 main body iPod dock adapter 4 different types A V cable AC power adapter Remote control Battery CR2032 User s manual 20GB 60GB mini nano MG725 main body iPod dock adapter A V cable AC power adapter Remote control Battery CR2032 User s manual ...

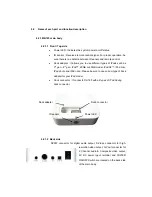
Page 8: ... gen 4th gen iPod 20GB or 60GB model iPodU2 iPod mini iPod photo and iPod nano Please be sure to use correct type of dock adapter for your iPod model Dock connector It connects MG725 with all types of iPod having dock connector 4 2 1 2 Back side SPDIF connector for digital audio output S Video connector for high resolution video output A V out connector for 2 Channel audio Composite video output 9...

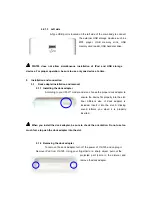
Page 9: ...e dock adapter According to your iPod model and size choose the proper dock adapter to ensure the device fits properly into the slot Four different size of dock adapter is included Insert it into the slot A clicking sound informs you when it is properly inserted When you install the dock adapter be sure to check the orientation Do not use too much force to push the dock adapter into the slot 5 1 2...

Page 10: ...y USB storage devices simultaneously Also check the dock adapter type matching with your iPod model 5 2 2 Removing the iPod Before you remove iPod from MG725 select the Eject icon on the main menu and wait until OK to disconnect message appear on TV screen 5 3 Remote control battery installation Before using your remote control install the battery as described below Using a clip or fingertip push ...

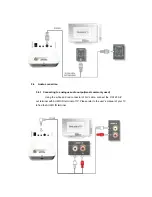
Page 11: ...on 5 5 1 Connecting to composite output most commonly used Using the yellow connector of A V cable connect the MG725 A V out terminal with VIDEO IN or COMPOSITE IN terminal of TV Please refer to the user s manual of your TV to find the VIDEO IN terminal 5 5 2 Connecting to S VIDEO output If your TV has S Video input terminal you can enjoy high quality video using separately bought S Video cable no...

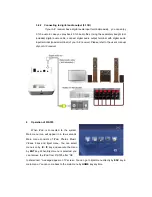
Page 12: ...ting to analogue audio output most commonly used Using the white and red connector of A V cable connect the MG725 A V out terminal with AUDIO IN terminal of TV Please refer to the user s manual of your TV to find the AUDIO IN terminal ...

Page 13: ...our A V receiver Please refer to the user s manual of your A V receiver 6 Operation of MG725 When iPod is connected to the system Main menu icon will appear in a few seconds Main menu consists of iPod Photos Music Videos Files and Eject menu You can select menu icon by key and execute the menu by ENT key When Eject menu is selected you can remove the iPod from MG725 after OK to disconnect message ...

Page 14: ...he audio Press it again to cancel the selection Start playing a highlighted file Press it once more to pause playback Previous Next Go to previous page next page when file browsing Go to previous file next file when playback 6 1 iPod mode You can enjoy itunes music which is downloaded by Apple itunes in iPod mode Apple and itunes is a registered trademark of Apple Computer Example of iPod library ...

Page 15: ...lide show with your iPod photo or color screen you can enjoy this iPod slide show on TV screen by selecting A V SEL While iPod slide show VOL key works Press A V SEL again to cancel the selection Move up down when browsing Fast reverse forward in song playback By pressing it once more go to normal speed Start playing a highlighted song Press once more to pause playback 6 2 Photos mode Photos mode ...

Page 16: ... format If there is no JPEG file in the selected photo folder NO PHOTO FILE message will appear when trying music slide show in Music mode DIGEST Display photo thumbnails Press it again or press ESC to escape from the thumbnail screen It may take time to finish the digest screen depending on the photo file resolution You can highlight the photo thumbnail using keys and play the highlighted photo u...

Page 17: ...rotected itunes song All the paid itunes song is protected by DRM Digital Rights Management technology DRM song can be played back only in iPod mode DISPLAY Show the music file information while playback Press it again to cancel the selection SHOW Start music slide show using the previously selected photo folder in Photos mode If no photo folder is selected ahead it starts music slide show using a...

Page 18: ...e selection DISPLAY Show the video file information while playback Press it again to cancel the selection Reverse fast Forward fast during movie playback SUB T Select the preferred subtitle language This function is useful only with video files on which multiple subtitle language are recorded AUDIO Select the preferred audio language This function is useful only with video files on which multiple ...

Page 19: ...lecting firmware upgrade menu Press SETUP key to go to the setup menu Go to PREFERENCES UPGRADE MODE and select YES Exit setup by pressing SETUP key Firmware updating starts automatically Do not turn off the power during firmware update If the power is turned off it causes fatal damage to the system 7 4 Completing firmware update After finishing update power is turned off automatically Turn off me...

Page 20: ...version Example of firmware version screen 7 7 Starting the MG725 after firmware update is finished After completing update of firmware process re connect the MG725 into iPod and start again 8 Setup system configuration Press SETUP key go to the setup menu Highlight the menu item you want using keys and press ENT for selection 8 1 PHOTO SETUP 8 1 1 TRANSITION MODE TRANSITION MODE allows you to sel...

Page 21: ...lso 8 3 MOVIE SETUP 8 3 1 REPEAT MODE REPEAT MODE allows you to select the repeat mode in movie playback You can change it by REPEAT key also 8 4 SLIDE SHOW SETUP 8 4 1 SLIDE SHOW MODE SLIDE SHOW MODE allows you to select the manual transition or auto transition If manual transition is selected you can move forward reverse by key If auto transition is selected it moves forward every second setup b...

Page 22: ...al time of photo transition in photo playback For it to be effective SLIDE SHOW MODE should be AUTO 8 4 4 TRANSITION TRANSITION determines the way of photo transition in photo playback 8 5 PREFERENCES 8 5 1 TV DISPLAY TV DISPLAY menu allows you to select the aspect ration of TV screen NORMAL PS Normal 4 3 pan scan display NORMAL LB Normal 4 3 letter box display WIDE 16 9 Wide screen display ...

Page 23: ... output SPDIF PCM PCM modulated signal output 8 5 3 OSD LANGUAGE OSD LANGUAGE allows you to choose the language type for on screen display 8 5 4 SETUP VALUE Reset all the user setting and go back to the default setting 8 5 5 UPGRADE MODE UPGRADE MODE allows the user to select the firmware upgrade function ...

Page 24: ...mode too 9 FAQ Trouble shooting Problem Possible solution CODEC NOT SUPPORTED message appears on screen Check if a selected file is supported by the system Check your firmware version and if new firmware is available please update DIVX DECRIPTION ERROR Check if the movie file format is supported by the system NO MEDIA DETECTED message appears Check if the iPod or USB storage device is securely con...

Page 25: ...Check if that the correct TV type NTSC PAL is chosen No sound Check the audio volume Check if mute is enabled Check the A V OUT cable connection to TV or A V Receiver You turned off power while the firmware updating The system is critically damaged Contact customer service for repair ...

Reviews: