Software Description
2014 Microchip Technology Inc.
DS50002300A-page 31
4.3.1.2
CHARGING DOWNSTREAM PORT (CDP)
The CDP charging profile is based on the “
USB Battery Charging Specification v1.x
”.
When a BC1.x-compliant portable device attachment is detected, the UCS81003 and
the portable device do handshaking based on the standard. If handshaking is
successful, charging occurs up to the set current limit.
To select the CDP port power profile, M1, M2 and EM_EN must all be high. This can
be done by removing the jumpers for these pins (from J9 header) or by using the pin
override in the GUI (see
Section 4.2.3.3 “Pin Override”
).
4.3.1.3
PASS-THROUGH
Data Pass-Through does not apply any type of charger emulation. When selected, it
closes the USB high-speed data switch and supplies current up to the current limit.
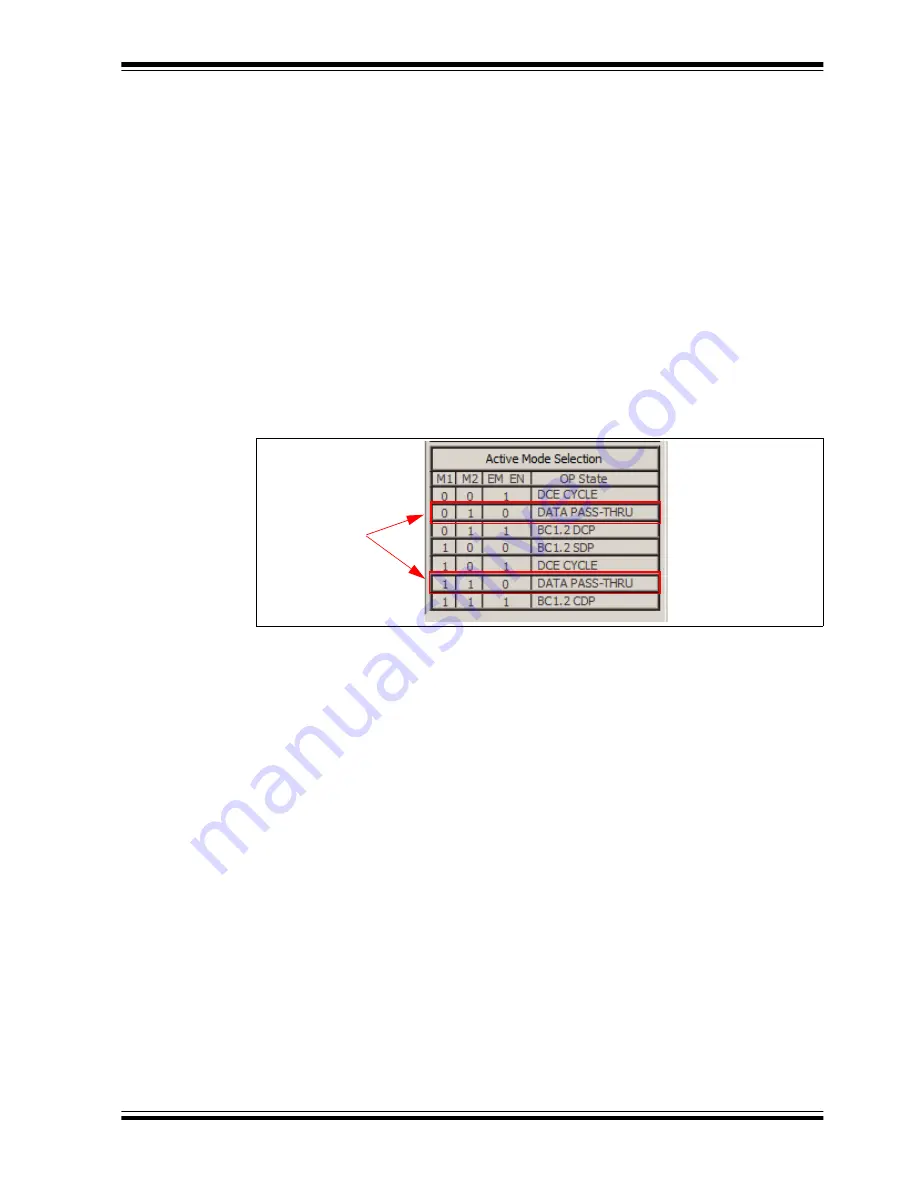
To select Data Pass-Through, M1, M2 and EM_EN can be set to any one of the two
DATA PASS-THRU combinations (
010
and
110
), as shown in
. This can be
done by setting the jumpers for these pins (from J9 header –
see
Section 2.4 “Jumpers on the Evaluation Board”
) or by using the pin override in
the GUI (see
Section 4.2.3.3 “Pin Override”
).
FIGURE 4-9:
Data Pass-Through Selection Options.
4.3.1.4
CURRENT MONITORING AND CHARGE RATIONING
To view current monitoring and current rationing, perform the following on the
Main
tab:
1. Set a Ration Limit. The ration limit is expressed in mAh (electric charge).
2. Set rationing behavior. The Ration Completion Behavior defaults to “Report &
Disconnect”. Once the ration limit is reached, portable device charging will
cease, the ALERT# pin will assert, and the
Ration Complete
bit will be set. If
you do not want the system to behave in this fashion, select one of the other
three options from the Ration Completion Behavior drop-down list: Report,
Report & Sleep or Take No Action.
3. Connect V
S
to the evaluation board (see
). The VS_LOW indicator on the bottom of the Main Tab must
be dark. If the VS_LOW indicator is red, the voltage is not high enough to charge
a portable device.
4. Connect a portable device to the evaluation board. Use the OEM USB charging
cable that comes with the portable device.
5. Enable rationing by checking the Ration Enable check box on the Main Tab.
6. Watch the GUI as the device starts charging.
shows the interface
after the ration limit was reached (for “Report & Disconnect” behavior setting).
Data
Pass-Through
Options


