MICROBOARDS TECHNOLOGY, LLC PF-PRO Disc Printer
9
Installation of Drivers and Software
Driver Installation
Drivers must be installed on a hard disc. Once you have installed the software, store the original
installer disc in a safe place.
1. Insert the Installation CD in your system’s disc drive. Open the disc icon when it appears on
the desktop.
2. Double-click
on
the
PFPro.pkg
icon. Follow the on-screen instructions, read and agree to the
end user license agreement.
3. When prompted, enter your administrator password.
4. When prompted, click
Install
.
5. Once the installation has completed, click
Restart
.
Connecting to a Mac
DO NOT CONNECT YOUR PF-PRO DISC PRINTER BEFORE RUNNING THE
INSTALLER LOCATED ON THE INSTALLATION DISC!!
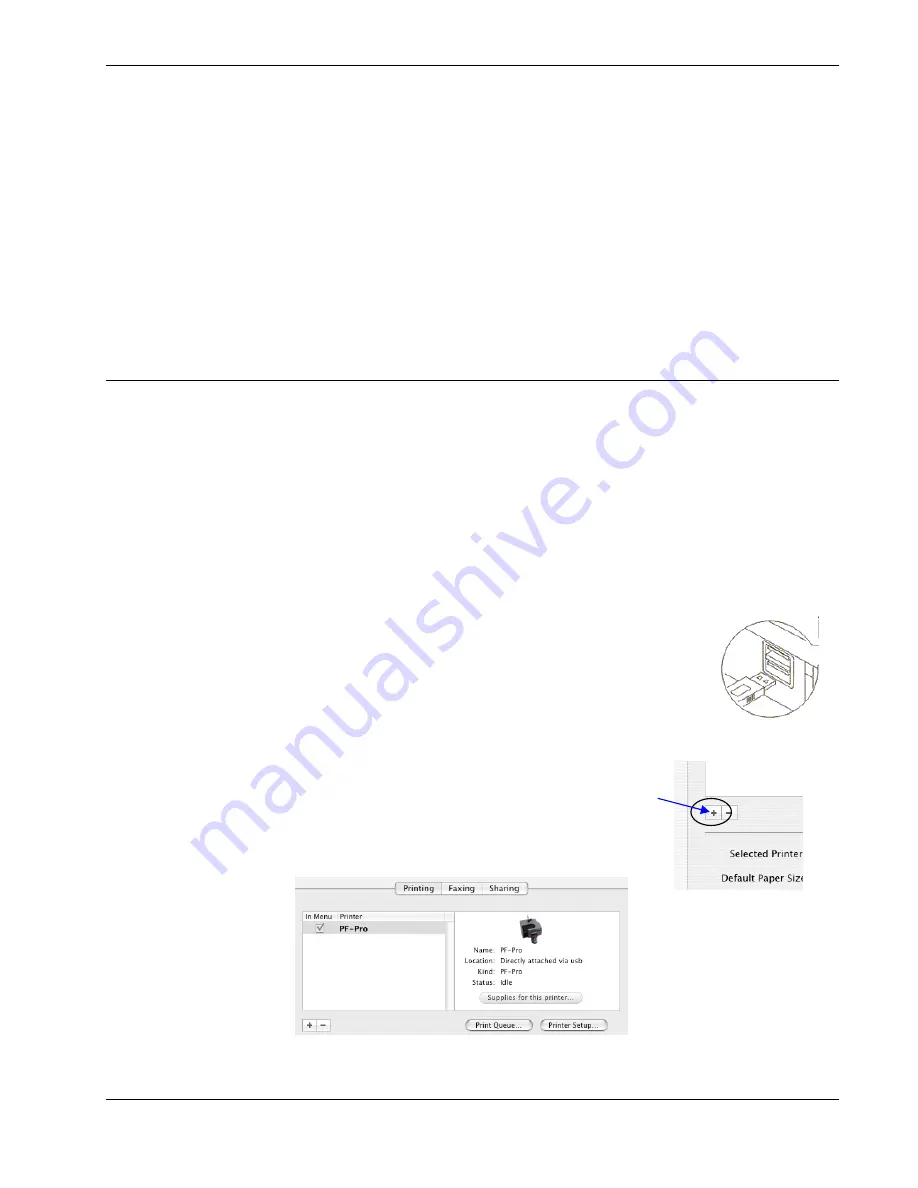
The connection between the Mac and the Microboards PF-Pro Disc Printer is done with one USB 2.0
cable.
1. Install all 4 Ink Cartridges (see page 7).
2. Install both Printheads (see page 7).
3. Plug in the AC power cord to the back of the PF-Pro Disc Printer.
Do not turn on power to
the PF-Pro Disc Printer until an ink cartridge has been installed.
4. Connect the square shaped end of the USB cable to the back of the PF-Pro Disc Printer.
5. Connect the flat, rectangular end of the USB cable into a USB 2.0 port in
your Mac.
6. Turn on the PF-Pro Disc Printer.
Adding the PF-Pro Disc Printer
Once the drivers and software have been installed and the PF-Pro Disc Printer connected, the PF-
Pro Series Printer needs to be added.
1. Click
System Preferences
in the Dock.
2. Select
Print & Fax
, then click the
Add
or
+
button to add a printer.
3. Select
PF-Pro
from the list and click the
Add
button.
4. Once the PF-Pro Disc Printer Series Printer has been added, it will
appear in the available printers list, as shown below.


