background image

10 

©2021 Micro-Air Corp 


June 18, 2021, revision 1.5 

Settings Screen 


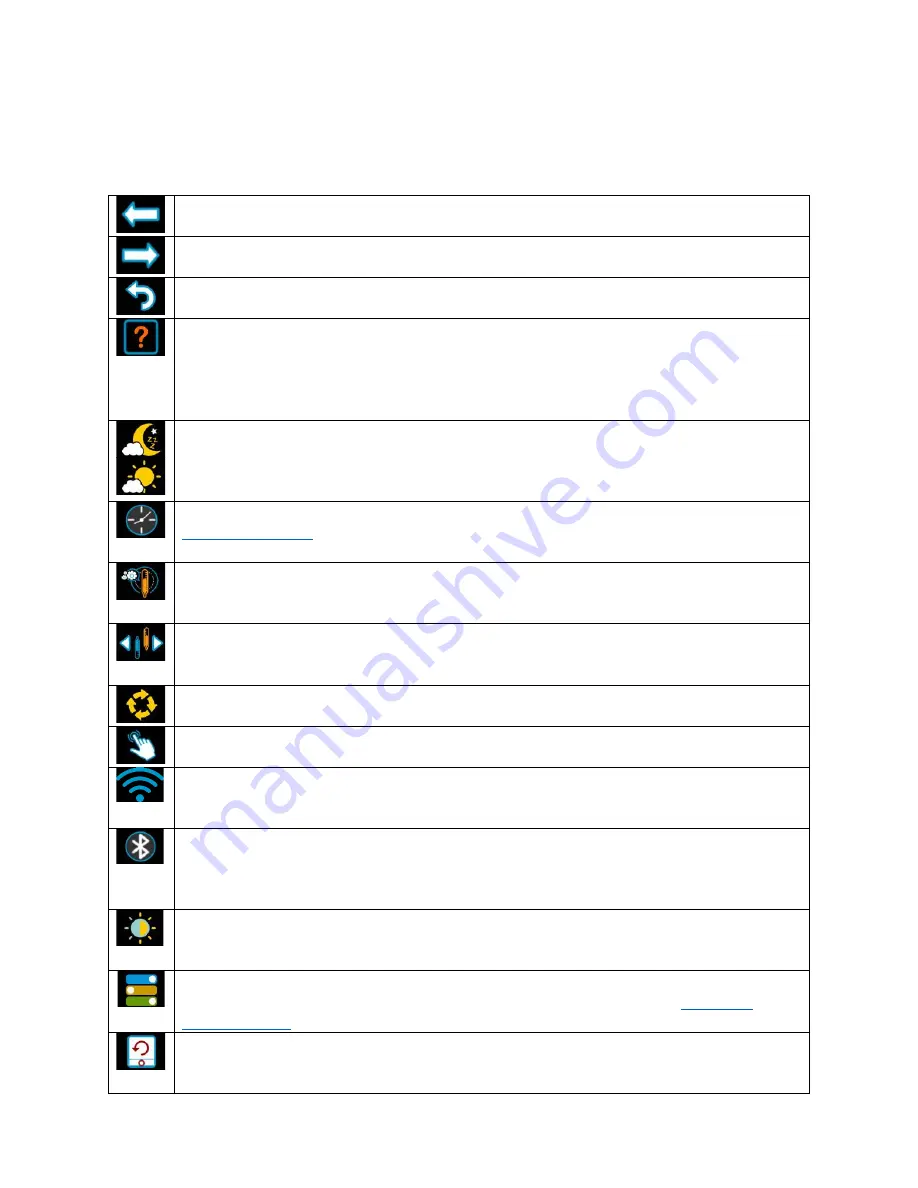
Pressing the settings gear brings up a menu with multiple options listed below. These are 

informational or operational changes that can be made to the thermostat. 


Last menu navigation. 


Next menu navigation. 


Return to main screen. 


Help Screen: The QR code will bring you to the Micro-Air EasyTouch page when selected 
using a QR compatible phone app. Below the QR code is the serial number for the 
thermostat and the firmware revision for the thermostat. Firmware updates can be checked 
for in the smart device application. 


 Day/Night mode. Day mode (shown above) will dim the display down to the screen saver 
set point after 30 seconds. Night mode (moon icon) will turn off the back light after 30 
seconds. The display will brighten again once the touch screen is pressed.  


Schedule is used to change the set point automatically at a pre-determined time. See 

Schedule operation

 for more details. 


Temperature adjustment is used to adjust the inside temperature with an offset. This will 
only apply to zone 1. 


Temperature gap: Sets the “dead band” or gap. This is the number of degrees the 

temperature must move to start a cycle. High numbers can prevent short cycling in smaller 

RV’s


Restart: This icon allows restarting the thermostat just like removing and restoring the 
power. 


Touchscreen calibrate: This icon allows calibrating the touch press locations on EasyTouch. 
This is normally not necessary. Follow the on-screen prompts to complete calibration. 


WIFI is used to view your WIFI settings and MAC address. Changes to the WIFI connection 
must be made using the smart device application. 


Bluetooth is used to reset the Bluetooth password. This password is saved from your 
account password. Only one account at a time may access the thermostat. Reset the 
password whenever you change your account password. 


Brightness settings allow dimming the normal brightness and setting the screen saver 
brightness. 


The DIP switches icon is used to configure the modes available in the thermostat. It must be 
used when installing the thermostat to set the available heat sources. Se

setting the 

available modes

 for more details. 


Reset all will reset the thermostat to factory settings including all set points, schedule 
events, and other settings. 
 

Summary of Contents for ASY-350-X01

Page 1: ...EasyTouch 354 Operating Manual Revision 1 5...

Page 2: ...t and cool set points 8 Schedule screen 9 Setting a change event 9 12 or 24 hour format 9 Setting the time 9 Enabling the schedule 9 Settings Screen 10 Gas Heat Override 11 Smart device application on...

Page 3: ...ere are three steps to installing the thermostat First remove your old thermostat Next disconnect and reconnect the wiring Finally install the mounting pins to the wall and mount your new thermostat R...

Page 4: ...for details on the colors used with the thermostat and the function of the wires Note Some versions of this thermostat come with a connector wired to the EasyTouch circuit board Directly wired custom...

Page 5: ...Step 2 Screw in one screw and level the buttons so the display will be straight when installed Step 3 Screw in second screw making sure the two buttons remain level Step 4 Remove mounting tab before m...

Page 6: ...1 wiring for more information on these systems Connecting remotely This thermostat may be operated remotely using either Bluetooth or WIFI Apps may be loaded from the Google Play store or Apple App st...

Page 7: ...tting a heating and a cooling set point and automatically changing from heating to cooling 8 The zone selection button will show a zone in green when it is turned on The zone number will show in gray...

Page 8: ...ht time heating temperature It can also be used to control the temperature extremes when you are away from the RV The mode selected must be an automatic mode to allow both heating and cooling operatio...

Page 9: ...e temperature the system will try to achieve after the time that was set 12 or 24 hour format 2 Press the time in the upper right to change 12 and 24 hour time formats Setting the time 3 Time zone is...

Page 10: ...nly apply to zone 1 Temperature gap Sets the dead band or gap This is the number of degrees the temperature must move to start a cycle High numbers can prevent short cycling in smaller RV s Restart Th...

Page 11: ...ing This is indicated by a red circle and line through the electric mode button When the furnace is actively overriding the electric heat a furnace symbol will appear at the top of the thermostat scre...

Page 12: ...of operation with an 80 F maximum temperature set Notification will be sent for each degree it rises above the maximum temperature If temperature drops no notification will be sent unless the tempera...

Page 13: ...GHz network and not a 5GHz or 6GHz network Set the security to WPA2 and TKIP AES if you are having trouble The thermostat has a limit of 31 characters for the SSID and 50 for the password The number o...

Page 14: ...ded 1 Press Add on the top of the selection screen Apple or press the settings gear and Add Device Android 2 The second thermostat should be listed in the new selection window Select the device and en...

Page 15: ...r heating Two stage furnaces like certain suburban models use the orange and white wires to turn on the high furnace fan and high gas valve This feature activates high furnace if the ambient temperatu...

Reviews: