background image

©2021 Micro-Air Corp 


June 18, 2021, revision 1.5 

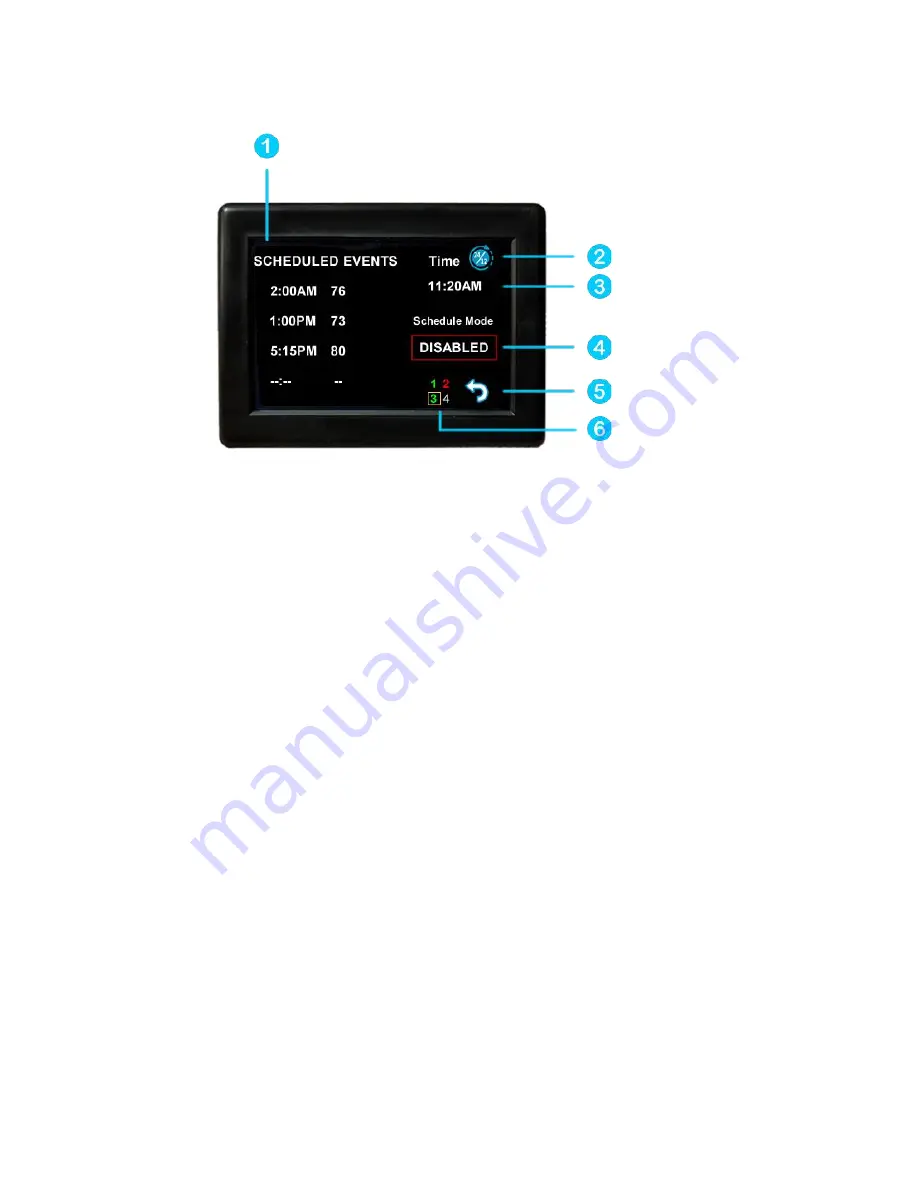
Schedule screen 


Set points may be changed on a time-based schedule. The mode used will be the heating or 
cooling mode set on the main screen. 

 
Setting a change event 


1. Events will show --:-- when the event is disabled. Press the hours position to set the hours. A 

flashing bar will appear under the hours along with up and down adjustment selectors. Use the 
adjustment selectors to change the hours.  

Press the minutes to move the flashing bar under the minutes and allow ¼ hour adjustments. 

Use the up and down adjustment selectors to make changes.  

Press the temperature to change the desired temperature set point. This is the temperature the 

system will try to achieve after the time that was set. 

12- or 24-hour format 


2. Press the time in the upper right to change 12 and 24-hour time formats. 

Setting the time 

3. Time zone is set and saved whenever the thermostat connects using Bluetooth. Time is set on 

power up through the internet connection, or whenever a connection is made on either Bluetooth or 
WIFI.  

Enabling the schedule 


4. Press the enabled/disabled button to enable the schedule. The schedule will be active and 

make set point changes anytime the schedule is selected on the main screen. The Home/Schedule/Away 
button will only toggle between schedule and away when the schedule is enabled. The button will only 
select between home and away if the schedule is disabled. Away mode is not configurable on a 
schedule. 

5. Press the round arrow to return to the regular settings screen. 

Summary of Contents for ASY-350-X01

Page 1: ...EasyTouch 354 Operating Manual Revision 1 5...

Page 2: ...t and cool set points 8 Schedule screen 9 Setting a change event 9 12 or 24 hour format 9 Setting the time 9 Enabling the schedule 9 Settings Screen 10 Gas Heat Override 11 Smart device application on...

Page 3: ...ere are three steps to installing the thermostat First remove your old thermostat Next disconnect and reconnect the wiring Finally install the mounting pins to the wall and mount your new thermostat R...

Page 4: ...for details on the colors used with the thermostat and the function of the wires Note Some versions of this thermostat come with a connector wired to the EasyTouch circuit board Directly wired custom...

Page 5: ...Step 2 Screw in one screw and level the buttons so the display will be straight when installed Step 3 Screw in second screw making sure the two buttons remain level Step 4 Remove mounting tab before m...

Page 6: ...1 wiring for more information on these systems Connecting remotely This thermostat may be operated remotely using either Bluetooth or WIFI Apps may be loaded from the Google Play store or Apple App st...

Page 7: ...tting a heating and a cooling set point and automatically changing from heating to cooling 8 The zone selection button will show a zone in green when it is turned on The zone number will show in gray...

Page 8: ...ht time heating temperature It can also be used to control the temperature extremes when you are away from the RV The mode selected must be an automatic mode to allow both heating and cooling operatio...

Page 9: ...e temperature the system will try to achieve after the time that was set 12 or 24 hour format 2 Press the time in the upper right to change 12 and 24 hour time formats Setting the time 3 Time zone is...

Page 10: ...nly apply to zone 1 Temperature gap Sets the dead band or gap This is the number of degrees the temperature must move to start a cycle High numbers can prevent short cycling in smaller RV s Restart Th...

Page 11: ...ing This is indicated by a red circle and line through the electric mode button When the furnace is actively overriding the electric heat a furnace symbol will appear at the top of the thermostat scre...

Page 12: ...of operation with an 80 F maximum temperature set Notification will be sent for each degree it rises above the maximum temperature If temperature drops no notification will be sent unless the tempera...

Page 13: ...GHz network and not a 5GHz or 6GHz network Set the security to WPA2 and TKIP AES if you are having trouble The thermostat has a limit of 31 characters for the SSID and 50 for the password The number o...

Page 14: ...ded 1 Press Add on the top of the selection screen Apple or press the settings gear and Add Device Android 2 The second thermostat should be listed in the new selection window Select the device and en...

Page 15: ...r heating Two stage furnaces like certain suburban models use the orange and white wires to turn on the high furnace fan and high gas valve This feature activates high furnace if the ambient temperatu...

Reviews: