background image

MFB Tanzbär Lite

MFB Tanzbär Lite

Record Mode – Programming Patterns

28

29

Record Mode – Programming Patterns

11. Shuffle

You can assign some shuffle to you pattern (i. e. delaying one note by a certain factor, 
shifting the focus of the rhythm a bit – real drummers tend to do this all the time, but not 
always in musically meaningful ways). To accomplish that, you do not need to exit Record 
mode or even stop the sequencer. Please note that shuffle is a global parameter which 
affects all tracks in the same way.
You already know the programming procedure of the shuffle function from the Play mode 
section. Please refer to page 16 when in doubt. In Record mode, it works exactly the same 
way.

12. Saving patterns

To save your pattern permanently, you need to use the „Store Pattern“  

function, described on page 34.


Programming patterns containing more than sixteen steps.

As you already know, you can program patterns with a length of more than sixteen steps. 
In the section „Play Mode“ on pages 16 and 17 you have learned about the functions  
„Last Step“, „Scale“, and „A/B Toggle“ and the way they interact. These functions are also 
available in Record mode and work the same way here.

Please use the A/B key to toggle betwen both pattern sections „A“ and „B“. This way, you 
can play back only the section you are currently working on (don‘t complain, the 808 you 
sold for peanuts ages ago did that in a similar fashion). To use the toggle function, please 
set the „A/B Toggle“ mode to „Manual“:

•  Hold 

Shift

  + press

 A/B Toggle (Step 4)

 to select the A/B Toggle function.  

If the LED of step key 4 stays dark, the function is set to „Manual“.  
Now you can toggle between the pattern sections A and B manually: 

•  Press 

A/B

 key to select the pattern section that is to be played back. 

The corresponding LED will light up.

Copy A / Copy B functions

These two copy functions are pretty useful for creating several variations of an existing A/B 
pattern easily and instantly. Depending on the function („Copy A“ / „Copy B“), the first or 
second section of the pattern will be copied to the respective other section. It can be used 
as a starting point for variations.

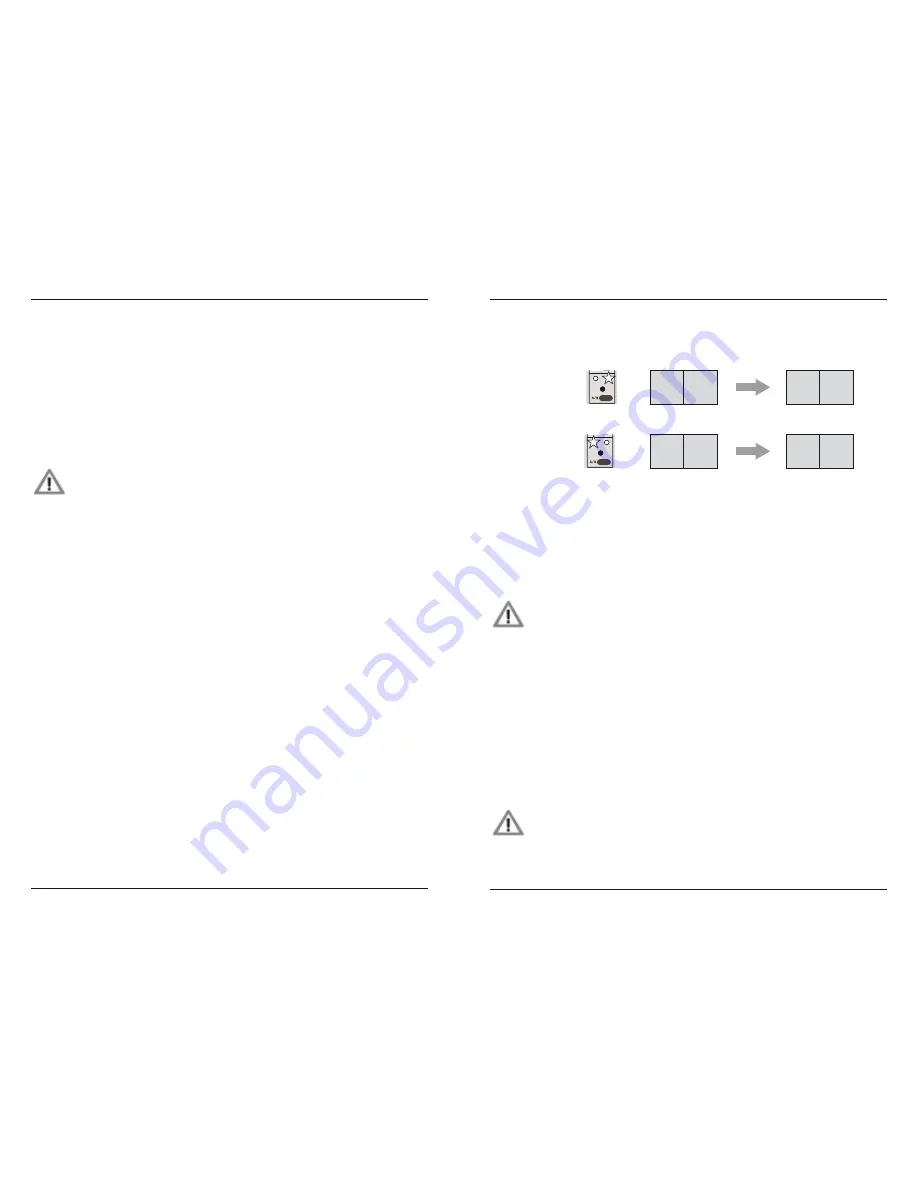
The following figure shows the different modes of operation of these two functions:

This is how to operate the Copy A / Copy B functions:
Load or create a pattern with A/B sections first (in other words, a pattern with more than  
16 steps in length). Now you can use the copy functions: 

•  If required, press 

A/B

 key to select the target section (to copy section „A“ to the  

empty section „B“, first you have to select „B“ with the A/B key and vice versa –  
please see figure above).

•  Hold 

Shift

 + press 

Step 7

 resp. 

8 (Copy A / Copy B)

.

Please note: 

• In Record mode, these functions will affect the selected track. 

• In Play mode, these functions will affect all tracks, resp. the entire pattern.

Clearing Pattern

This function is closely related to the copy functions explained above. You can optionally 
clear the entire pattern or only the section currently selected.

This is how to clear the currently selected section:

•  Hold 

Shift

 + press 

Step 6 (Clear Pattern).

This is how to clear the entire pattern:

•  Hold 

Shift

 + press 

Step 6 (Clear Pattern)

 two times.

Please note: 

• In Record mode, these functions will affect the selected track. 

• In Play mode, these functions will affect all tracks, resp. the entire pattern. 


Attention: There is no undo! Please think (!!!) twice before using the  

Clear Pattern function.

Initial situation:

Result:

Function:

Copy A:

Pattern

Copy B:

Pattern

A-Part

A-Part A-Part

B-Part

B-Part B-Part

empty

empty

TomTom

SnareDrum

Claps

Sample 1

Sample 2

Master Level

Rimshot

A/B

Flam

Shift

Play

Real

Bnk

Chain

SP1

SP2

Send On/Off

TomTom

SnareDrum

Claps

Sample 1

Sample 2

Master Level

Rimshot

A/B

Flam

Shift

Play

Real

Bnk

Chain

SP1

SP2

Send On/Off

Summary of Contents for Tanzbar Lite

Page 1: ...User Manual Tanzbär Lite ...

Page 2: ...nual Mode 14 Sound Generation 18 Record Mode 21 The different Modes 21 Step Record Mode 22 Patterns with more than 16 Steps 28 Realtime Record Mode 30 Manual Trigger Mode Manual Trigger Record 31 Memory Functions 34 Setup MIDI Functions 35 Setup Menu 35 MIDI Dump Functions 37 Addendum 38 MIDI Implementation 38 Impressum 39 MFB Tanzbär Lite ...

Page 3: ... of step number 1 to 32 and scaling five settings allows for almost all kinds of time signatures A B pattern toggle Roll Flam function multiple triggering Chain function chaining patterns not programmable in memory Track mute function Shuffle function global setting same for all tracks The following functions can be programmed for each track Track length up to sixteen steps resp up to 32 steps whe...

Page 4: ... program change data When connecting a MIDI keyboard or MIDI drum pads here sounds can be triggered live in realtime Via MIDI Out Tanzbär Lite transmits note data of all tracks MIDI clock and song position pointer data as well as program change data Incoming MIDI information is put through to the MIDI Out socket Thru function Audio Outs Tanzbär Lite features one main audio out using a 6 3mm 1 4 st...

Page 5: ... depressed Now hit the desired step key to toggle between the two possible settings or enter the desi red value For example the start stop function and the selection of the four Accent levels works just this way OH LED lights up press Shift hold press step key e g Accent 1 Next there are shift functions that access another level of possible value settings It takes an additional function level to a...

Page 6: ...ttern chaining PLAY MODE First of all let s have a go at some demo patterns to give you an idea of what Tanzbär Lite can do At the same time we will learn how to perform on the Tanzbär Lite that is how to play back patterns modify them and how to tweak sounds To play back and tweak pre programmed sounds and patterns we need to go into PLAY MODE The following figure shows an overview of the Play Mo...

Page 7: ...cer Hold Shift press Play The sequencer will start Hold Shift press Play again The sequencer will stop Adjusting tempo Turn Tempo control There is no tempo readout on Tanzbär Lite The value range of the control covers approx 30 BPM to 180 BPM Muting tracks Press Step keys When in Play mode the tracks are directly muted using the corresponding step keys me aning Step 1 bassdrum Step 5 clap etc LFO ...

Page 8: ...ess Select Attention The sound settings previously stored in the patterns will be over written There is NO UNDO Don t say we didn t warn you Alternatively you can store the entire pattern trigger and sound settings permanently any time using the Store Pattern function Please see page 34 Manual Mode When loading a pattern in Manual mode only its trigger data will be loaded The sound settings are ma...

Page 9: ...scaling will light up Press Step 1 5 to select the desired new scaling Shift LED is flashing the newly selected Step key will light up Press Shift to exit the Scale function A B Toggle As you have just learned from the scale function a pattern can have a maximum number of up to 32 steps In order not to waste precious studio space we have equipped your neat little Tanzbär Lite with just 16 step key...

Page 10: ...all the time Press step key again while still holding Snd to enter the desired parameter value e g between 1 and 16 You may press several step keys consecutively to try out different settings The last step key selected will light up permanently Release Snd key Here you will find a list of all available sound parameters of all instruments BD Bassdrum Decay controls decay time Tune controls pitch ca...

Page 11: ...h only seven instruments Still you might not want to use this cool feature all the time Sometimes it can make sense when every beat of a pattern sounds exactly the same across the entire pattern length Or maybe you feel like tweaking the sound in realtime while the sequencer is running This is all possible Apart from that you can play Tanzbär Lite live via step keys or external MIDI devices such a...

Page 12: ...ents You can assign one out of four different accent levels to each selected step This is done using the shift function Let s pretend a track has been selected and the Record mode enabled see programming step 1 The selected track features some steps see programming step 2 which if ne cessary have to be selected to be edited Hold Select press step s their LEDs will start flashing Please now proceed...

Page 13: ...lease note The currently locked settings are now only protected against getting overwritten unintentionally but they have not yet been stored perma nently in the pattern itself If you were to change the pattern now or decide to power down your Tanzbär Lite because of your neighbors complaining the step settings that had just been programmed would be lost forever To store them permanently you need ...

Page 14: ...hing Now you can select more steps using Snd Step s in order to assign different LFO settings to them Press Select The edited steps will now be de selected and the parameter settings locked when in doubt please refer to page 25 programming step 8 The key assignment for the LFO parameters works as follows Step 1 whole note Step 7 1 16th triplet Step 13 sine up Step 2 1 2th note Step 8 1 16th note S...

Page 15: ...orresponding LED will light up Copy A Copy B functions These two copy functions are pretty useful for creating several variations of an existing A B pattern easily and instantly Depending on the function Copy A Copy B the first or second section of the pattern will be copied to the respective other section It can be used as a starting point for variations The following figure shows the different m...

Page 16: ...ecord mode To make things easier it can be helpful to reduce the tempo while recording 4 Saving Patterns To save your pattern permanently you need to use the Store Pattern function described on page 34 Manual Trigger mode Manual Trigger Record You can trigger Tanzbär Lite instruments in realtime by hitting step keys or via MIDI using a suitable MIDI device such as a keyboard or drum pads At the sa...

Page 17: ... MIDI keyboard or MIDI drumpads Sounds can also be tweaked live via MIDI controller but not recorded Step recording in the Manual Trigger Record function via MIDI works the same way as with step keys However you have to adjust some of Tanzbär Lite MIDI functions first To do that please use Tanzbär Lite MIDI learn function smart mouse eh The MIDI learn function is used to assign MIDI note numbers a...

Page 18: ...nd twice before you erase the current pattern or its individual sections The consequences might be dreadful SETUP MIDI FUNCTIONS The setup menu is hidden behind step key 16 and makes use of eight step keys there each of them assigned to a sub function Here you will find Tanzbär Lite MIDI functions in the first place Also you can enable the Manual Trigger Record function please see page 31 and dete...

Page 19: ...n when using the Store Pattern function The function is active when step LED 8 lights up Please note that this function is not labelled on Tanzbär Lite frontpanel Default setting off MIDI dump functions Tanzbär Lite allows for transmitting the current pattern bank as a MIDI SysEx datafile Apart from that a pattern bank sent from a suitably equipped MIDI device can be recei ved by your Tanzbär Lite...

Page 20: ...e corres ponding instrument It is selected with the MIDI Learn function Tanzmaus responds to the following MIDI data MIDI_CLOCK MIDI_START MIDI_CONTINUE MIDI_STOP MIDI_NOTE_OFF MIDI_NOTE_ON MIDI_CONTROLLER MIDI_PROG_CHANGE 0 63 MIDI_SYSEX MIDI_SONG_POSITION_POINTER Service and terms of warranty Concerning service and warranty conditions please refer to our terms of business Imprint Copying distrib...

Page 21: ...Tanzbär Lite ...

Reviews: