background image

5HY

6SDUHSDUWV

30

Summary of Contents for WD-6E

Page 1: ...D MODEL STANDARD MODEL TYPE WD 6E Accessories STEAM HOOD CUT OFF COCK NON RETURN VALVE VACUUM VALVE BOOSTER PUMP DRAIN PUMP AUTOMATION TO EVALUATION FAN DETERGENT DISPENSER QVWDOODWLRQ DQG 2SHUDWLRQ 0DQXDO S N Rev 2 2 ...

Page 2: ... 5HY 2 ...

Page 3: ...nt The instructions and hints in this manual will give you a quick and easy start in using this equipment You will note very quickly how nice it is to use the Metos equipment All rights are reserved for technical changes You will find all the main technical data on the rating plate fixed to the equipment When you need service or technical help please let us know the serial number of the equipment ...

Page 4: ... 5HY 4 ...

Page 5: ...ne 9 2 5 3 Outside of the machine 9 2 6 Floors 9 2 7 Repairs and maintenance of the machine 9 XQFWLRQDO HVFULSWLRQ 3 1 Application of the appliance 10 3 1 1 Prohibited use Use for other purposes 10 3 2 Construction 11 2SHUDWLRQ 4 1 General 12 4 2 Operation procedures 12 4 2 1 To fill with water 12 4 2 2 Choice of wash programme 12 4 2 3 Washing 12 4 2 4 Hygiene warranty 13 4 3 After operation 13 4...

Page 6: ...V 6 1 Filling rinsing 17 6 1 1 Filling time final rinse flow 17 6 2 Setting the rinse aid dosing pump 17 6 3 Adjustment of reference values 18 6 3 1 Adjustment of reference values diagnostic texts 18 6 3 2 Function change over 19 6 3 3 Reference values 20 7URXEOHVKRRWLQJ 6SDUH SDUWV 8 1 Voltage codes 27 8 2 Product codes 27 7HFKQLFDO VSHFLILFDWLRQV ...

Page 7: ...zed by the manufacturer and using original spare parts Not complying with the above may put the safety of the appliance in danger 6 PEROV XVHG LQ WKH PDQXDO This symbol informs about a situation where a safety risk might be at hand Given instruc tions are mandatory in order to prevent injury This symbol informs about the right way to perform in order to prevent bad results appli ance damages or ha...

Page 8: ...voltage is the same as that indicated on the data plate of the ap pliance The machine shall be connected to the main switch Water connection must be carried out in a manner that complies with the regulations of the local water supply authority Check the tightness at the connection point before start ing up See also Water connections in Chapter Installation HWHUJHQW DQG ULQVH DLG Only detergent and...

Page 9: ...s no sealing class capable of withstanding high pressure QVLGH RI WKH PDFKLQH Don t use steelwool and for cleaning of the machine Don t use foaming detergents for cleaning the machine 2XWVLGH RI WKH PDFKLQH It is recommended to use a damp cloth only ORRUV When rinsing floors water can splash up under the machine and damage the electrical components These have not been designed to withstand rinsing...

Page 10: ...ing of food including various types of items used for the storage of food Washing must therefore be carried out with a machine dishwashing detergent and rinse aid suitable for this purpose 3URKLELWHG XVH 8VH IRU RWKHU SXUSRVHV Use of the machine for applications other than what it was designed for must always be checked in advance with the manufacturer ...

Page 11: ...hen tank temperature is below 50 C or when water level is low 4 Final rinse indicator Flashes when rinse temperature is lower than refer ence value 5 Program selection 6 On Off 7 Rinse nozzle 8 Wash nozzle 9 Rinse and wash arms 10 Strainers 11 Overflow pipe 12 Drain strainer only in types with drain pump 13 Pump strainer ...

Page 12: ... temperature is displayed on the display 2 Correct working temperatures are wash 60 C rinse 85 C To check the rinse temperature Keep P1 pressed for a couple of seconds The rinse temperature is displayed on the display 2 KRLFH RI ZDVK SURJUDPPH Choose wash programme P1 P2 or P3 Programme P3 is selected by pressing P1 and P2 simultaneously P1 Slightly dirty goods P2 Normal washing P3 Ex tremely dirt...

Page 13: ... too low IWHU RSHUDWLRQ PSW LQJ LQWHUQDO PDFKLQH ULQVH Press 0 1 The display shows for approx 5 sec the number of washed racks Clean the tank strainers 10 Empty the tank by pulling the overflow pipe 11 up wards lean it against the frontside of the tank and release it If the machine is equipped with the drain pump push P1 EP is shown on the dis play and the drain pump starts The drain pump stops au...

Page 14: ...nd maintenance make sure that the machine is placed in a well lit room 9HQWLODWLRQ A satisfactory working environment requires ventilation in the dishwashing room The recommendation of ventilation is 600m3 h QVWDOODWLRQ SURFHGXUHV OHFWULFDO FRQQHFWLRQV See details in the drawings of installation instructions and technical specifications tables The electrical supply for the machine has to be equipp...

Page 15: ...mp The hose is con nected to the sink with copper pipe d 22 mm and it has to be ended at least 25 mm above the sink edge IWHU LQVWDOODWLRQ 6HH DOVR KDSWHU 2SHUDWLRQ Check the following points before using the machine the dishwasher has been installed horizontally according to the installation in structions all the connections electricity water are tight and correctly made LUVW UXQ 3UHSDUDWLRQV Che...

Page 16: ...nd the rinsing temperature approx 80 85 C RQWUROOLQJ WKH KRRG PDJQHWLF VZLWFK Check that themagnetic switch stops the machine during both the wash and rinse cycle when the hood is lifted 6WDII WUDLQLQJ Before the machine is used make sure that the personnel receive the requisite information for handling and maintenance ...

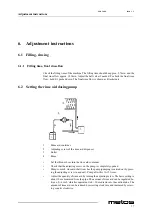
Page 17: ...nse aid dispenser 3 Boiler 4 Rinse Set the thinner hose into the rinse aid container Check that the adjusting screw on the pump is completely opened Pump so much rinse aid that it reaches the pump pumping is carried out by press ing the adjusting screw in and out Pump after this 10 15 times Adjust the quantity of rinse aid by turning the adjusting screw The basic setting is about 10 cm measured fr...

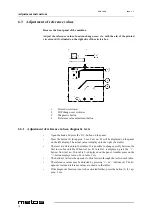
Page 18: ... will be displayed on the panel on the left display The actual value is displayed to the right See table The texts are divided into four tables It is possible to change quickly between the first rows of each table When text no 01 in table 1 is displayed press the button Now text no 20 in table 2 is displayed on the panel Another press on the button displays text no 30 in table 3 etc The button 3 a...

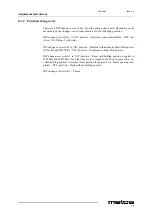
Page 19: ... filling of cold water DIP change over switch 2 in ON position Machine with automatic hood lifting device WD 6EA and WD 7EH OFF position No automatic hood lifting device DIP change over switch 3 in ON position Hood with holding position Applies to WD 6EA and WD 7EH Once the rinse cycle is complete the hood is opened to a so called holding position It remains in this position for approx 6 sec befor...

Page 20: ...program 1 1 0 min 0 9 4 min 08 Washing time program 2 1 5 min 0 5 9 4 min 09 Washing time program 3 3 0 min 0 5 9 4 min 10 Rinse time program 1 13 sec 5 30 sec 11 Rinse time program 2 13 sec 5 30 sec 12 Rinse time program 3 13 sec 5 30 sec 13 Dosage time for detergent 2 0 sec 0 9 9 sec 14 Delayed running time for booster pump 10 sec 1 20 sec Left display Text no Refers to Right display 20 Hood swi...

Page 21: ... filling memory to zero text no 30 in the diagnostics text 0 or loosen the plug T41 on the printed circuit card 5DFN FDOFXODWLRQ The two displays show the total number of racks up to 9999 By pressing the button 3 once more the number of racks is displayed in tens of thousands ...

Page 22: ... water Dishes improperly placed Correct Dishes are not dry Too little rinse aid Adjust Dishes have been too long in the dishwasher Remove the dishes as soon as the rinse cycle is finished Rinse water is too cold Call the service Streaks and spots on dishes Improper amount of rinse aid Adjust Rinse water is too dirty Call the service Rinse water too cold Call the service Dishwasher stops during a w...

Page 23: ...red Suction hose above the liquid level Check and clean the filter Err1 on display Tank filling has been on 4 minutes and tank is not full Push twice I 0 Err2 on display Too low water flow when filling the tank Push twice I 0 Err4 on display Sensor T41 defective Call the service Err5 on display Sensor T21 defective Call the service Err6 on display Too low water flow when rinsing Open and close the...

Page 24: ... 5HY 7URXEOHVKRRWLQJ 24 ...

Page 25: ... 5HY 6SDUH SDUWV 25 6SDUH SDUWV 5DFN IUDPH FRYHU SODWHV 7DQN GHWDLOV GRVDJH GHYLFHV RLOHU FRXSOLQJV DVK ULQVH V VWHP RRG OLIW OHFWULF FXELFOH 3XPS 5 PSW LQJ SXPS RRVWHU SXPS ...

Page 26: ... 5HY 6SDUH SDUWV 26 ...

Page 27: ...PE 230V 50Hz I 3 PE 220V 60Hz J 3 PE 380 50Hz K 3 PE 400V 50Hz L 3 PE 415V 50Hz M 3 PE 440V 60Hz N 3 PE 460V 60Hz O 3 PE 480V 60Hz P 1 N PE 220 240V 50Hz R 2 PE 220 230V 60Hz Product code Full name Model codes i INSULATED MODEL sd STANDARD MODEL Type codes 6E WD 6E Accessory codes SH STEAM HOOD SV CUT OFF COCK NV NON RETURN VALVE VV VACUUM VALVE Bp BOOSTER PUMP DP DRAIN PUMP EFA AUTOMATION TO EVAL...

Page 28: ... 5HY 6SDUH SDUWV 28 ...

Page 29: ...29 ID Code Model Accessory Voltage Description MODULE Rack frame cover plates 10 300201 Rack frame 12 403731 Guide rail 14 3003431 Front plate 16 5315287 Panel 18 6080002 Edge list 20 7181050 Plug 24 3003432 Back plate ...

Page 30: ... 5HY 6SDUH SDUWV 30 ...

Page 31: ... 170 7140408 Hose clamp 180 411531 Clip 190 5315687 Suction hose detergent L 2000 mm 200 5315671 Strainer 210 5315669 Strainer 220 4288731 Reinforcement pin Detergent hose 230 4294631 Reinforcement pin Rinse aid hose 240 4052231 Suction hose rinse aid pump 250 5210164 Plastic foot 260 7190601 Rubber hose L 75 mm 270 6040013 Nut 280 6040014 Gasket 290 5320102 Pump strainer 300 5315699 Glass gauge s...

Page 32: ... 5HY 6SDUH SDUWV 32 ...

Page 33: ...le cover 510 5320275 Distance nut 520 5320274 Electric mantle 530 51460511 Cable screw cap 18 6 400V 550 7051903 Coupling 560 5320194 Gasket 570 5315607 Filter 580 5320216 Nipple 590 7060503 Muff 600 5320214 Couplling 610 5315593 Ball valve 620 5315588 Coupling 630 5315162 Coupling 640 4260131 Pipe 650 5315581 Coupling 660 5315761 A H M Solenoid valve 670 4264131 Pipe 680 7181048 Plastic plug 690 ...

Page 34: ...7 7 5 6 167 7 5 16 50 0 7 2 1 9 2 7 1 29 5 72 7 1 7 2 7 5 16 3 3 6 11 77 66 88 7 8387 7 1b0b 21 bb11 77b9b 1 1 77b 1 12 9 7 67 1 8 0 66 88 7 89 56 1 1b 1 3bb7 88 81 8 25 81 21 629 77 9 88 7 8387 1 1 9 0217 5 1 9 632 5g5 6 66 95 6 6c 77 08167 1 87 5 5 5 027 632 50 1 b1 8 16 c6 6 3 66 632 5g5 76 2 1 9 8 25 81 c6 2 ...

Page 35: ... 1050 5315155 Hose 1060 5315681 V ring 1070 5315277 Neck 1080 5315281 Locking screw 1090 5315221 Rinse arm bearing 1100 5320012 Rinse pipe complete 1110 5315219 Cover 1120 5315275 Rinse pipe attachment 1130 5315279 Locking nut 1140 5315569 Nut M5 1150 5320014 Rinse pipe complete 1160 5315643 Nozzle 1170 151301 Main pipe 1180 3534431 Pump attachment 1190 5315056 Wash arm complete 1200 7390203 Wash ...

Page 36: ... 5HY 6SDUH SDUWV 36 ...

Page 37: ...fting handle clamp 1580 3321502 Lifting handle 1590 7000905 Nut 1600 5320238 Nut cover 1610 7181008 Plug 1620 7130511 Gas spring 1630 7000824 Screw 1640 5315270 Hood bearing 1650 5315087 Sliding roller 1660 7000715 Screw 1670 1002701 SD Hood 1670 165101 I Hood 1680 5315359 Magnet 1690 7000714 Screw 1700 7000607 Screw 1710 7001201 Washer 1720 7181007 Plug 1730 7181009 Plug 1740 4280931 Magnet holde...

Page 38: ... 5HY 6SDUH SDUWV 38 ...

Page 39: ...180724 Plastic nut 2130 5315451 Display A2 2135 5320196 Distance tub 2140 7191219 Conduit entry 2145 5315467 Temperature sensor B21 2145 5320145 Spring temperature sensor 2145 5320146 Screw temperature sensor 2150 5320050 Field break switch B1 2155 4856431 A Connection block plate 400 415V 2155 4864931 H Connection block plate 230V 3 2160 61001830 E prom 2165 5315453 Printed circuit board A1 2170 ...

Page 40: ... 5HY 6SDUH SDUWV 40 ...

Page 41: ...el Accessory Voltage Description MODULE Pump FIR 2400 8052590 Pump complete 230 400V 3 phase 50Hz impeller 93 mm 2410 5315965 Pump housing 2420 5315966 Impeller Fan 2430 5315968 Impeller 93 mm 2440 5315969 O ring 2450 5315970 Sealing ...

Page 42: ... 5HY 6SDUH SDUWV 42 ...

Page 43: ... 43 ID Code Model Accessory Voltage Description MODULE Emptying pump BE 2800 5315809 DP Impeller Fan 2810 5315811 DP Sealing set 2820 5320032 DP Pump wheel 2830 5320034 DP Pump housing 2840 5320022 DP Pump complete M8 ...

Page 44: ... 5HY 6SDUH SDUWV 44 7 5 211 7 21 9 6 7b17b 9 77 1 16 871 1 2 5 211 7 21 2 5 7b17b 2 5 16 871 1 ...

Page 45: ...909 Coupling 2960 7060810 Nipple 2970 7060302 Bushing 2980 5315583 Couplilng 2990 5320197 Support sleeve 3000 9180115 Pipe L approx 250 mm 3010 5315607 Filter R1 2 3020 5320216 Nipple 3030 7060503 Muff 3040 5315761 Solenoid valve 3050 5315581 Coupling 3060 4260131 Pipe 3070 5315162 Coupling 3080 5315588 Coupling 3090 5315593 Ball valve 3100 7051903 Coupling 3120 7060303 Bushing 3130 5320246 Rubber...

Page 46: ... 5HY 6SDUH SDUWV 46 ...

Page 47: ... 5HY 7HFKQLFDO VSHFLILFDWLRQV 47 7HFKQLFDO VSHFLILFDWLRQV RQQHFWLRQ GLDJUDP RQQHFWLRQ GLDJUDP QVWDOODWLRQ GUDZLQJ ...

Page 48: ...lem boil Genomstr 230 400V 9kW F1 1 Sulake Fuse Säkring FR10 E 1 Lämpörele Thermal relay Termoutlösare FV 1 Varistori Varistor Varistor K1 1 Kontaktori pump Contactor pump Kontaktor pump K10 E 1 Kontaktori Contactor Kontaktor 240V K21 1 Kontaktori Contactor Kontaktor 240V K41 1 Kontaktori boil Contactor boiler Kontaktor genomstr 240V M1 1 Pumppu Pumpmotor Pumpmotor 230 400V M8 E 1 Tyhj pumppu Drai...

Page 49: ...1 Vastus boil Heat elem boil Genomstr 230 400V 9kW F1 1 Sulake Fuse Säkring FR10 E 1 Lämpörele Thermal relay Termoutlösare FV 1 Varistori Varistor Varistor K1 1 Kontaktori pump Contactor pump Kontaktor pump K10 E 1 Kontaktori Contactor Kontaktor 240V K21 1 Kontaktori Contactor Kontaktor 240V K41 1 Kontaktori boil Contactor boiler Kontaktor genomstr 240V M1 1 Pumppu Pumpmotor Pumpmotor 230 400V M8 ...

Page 50: ... Warm water connection R1 2 55 70 C Cold water connection R1 2 5 12 C for machine connected to cold water 4 Drain connection Ø22 Valid for machine with drain pump 11 Vacuum valve 12 Non return valve 13 Cut off cock NOTE The inside diameter of the connection pipe should not be less than 12 mm Not included ...

Page 51: ... Surface temperature front side of hood 33 C Wash cycle time incl rinse P1 1 2 min Wash cycle time incl rinse P2 1 7 min Wash cycle time incl rinse P3 3 2 min Tank volume 50 litres Final rinse flow 3 9 l rack Wash capacity 50 racks h Rack size 500mm x 500mm Noise level 61 dB A Weight of the machine 113 kg Weight of package 15 kg Pump motor 0 75 kW Tank heating 1 8 kW Boiler 9 kW Max effect 9 75 kW...

Page 52: ...CE conformancy ...

Reviews: