background image


Rev. 1.00 

- 8 - 

Metapace T-3

1-2 Connecting the Cables 


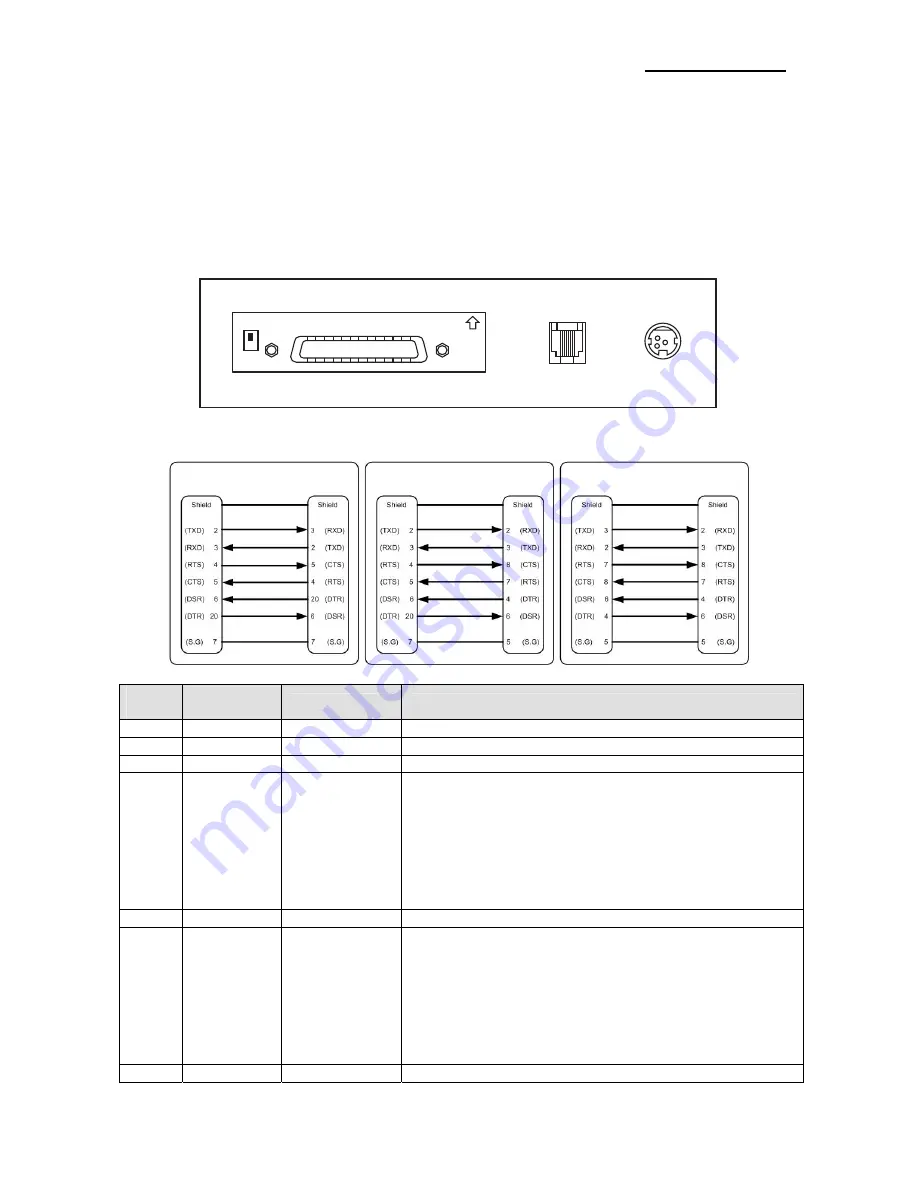
You can connect up the three cables to the printer. They all connect to the connector panel 
on the back of the printer, which is shown below: 


 NOTE 

Before connecting any of the cables, make sure that both the printer and the host are 
turned off. 


1-2-1 Serial Interface (RS-232C) 


ON


 When the Dip Switch is “ON” on the Serial Interface Board, 

DTR and RTS are connected each other. 


Pin 

No. 

Signal 

Name 

Signal Direction

Function 

BODY  Frame GND 

Frame Ground 

2 TXD  Output 

Transmit 

Data 

3 RXD  Input 

Receive 

Data 

6 DSR  Input 

This signal indicates whether the host computer can 
receive data. (H/W flow control) 
  1) MARK(Logic1) : The host can receive a data. 
  2) SPACE(Logic0) : The host can not receive a data. 
  3) The printer transmits a data to the host, after 

confirming this signal. 

  4) When XON/XOFF flow control is selected, the printer 

does not check this signal. 

Signal GND 

Signal Ground 

20 DTR  Output 

This signal indicates whether the printer is busy. (H/W flow 
control) 

1) MARK(Logic1) : The printer is busy. 

  2) SPACE(Logic0) : The printer is not busy. 
  3) The host transmits a data to the printer, after 

confirming this signal. 

  4) When XON/XOFF flow control is selected, the host 

does not check this signal. 

Shield  Frame GND 

Frame Ground 

IFA-S2 TYPE

Drawer kick-out
connector 

Power supply 
connector 

Interface connector 

PRINTER 

SIDE (25P) 

HOST 

SIDE (25P) 

PRINTER 

SIDE (25P)

HOST 

SIDE (9P) 

PRINTER 

SIDE (9P) 

HOST 

SIDE (9P) 

Summary of Contents for T-3

Page 1: ...User s Manual Metapace T 3 Thermal Printer Rev 1 00 http www metapace com ...

Page 2: ... plastic bag out of children s reach If not a child may put the bag on his head Do not pull the cable to unplug This can damage the cable which is the origin of a fire or a breakdown of the printer You must use only the supplied adapter It is dangerous to use other adapters Do not plug several products in one multi outlet This can provoke over heating and a fire If the plug is wet or dirty dry or ...

Page 3: ...mble repair or remodel it for yourself Call your dealer when you need these services Do not touch the blade of auto cutter Install the printer on the stable surface If the printer falls down it can be broken and you can hurt yourself Keep the desiccant out of children s reach If not they may eat it If you observe a strange smoke odor or noise from the printer unplug it before taking following meas...

Page 4: ...reglements d interference radio Caution Some semiconductor devices are easily damaged by static electricity You should turn the printer OFF before you connect or remove the cables on the rear side in order to guard the printer against the static electricity If the printer is damaged by the static electricity you should turn the printer OFF Waste Electrical and Electric Equipment WEEE This marking ...

Page 5: ...ircuit enables control of external devices such as cash drawer 6 Characters can be scaled up to 64 times compared to it s original size 7 Bar code printing is possible by using a bar code command 8 Different print densities can be selected by DIP switches Please be sure to read the instruction in this manual carefully before using your new Metapace T 3 NOTE The socket outlet shall be near the equi...

Page 6: ...ng the Drawer 10 1 4 Setting the Dip Switches 11 1 4 1 Serial Interface 11 1 4 2 Parallel USB Interface 11 1 5 Installing or Replacing the Paper Roll 13 1 6 Adjustments and Settings 15 1 7 Using the Printer 15 1 8 Connecting the computer 16 1 9 Connecting the Power Supply 16 2 Self Test 17 3 Hexadecimal Dumping 18 4 Specification 19 5 Appendix 20 5 1 Cleaning Printer 20 5 2 Printing Speed 20 5 3 U...

Page 7: ...cking Your printer box should include these items If any items are damaged or missing please contact your dealer for assistance Metapace T 3 Cover Cable CD Roll Paper Quick Start Guide Safety Guide AC Adapter Power Cord Splash Proof Cover Buzzer Cleaning Pen ...

Page 8: ...an receive data H W flow control 1 MARK Logic1 The host can receive a data 2 SPACE Logic0 The host can not receive a data 3 The printer transmits a data to the host after confirming this signal 4 When XON XOFF flow control is selected the printer does not check this signal 7 Signal GND Signal Ground 20 DTR Output This signal indicates whether the printer is busy H W flow control 1 MARK Logic1 The ...

Page 9: ...nter Data 6 9 Host Printer Data 7 MSB 10 Printer nAck PtrClk 11 Printer Busy PtrBusy Data3 7 12 Printer Perror AckDataReq Data2 6 13 Printer Select Xflag Data1 5 14 Host nAutoFd HostBusy 15 NC NC 16 GND GND 17 FG FG 18 Printer Logic H Logic H 19 30 GND GND 31 Host nInit nInit 32 Printer nFault nDataAvail Data0 4 33 GND ND 34 Printer DK_Status ND 35 Printer 5V ND 36 Host nSelectIn 1284 Active IFG P...

Page 10: ...roper drawer may damage the drawer as well as the printer CAUTION Do not connect a telephone line to the drawer kick out connector otherwise the printer and the telephone line may be damaged Plug the drawer cable into the drawer kick out connector on the back of the printer next to the power supply connector Pin No Signal name Direction 1 Frame GND 2 Drawer Kick Out Driver Signal 1 Output 3 Drawer...

Page 11: ...int Density Refer to the following table 2 OFF 2 7 Near End Sensor Status Disable Enable OFF 2 8 External buzzer control External buzzer enable External buzzer disable OFF 1 4 2 Parallel USB Interface DIP Switch 1 SW Function ON OFF Default 1 1 Auto Line Feed Enable Disable OFF 1 2 Reserved OFF 1 3 Reserved OFF 1 4 Reserved OFF 1 5 Reserved OFF 1 6 Reserved OFF 1 7 Reserved ON 1 8 Reserved OFF DIP...

Page 12: ...00 OFF OFF OFF 38400 OFF ON ON 57600 OFF OFF ON 115200 ON ON ON 9600 Table 2 Print Density Selection Print Density 2 5 2 6 Default 1 Light ON ON 2 Medium OFF OFF 3 Dark OFF ON 2 Auto Cutter Enable Disable selection Dip Switch Set 2 ON Auto Cutter Disabled SW 2 3 OFF Auto Cutter Enabled Application Ignores Auto Cutter error for continuous printing ...

Page 13: ...e because the printer cannot detect the paper end correctly 1 5 1 Make sure that the printer is not receiving data otherwise data may be lost 1 5 2 Open the paper roll cover by pressing the cover open button NOTE Do not open the print cover while the printer is operating This may damage the printer 1 5 3 Remove the used paper roll core if there is one 1 5 4 Insert the paper roll as shown ...

Page 14: ...correct direction that the paper comes off the roll 1 5 6 Pull out a small amount of paper as shown Then close the cover NOTE When closing the cover press the center of printer cover firmly to prevent paper miss loading 1 5 7 Tear off the paper as shown ...

Page 15: ...g on the roll when the near end sensor is triggered you can change the near end sensor setting Rotate the near end sensor tab at front or rear position See the below figure 1 7 Using the Printer Control Panel POWER The POWER light is on whenever the printer is on ERROR This indicates an error PAPER This light indicates the near end of the paper roll Install a new paper roll and the printer will co...

Page 16: ... the power supply s rated voltage and your outlet s voltage do not match contact your dealer for assistance Do not plug in the power cord Otherwise you may damage the power supply or the printer 1 9 1 Make sure that the printer s power switch is turned off and the power supply s power cord is unplugged from the electrical outlet 1 9 2 Check the label on the power supply to make sure that the volta...

Page 17: ...the current printer status which provides the control ROM version and the DIP switch setting 2 4 After printing the current printer status self test printing will print the following and pause The PAPER LED light blinks SELF TEST PRINTING PLEASE PRESS THE FEED BUTTON 2 5 Press the FEED button to continue printing The printer prints a pattern using the built in character set 2 6 The self test autom...

Page 18: ...olding down the FEED button 3 3 Close the cover then the printer enters the hexadecimal dump mode 3 4 Run any software program that sends data to the printer The printer will print all the codes it receives in a two column format The first column contains the hexadecimal codes and the second column gives the ASCII characters that corresponds to the codes 1B 21 00 1B 26 02 40 40 40 40 02 0D 1B 44 0...

Page 19: ...tion of control commands SMPS Input voltage 100 240 VAC Frequency 50 60 Hz Supply voltage SMPS Output voltage 24 VDC Temperature 0 45 Operating 20 60 Storage Environmental Conditions Humidity 10 80 RH Operating 10 90 RH Storage Except for paper Mechanism Head 150 Km LIFE Auto Cutter 1 800 000 Cut MCBF Mechanism 70 000 000 lines These values are calculated under printing level 2 with recommended pa...

Page 20: ...aper roll and close the printer cover The remained amount of paper detected by paper near end sensor varies with the diameter of the paper core To adjust the remained amount contact your dealer 5 2 Printing Speed When the paper is about to run out the printing speed may become slower while printing Press the Push button open and then close the cover to print at the normal speed until all the paper...

Reviews: