-4-
Diameter
Outside dia.
Max. thickness
Radius
Bending angle
1/2”
21.30mm
3.25m
62mm
0-90
o
3/4”
26.80mm
3.50mm
78mm
0-90
o
1”
33.50mm
4.00mm
98mm
0-90
o
1-
1/4”
42.30mm
4.00mm
128mm
0-120
o
1-
1/2”
48.00mm
4.25mm
148mm
0-120
o
2”
60.00mm
4.50mm
187mm
0-120
o
IV OPERATIING INSTRUCTIONS
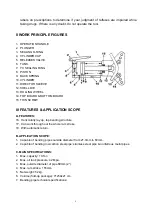
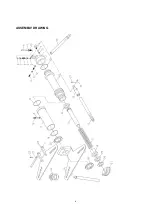
1. Before using, rotating three supporting stands (No. 38) into the position. Remove the
stands and fold the bender for moving or storage after using.
2. The working bench is composed with fixed bottom board (No. 25) and movable top board
(No. 21). Before bending, the top board shall be close to the top board (No. 21) and the
roller wheel (No.24). After the bending is completed, the pipe can be taken out by opening
the top board.
3. There are marks of size on the socket of both the top and bottom boards, the small die
and the curved supporting surface on the rolling wheel. Use the suitable size according to
the work before operation.
4. Rotating tightly the release valve (No. 4) before operating. Open release valve when
bending is completed and the arm will return automatically.
5. The tank between the outer-casing and the cylinder shall be filled properly with normally
1-1.2 hydraulic oil (No. 10). If the tank is over fed, it will be difficult for the piston to return
and on the contrary the ram will not move all the way to the end.
6. If the pressure on the handle shows the sign of reducing and oil leakage occurs on the
pump after a long time use, remove the trunk piston in the pump and replace the sealing
ring. It is the same problem when it sounds noisy if heavy-load or light-load.
7. The Yx sealing ring can be replaced by removing the thin screw, the direct sleeve and the
piston.
8. If the transporting, rotating, side down display cause the ram unable to proceed, it shows
that the air comes into the tank. Please follow the steps listed below to eliminate the air:
a. Release the piston base (No.10), rotate tightly the release valve No. 4), press the
trunk piston several times till the oil flow out from the gap between the piston base
(No. 10) and valve block (No. 33) proceeds, the machine is normal, otherwise,
please try the second step.
b. Release the adjustable valve, press the truck piston several times till the oil flow out
of the adjustable valve, Then close the adjustable valve. Try it again, if the ram
proceeds, and no “two steps proceed and one step move back” occurs, the machine
is normal, otherwise, please try the third step.
c. Use a hammer to hit the truck piston for several times to clear up the bubbles in the
oil till the machine works normally.
d. If you follow all the steps afford-
said, it still appears that the ram can’t proceed. It is
because of the less of the oil. You may fill up the oil till the oil level are not below the
O-ring in the piston base.
Caution: Clear up the air after filling up the oil.

