Metallkraft 3840321 Instruction Manual Download Page 18

18

HKS 320 | Version 1.04

Disposal, recycling of old equipment


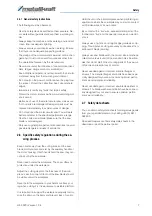
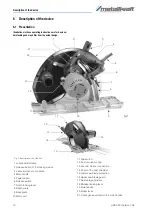
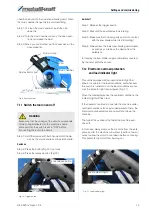
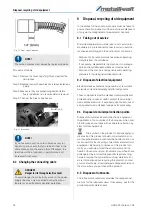
Fig. 13: Wear carbon brushes

Proceed as follows:

Step 1: Remove the brush caps (Fig.14) and pull out the 

old brushes.

Step 2: Replace them with new brushes (always replace as 

a pair).

Step 3: Make sure they are properly aligned and slide 

freely. Installation is in reverse order to removal.

Step 4: Then put the brush caps back on.

Fig. 14: Brush cap

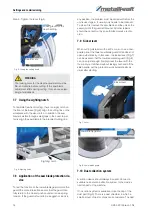
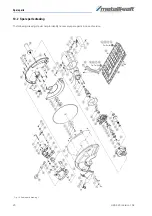
8.3 Changing the connecting cable

9 Disposal, recycling of old equipment

In the interest of the environment, care must be taken to 
ensure that all components of the machine are disposed 
of only via the designated and approved channels. 

9.1 Taking out of service

Discarded equipment must be taken out of service im-
mediately in a professional manner in order to avoid la-
ter misuse and danger to the environment or persons.

- Dispose of all environmentally hazardous operating 

materials from the old device.

- If necessary, disassemble the machine into manage-

able and recyclable assemblies and components.

- Dispose of the machine components and operating 

materials in the designated disposal route.

9.2 Disposal of electrical equipment

Electrical devices contain a large number of recyclable 
materials and environmentally harmful components. 

These components must be disposed of separately and 
professionally. In case of doubt, contact the municipal 
waste disposal service.  If necessary, use the services of 
a specialized waste disposal company for processing.

9.3 Disposal via municipal collection points

Disposal of used electrical and electronic equipment 
(Applicable in the countries of the European Union and 
other European countries with a separate collection sy-
stem for this equipment).

 The symbol on the product or its packaging in-

dicates that this product should not be treated as nor-
mal household waste, but should be handed in at a col-
lection point for the recycling of electrical and electronic 
equipment. By helping to dispose of this product cor-
rectly, you will help protect the environment and the 
health of those around you. Environment and health are 
endangered by incorrect disposal. Material recycling 
helps to reduce the consumption of raw materials. For 
more information about recycling this product, contact 
your local authority, municipal waste disposal service or 
the store where you purchased the product.

9.4 Disposal of lubricants

The lubricant manufacturer provides the disposal inst-
ructions for the lubricants used. If necessary, ask for the 
product-specific data sheets.

NOTE!

The carbon brushes must always be replaced in pairs.

NOTE!

If you have removed the carbon brushes only for 
inspection, make sure that you reinsert them in the 
same place and in the same order. Otherwise, the 
result would be a reduction in performance and 
increased brush wear.

DANGER!

Danger to life through electric shock!

To avoid danger from electricity, work on the power 
supply line may only be carried out by the manu-
facturer or an authorized specialist workshop. 
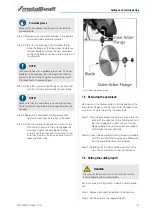
Brush cap

Summary of Contents for 3840321

Page 1: ...HKS 320 Instruction Manual HKS 320 HKS 320 Hand held circular saw...

Page 2: ...uring the sawing process 7 2 7 Safety data sheets 7 2 8 Safety labels on the device 8 3 Intended use 8 3 1 Improper use 8 3 2 Residual risks 8 4 Technical Data 8 4 1 Type plate 9 5 Transport packaging...

Page 3: ...arts orders Fax 0951 96555 119 E Mail ersatzteile stuermer maschinen de Please submit any information and experiences you make during application of the machine as these may be valuable for product im...

Page 4: ...ust also regularly train staff and notify of the hazards Operators shall provide staff with the required pro tective equipment and wearing the required pro tective equipment shall be mandatory Operato...

Page 5: ...ork area clean and well lit Disorder and unlit work areas can lead to accidents b Do not work with the power tool in a potentially explo sive environment containing flammable liquids ga ses or dust Po...

Page 6: ...on devices can be fitted they must be connected and used correctly The use of a dust extraction system can reduce dust hazards h Do not lull yourself into a false sense of security and do not ignore t...

Page 7: ...y handle or the motor housing If both hands hold the saw they can not be cut by the saw blade Never reach under the workpiece The cover offers no protection under the workpiece Adjust the cutting dept...

Page 8: ...anual Any use beyond the intended use or any other use is considered as misuse St rmer Maschinen GmbH accepts no liability for any design or technical modifications to the machine Claims of any kind f...

Page 9: ...apacity Danger points unevenness and disturbance points must be inspected before transport The removal of danger spots disturbances and unevenness at the time of transport by other employees leads to...

Page 10: ...the locking device 3 Vacuum cleaner connection 4 Main handle 5 Power cable 6 Release switch 7 Depth locking lever 8 Depth scale 9 Base plate 10 Motor unit 11 Clip switch 12 Dust connection cap 13 Vacu...

Page 11: ...ny reason release the switch and hold the saw mo tionless in the material until the saw blade comes to a complete stop c Never attempt to remove the saw from the workpiece or pull the saw backwards wh...

Page 12: ...nds NOT to modify and or use this tool for ap plications other than those for which it was desi gned If you have any questions about the application DO NOT use the tool but contact the manufacturer Wh...

Page 13: ...no one is injured by the saw blade Step 1 Push the saw blade locking lever in and turn the shaft with the spanner on the holding bolt until the lock engages the shaft Loosen the saw blade holding bolt...

Page 14: ...All other repairs should be carried out by an authorized service techni cian 7 9 Kicker lever When cutting materials with a soft core such as a com posite panel the lower saw blade guard often does no...

Page 15: ...the outer protective cover 7 12 Electronic overload protection and load indicator light This unit is equipped with a load indicator light that shows the operator the load conditions and whenever the...

Page 16: ...ower blade guard close completely after the cutting pro cess is finished Immersion cut Step 1 Set the depth stop to the maximum cutting depth and manually open the lower saw blade guard until the saw...

Page 17: ...ust be cleared of chips and deposits DANGER Before starting cleaning and maintenance work on the machine pull the mains plug Tips and recommendations To ensure that the metal circular saw is always in...

Page 18: ...services of a specialized waste disposal company for processing 9 3 Disposal via municipal collection points Disposal of used electrical and electronic equipment Applicable in the countries of the Eur...

Page 19: ...e number and year of manufacture can be found on the type plate attached to the device Example The handle for the Hand held circular saw HKS 320 must be ordered The handle has the number 49 in the spa...

Page 20: ...20 HKS 320 Version 1 04 Spare parts 10 2 Spare parts drawing The following drawing should help to identify necessary spare parts in case of service Fig 15 Spare parts drawing 1...

Page 21: ...Wire connection HKS 320 Version 1 04 21 11 Wire connection Fig 16 Wire connection...

Page 22: ...2014 Cor 2 2015 DIN EN 62841 2 5 2015 05 Electric motor operated hand held tools transportable tools and lawn and garden machi nery Safety Part 2 5 Particular requirements for hand held circular saws...

Page 23: ...Notes HKS 320 Version 1 04 23 13 Notes...

Page 24: ...www metallkraft de...

Reviews: