background image

Refer to the below picture:

1. Get a standard ruler

2. Put the microscope camera on the ruler

16

Summary of Contents for MV-900

Page 1: ...Microscope MV 900 User Manual Copyright 2010 Meta Media Incorporated 1...

Page 2: ...7 Part three software installation 8 3 1 Step 1 8 3 2 Step 2 8 3 3 Step 3 9 3 4 Step 4 9 3 5 Step 5 10 3 6 Step 6 10 3 7 Step 7 11 3 8 Step 8 11 3 9 Step 9 12 Part four Application software 13 4 1 VP...

Page 3: ...in white light LED illumination High Resolution snapshot 1 2 System requirements Pentium 4 Class CPU or above 128 MB of system RAM or above VGA system with at least 16bit color support Windows XP SP2...

Page 4: ...w to use the plastic holder The metal stand and the plastic holder are assembled well in the package You may put the microscope camera on the holder to keep observation position steadily To change ang...

Page 5: ...value of the gauge telling you the focus is in a better position In figure 2 3 a red box shows the focus ring of the microscope camera Fig 2 3 The lens side of the microscope camera is shown in a red...

Page 6: ...2 5 Placement when not using the microscope The microscope camera can be kept in the normal position as below when it is not in use 6...

Page 7: ...d the other is the near focus The far focus can provide larger magnification than the near focus Please check the below pictures A normal object Near focus view Far focus view Microscope camera can sh...

Page 8: ...Part three software installation 3 1 Step 1 Insert the CD ROM or click on the icon of the CD device then select AutoPlay option 3 2 Step 2 Click on NEXT 8...

Page 9: ...3 Choose I accept the terms of the license agreement and Click on Next 3 4 Step 4 Enter the user name company name and product serial number and then click on Next Product serial number is on the CD...

Page 10: ...3 5 Step 5 Click on Next Note Do not change the file installation folder 3 6 Step 6 Program will install the files automatically 10...

Page 11: ...roduct uses universal video driver it is not necessary to install the camera driver Just plug the USB connector of the microscope camera into a computer as shown below The messages will come up at the...

Page 12: ...3 9 Step 9 Double click on VP EYE 6 6 icon to run the microscope software You can see the following window on a computer screen 12...

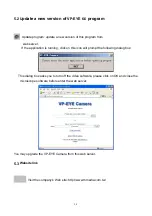
Page 13: ...will be asked to register on our servers by adding your information After that you can upgrade the new version of software or get the latest product information Please enter your information and click...

Page 14: ...ution change the camera video size like 640x480 1024x600 etc As below Snapshot take a picture and save it to the specific folder and the icon of this picture is displayed on the bottom If you want to...

Page 15: ...functions Press a key other than the hot keys or double click on the screen to return to the normal video Date and time switch on or off the date and time label on the right bottom area of video scre...

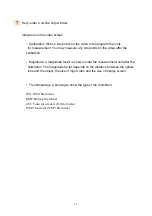
Page 16: ...Refer to the below picture 1 Get a standard ruler 2 Put the microscope camera on the ruler 16...

Page 17: ...r Click on the video screen by the right button of the mouse and then select the unit of 1 mm or 10 mm Click on the ruler by two points These points are marked as and the distance of these points on t...

Page 18: ...Settings enter a dialog box to select the options of the functions Snapshot types a file format to save a picture JPG the compressed JPEG file format BMP the standard uncompressed bitmap file format...

Page 19: ...d one frame per second record one frame on average of 30 frames 1 30 6 seconds 1 second one frame per second record one frame on average of 180 frames 1 180 20 seconds 1 second one frame per second re...

Page 20: ...nter or a grid with 1 mm See below Border Center Grid Orientation Original video shown the original video without changing its orientation Flip horizontally Flip the video left to right Flip verticall...

Page 21: ...r name is used for the file name User define You can enter the file name All combination Computer name user name and the name you specify are put together for the file name Save Folder To change the w...

Page 22: ...bration Magnitude a magnitude factor is shown under the measurement unit after the calibration The magnitude factor depends on the distance between the optical lens and the object the size of input vi...

Page 23: ...ra software it shows up automatically at the time the video software applies this virtual video driver This virtual video driver provides the image processing functions for the microscope camera Since...

Page 24: ...n is running click on this icon will prompt the following dialog box This dialog box asks you to turn off the video software please click on OK and close the microscope software before enter the web s...

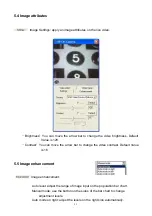
Page 25: ...e is 128 Contrast You can move the arrow bar to change the video contrast Default Value is 16 5 5 Image enhancement Image enhancement Auto level adjust the range of image input on the population bar c...

Page 26: ...a Click on the button to turn on or the LED lights The light bar chart of the video It shows the profile of the lights in the video You may change the left and right limitation of the bar chart to enh...

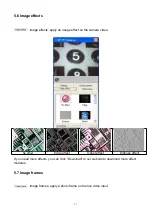
Page 27: ...effect on the camera video No effect Edge effect Ghost effect Emboss effect If you need more effects you can click Download to our website to download more effect modules 5 7 Image frames Image frames...

Page 28: ...No frame Binocular telescope Oval frame Pink mirror frame If you need more frame you can click Download to our website to download more frame modules 28...

Page 29: ...Part six Microscopy samples Microscopy samples Name Photos by a digital camera Photos by a microscope camera Coin IC Chip Gauze 29...

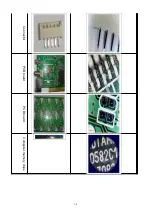
Page 30: ...Connector PCB board PCB board Computer memory chips 30...

Reviews: