background image

Starting up the server

16

fr

de
en

es

pt

it

nl

sv

no

fi

da

hu

ro

pl

el

ru

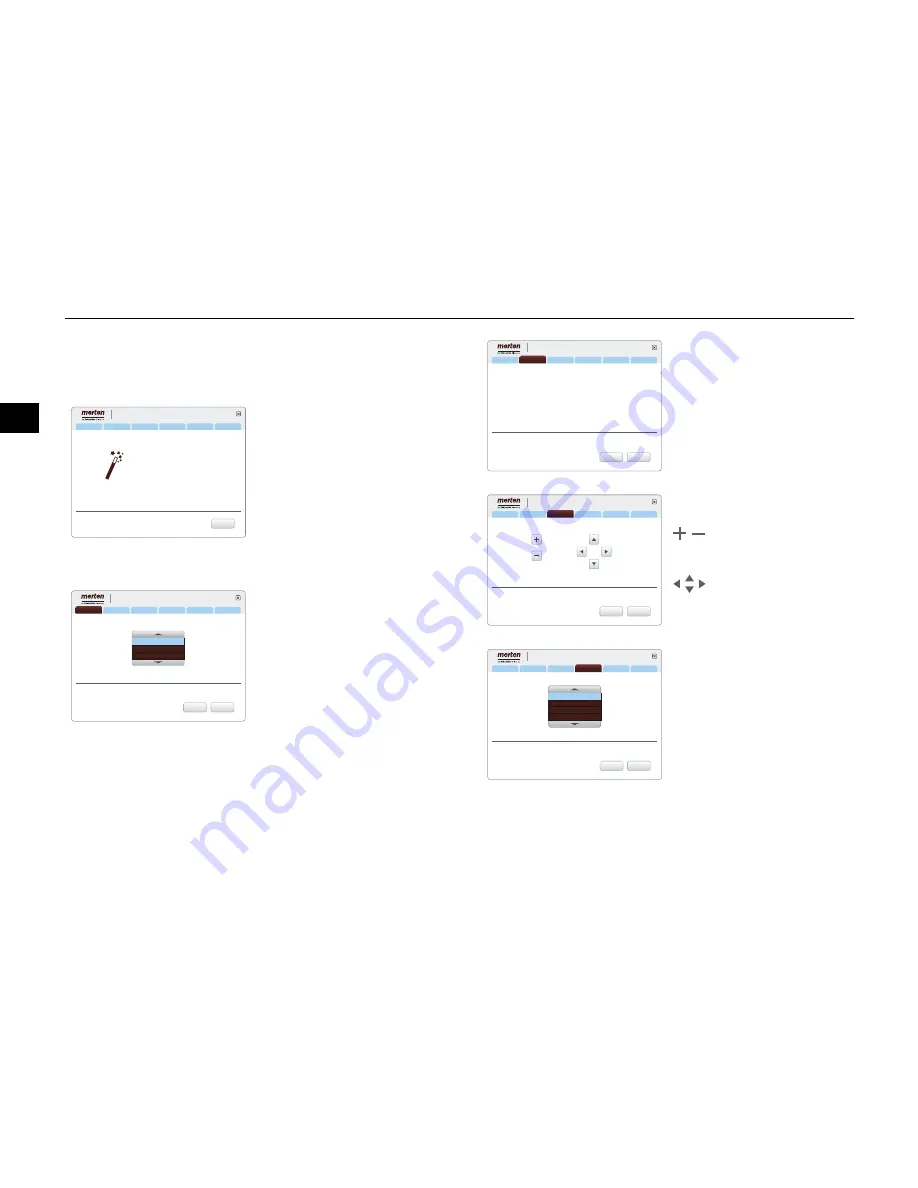
A/V Wizard

5

Follow the instructions from the A/V Wizard to optimise the 

audio and video settings of your connected monitor.

Operation

Confirm your entries with <OK> 

and continue to the next step.
Use <Zurück> to return to the 

previous step without saving.
You can also operate the wizard 

with the keyboard only:

[Cursor keys] = navigation

[Enter/Return] = <OK>

[ESC button] = <Zurück>

Setting the monitor resolution

Choose a suitable resolution for 

your monitor. 

Welcome to AV Wizard

Step 1

Final

Step 5

Step 4

Step 3

Step 2

Continue

From here you can set up the audio & video settings. 
For selections use „Up/Down/Left/Right“ arrows.
For validation use „OK“.
If you want to go back one step use „Back“.

AV Setup

Final

Step 5

Step 4

Step 3

Step 2

Select the appropiate resolution that you 
consider is best for your machine. After you 
choose one press „OK“.

Screensize / Resolution

720p (1280 x 720)

1280 x 1024

1080p (1920 x 1080)

OK

Back

Step 1

AV Setup

Testing the monitor resolution

The new setting will appear for 

approx. 15 seconds during 

which time you can confirm or re-

ject it. If you do not make any en-

tries during this time, the Wizard 

will automatically go back one 

step. 

Setting the image size and 

position

Adjust the height and the 

width of the image to the 

screen.
Set the image so it is 

central.

Selecting the audio output

Select a suitable audio output.

Final

Step 5

Step 4

Step 3

Step 1

Step 2

5

OK

Back

Select the appropiate resolution that you 
consider is best for your machine. After you 
choose one press „OK“.

If you want to keep it, choose „OK“.
If you want to choose another resolution, press „Back“.

Screensize / Resolution

720p (1280 x 720)

Your settings:

AV Setup

Zoom In

Zoom Out

Up

Down

Left

Right

Final

Step 5

Step 4

Step 2

Step 1

Adjust your screen position using the 
following options: Use Plus/Minus to Zoom 
In/Out the screen. Use arrow keys to center 
the image to the desired position.

Adjust Image Size

OK

Back

Step 3

AV Setup

Final

Step 5

Step 3

Step 2

Step 1

Wich connector did you use?

Audio output connector

OK

Back

Analog stereo

SPDIF coaxial

SPDIF optical

No sound

Step 4

AV Setup

Summary of Contents for Uniq Pro

Page 1: ...lefax 49 2261 702 136 E Mail servicecenter merten de InfoLine Telefon 49 2261 702 235 oder 49 800 63783640 Telefax 49 2261 702 680 oder 49 800 63783630 E Mail infoline merten schneider electric com es...

Page 2: ...AND BY MMC PRO Uniq Client Welcome to Uniq Admin Please log in Help with the Uniq Admin site Learn about Uniq at www uniq Version x x x xx UNIQ Login Configuration Welcome to Uniq Admin Please log in...

Page 3: ...d Architektur 2 Anschl sse Anzeigen und Bedienelemente 3 Vorderseite 3 R ckseite 4 Server aufstellen 5 Betriebsumgebung 5 Montageort 5 Server in Betrieb nehmen 5 Server mit eigener Hardware in Betrieb...

Page 4: ...Daten und Funktionen zur Verf gung Hierzu geh rt die Licht Jalousie und Klimasteuerung eines KNX Sys tems die Verwaltung von Musik Videos Bildern und Dokumenten die Kommunikation inner oder au erhalb...

Page 5: ...ei Zugriff auf die Festplat te Die gr ne Betriebs LED leuchtet wenn der Server eingeschaltet ist 2x USB 2 0 Schnittstelle Hinter der Abdeckung Ein Aus Taster kurz dr cken Das Betriebssystem wird ordnu...

Page 6: ...elle EIA 232 RS 232 VGA Anschluss f r einen Monitor 15 polig DVI D Anschluss f r einen Monitor mit DVI D Anschluss 8x USB 2 0 Schnittstelle Line in AUX Anschluss f r z B CD Player DVD Player oder Radi...

Page 7: ...rden Sch tzen Sie den Server vor Sch den die durch ber spannung und Spannungsspitzen verursacht werden Verwenden Sie einen Feinschutz z B ein berspan nungsschutzmodul Verwenden Sie eine unterbrechungs...

Page 8: ...x 1080 OK Back Step 1 AV Setup Monitoraufl sung pr fen Sie sehen die neue Einstellung f r ca 15 Sekunden und k nnen sie in dieser Zeit best tigen oder ablehnen Wenn Sie keine Ein gabe in dieser Zeit v...

Page 9: ...etzwerk Switch 5 PC Notebook mit internem Netzwerk verbinden und ein schalten Damit Uniq Interface und das Konfigurationstool korrekt angezeigt werden m ssen Sie an Ihrem PC Notebook eine Mindestaufl...

Page 10: ...u vermeiden m ssen Sie den Server vollst ndig von der Stromversorgung trennen Bet tigen Sie daher immer den Netzschalter an der R ckseite und entfernen Sie das Netzkabel Wenn Sie nur den Ein Aus Schal...

Page 11: ...uftfeuchtigkeit 5 90 relative Luftfeuchtigkeit bei 50 C nicht kondensierend Anschl sse Anzeigen und Bedienelemente Vorderseite 2x USB 2 0 Schnittstelle Ein Aus Schalter Reset Taster Betriebs LED gr n...

Page 12: ...urchf hren um zu versuchen diese St rungen zu beheben Installieren und bedienen Sie den Server so dass er nicht so viel elektromagnetische Energie abstrahlt dass diese bei Ger ten in der N he St runge...

Page 13: ...tecture 12 Connections displays and operating elements 13 Front 13 Rear 14 Setting up the server 15 Operating environment 15 Installation site 15 Starting up the server 15 Starting the server with you...

Page 14: ...aptops smartphones This includes control of lighting blinds and air conditioning of a KNX sys tem management of music videos pictures and documents communication inside or outside of a building teleph...

Page 15: ...hard drive is ac cessed The green operational LED lights up when the server is switched on 2 x USB 2 0 interfaces Behind the cover Press the on off push button briefly the operating system is started...

Page 16: ...EIA 232 RS 232 VGA connection for a monitor 15 pole DVI D Connection for a monitor with DVI D connection 8 x USB 2 0 interfaces Line in AUX Connection for e g CD player DVD player or radios with line...

Page 17: ...e damaged Protect the server from damage caused by voltage surg es and peaks Use surge protection e g a surge protective module Use an uninterrupted power supply UPS that keeps the system operational...

Page 18: ...Back Step 1 AV Setup Testing the monitor resolution The new setting will appear for approx 15 seconds during which time you can confirm or re ject it If you do not make any en tries during this time...

Page 19: ...itecture this may be a network switch for instance 5 Connect PC laptop with internal network and switch it on To ensure Uniq Interface and the configuration tool are displayed correctly you will need...

Page 20: ...ver you have to disconnect the server fully from the power supply For this reason always actuate the mains switch on the back and remove the mains cable If you only press the On Off switch on the fron...

Page 21: ...to 60 C Humidity 5 90 relative humidity at 50 C non condensing Connections displays and operating elements Front 2 x USB 2 0 interfaces On Off switch Reset button Operational LED green LED display for...

Page 22: ...ouraged to try to correct the interference by one or more of the follow ing measures Install and operate the server in such a manner that it does not radi ate sufficient electromagnetic energy to caus...

Reviews: