background image

44

Configuring the multimedia controller using a computer

Changing the setup options

The final stage in editing the settings is to configure the general

Setup

 options.

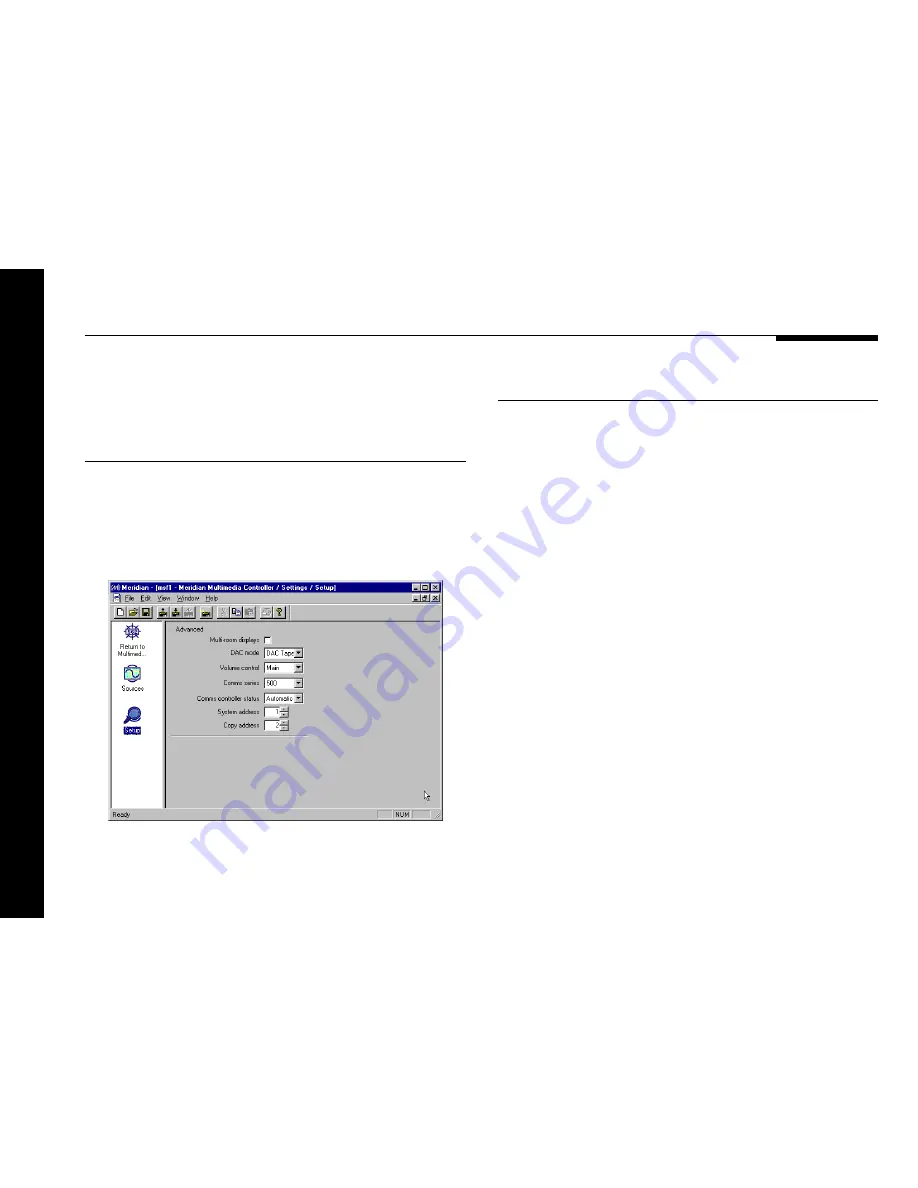
To change the setup options

Click the 

Setup

 icon in the left-hand panel of the 

Meridian

window.

The 

Setup 

options will be displayed:

The options are described in the table opposite:

Option

What it means

Multi-room displays

Includes displays of information from

Meridian sources; eg CD track number or

FM tuner frequency.

DAC mode

Specifies the operation of the optional

517 DAC Module. Choose 

No DAC

 if

there is no DAC module, or 

DAC Tape

 to

use the DAC for a tape loop or second

room system. 

DAC Variable

/

DAC Fixed

are provided for the original 562V unit.

Volume control

Specifies the system controlled by the

562V front-panel volume keys. Choose

Main

 for the main system, 

Secondary

 if

the 562V is used in a second room, and

None

 if the 562V is in the second or third

room of a three-room system.

Comms controller

Specifies whether the 562V is controller,

status

not controller, or set by auto setup; see

Connecting to other Meridian Equipment

,

page 25.

System and Copy

For two-room systems.

address

Summary of Contents for 562V.2

Page 1: ...Meridian 562V 2 Multimedia Controller u s e r g u i d e...

Page 2: ...i Preface Meridian 562V 2 Multimedia Controller User Guide...

Page 3: ...and service in the USA Meridian America Inc 3800 Camp Creek Parkway Building 2400 Suite 122 Atlanta GA 30331 Tel 404 344 7111 Fax 404 346 7111 Designed and manufactured in the UK by Digital Gramophone...

Page 4: ...oller and gives details of the audio and video connections Unpacking 16 Positioning the multimedia controller 17 Connecting the multimedia controller 18 Connecting outputs 22 Connecting sources 23 Con...

Page 5: ...your system 33 Configuring the multimedia controller using a computer 35 Describes how to configure the multimedia controller using the Meridian Configuration program The Meridian Configuration progra...

Page 6: ...gue to Digital Conversion for conventional analogue sources such as FM radio and video sound It also provides video switching for both composite video and S video sources and video conversion from S v...

Page 7: ...eridian System Remote using a simple and intuitive control interface 500 Series communications The 562V Multimedia Controller is part of the Meridian 500 series of advanced digital analogue and video...

Page 8: ...562V DSP6000 DSP6000 LaserDisc Video recorder 508 24 Meridian DVD Player Satellite 504 Sample configurations Meridian Digital Music System The 562V Multimedia Controller is the ideal control unit for...

Page 9: ...to create the ultimate surround system for all music and film sources The 568 Digital Surround Controller can connect directly up to eight Meridian active loudspeakers such as the DSP6000 floor standi...

Page 10: ...R With optional 517 DAC module 1 x stereo Delta Sigma DAC Digital outputs 1 x main SPDIF cable 75 up to 24 bit precision 32 96kHz 1 x tape SPDIF cable 75 up to 24 bit precision 32 96kHz 1 x tape optic...

Page 11: ...formation contact your Meridian dealer Meridian 515 516 Phono Modules The Meridian 515 516 Phono Modules convert the LP audio input A1 for use with a moving magnet or moving coil pickup respectively F...

Page 12: ...hapter provides a summary of the functions of the multimedia controller to identify the controls which you use to operate the unit It also provides step by step instructions for operating the multimed...

Page 13: ...nd video tape outputs 3 Mute Mutes the sound 4 Display Changes the information displayed on the front panel 5 V Decrease Decreases the system volume 6 A Increase Increases the system volume 7 Off Swit...

Page 14: ...off at the back panel and disconnect it from the AC power supply To switch on from standby Press Source front panel or select a source by pressing the appropriate source key on the remote eg CD If the...

Page 15: ...e audio and video input associated with each source can be configured from the front panel controls or using the Meridian Configuration program for more information see Configuring the multimedia cont...

Page 16: ...ws the currently selected source and volume setting For example CD65 Last Valid option The audio or video input for a source can be defined as Last Valid in which case selecting the source will leave...

Page 17: ...or the red A or V keys on the remote As you adjust the volume setting the display will show the current volume level For example CD55 To mute the sound Press Mute The display will show Mute To restore...

Page 18: ...can copy the audio and video components of a source to the audio and video tape outputs independently of the source you are listening to To copy a source Press Copy Each time you press Copy the multi...

Page 19: ...Using the multimedia controller 14...

Page 20: ...to your other audio equipment and the siting constraints Before you begin installation you should ensure that your multimedia controller is the correct voltage for your local AC supply If it is not do...

Page 21: ...to transport the unit Radio interference FCC Warning This equipment generates and can radiate radio frequency energy and if not installed and used correctly in accordance with our instructions may cau...

Page 22: ...To avoid overheating Do not position the multimedia controller In direct sunlight Near heat sources such as a radiator Directly on top of heat producing equipment such as a power amplifier Ensure tha...

Page 23: ...Analogue tape outputs Composite video inputs Trigger outputs Optical inputs Digital inputs Analogue output Power input and fuse Digital outputs Optical output S video outputs Composite video outputs...

Page 24: ...ve adequate shielding or the correct impedance or cables intended for UHF applications as these do not provide adequate shielding in the 1 30MHz region Optical connections should be made using a suita...

Page 25: ...o signals using phono LD V3 CABLE V4 connectors TV V5 V6 S1 VCR1 S2 VCR2 S video signals using miniDIN S3 DVD S4 connectors Video outputs The following table gives details of the video outputs Use thi...

Page 26: ...GERS 1 2 Trigger outputs which can be used to switch external equipment They may also be used to provide function select for SCART for more information please refer to your dealer Video connections Th...

Page 27: ...he conversion of analogue sources Route the video through the 568 to take advantage of the on screen display Configure the 562V to Type 1 see Choosing standard settings page 28 Configure each 562V sou...

Page 28: ...igh quality digital or optical lead Connect the 508 24 to the 562V using the comms lead provided see To connect to other Meridian 500 Series equipment page 25 To connect to an analogue source eg Merid...

Page 29: ...d provided see To connect to other Meridian 500 Series equipment page 25 To connect to a LaserDisc player OPTICAL OUTPUT LaserDisc player Meridian 519 Demodulator OPTICAL OUTPUT OPTICAL INPUT RF INPUT...

Page 30: ...h all the units to standby Press Clear on the remote Each unit will display Auto One unit will then be designated as the controller and display Con This is the unit that will respond to the remote All...

Page 31: ...Setting up the multimedia controller 26...

Page 32: ...ront panel controls This chapter explains how to choose one of the standard settings which are designed to cater for the six most common configurations of sources and outputs Alternatively for complet...

Page 33: ...ration using a DAC module for analogue tape The Types are numbered for consistency with the original 562V Choosing one of the six standard settings overrides any other configuration you may have perfo...

Page 34: ...troller Source Label Input Sensitivity Comms Composite input S video input Triggers CD CD D1 A2 n a 1 1 Radio RD A3 2 0V 2 v2 1 LP LP A1 1 0V 1 TV TV A4 1 0V v5 1 2 Tape1 T1 A5 2 0V 1 Tape2 T2 D2 n a...

Page 35: ...l and then switch on again to restore normal operation Configuring the sources When the multimedia controller is set to one of the standard settings the 12 source selection keys on the remote select t...

Page 36: ...ut for making analogue recordings or NE for no input Comms type CDNC 1C 8C or NC Choose 1C for a Meridian CD player 2C for a Meridian FM Tuner or NC otherwise Address CD2A 1A 8A Allows you to have up...

Page 37: ...imedia controller Turn off the multimedia controller using the power switch on the back panel Turn on the power again while holding down the Mute key on the front panel Programming levels The display...

Page 38: ...of the 562V Multimedia Controller to suit the way your system is set up and the way in which you want to use it For more information about these options see Changing the setup options page 44 These se...

Page 39: ...Configuring the multimedia controller without a computer 34...

Page 40: ...sation options which you can change to suit your own preferences and the other equipment in your system To configure the 562V you use the Meridian Configuration program an intelligent Windows based ap...

Page 41: ...customise the operation of each of the sources including the name of the source on the front panel display the audio and video inputs used for the source and additional information about the type of...

Page 42: ...isconnect Disconnects the program from attached products Add Product Adds a product to the current settings Copy Copies text or settings onto the clipboard Paste Pastes text or settings from the clipb...

Page 43: ...Connect one end to the RS232 connector on the back panel of the 562V Multimedia Controller Connect the other end to one of the serial ports on the PC or PC notebook computer Then specify the serial p...

Page 44: ...file such as your name and click the Save button Creating a new settings file This section explains how to create a new settings file using the Meridian Configuration program and how to enter persona...

Page 45: ...tion in the settings file Double clicking Return to top level takes you back to the previous level To display or edit the settings Double click the Settings icon The Meridian window will change to sho...

Page 46: ...e front panel display Choose a name from the Name drop down menu Setting up sources This section describes how to use the Meridian Configuration program to configure the sources provided by the multim...

Page 47: ...cted audio input If you have specified an analogue input for the Main input Specify the sensitivity for the source by choosing an option from the Sensitivity drop down menu If you have specified a dig...

Page 48: ...ure them to have different Comms addresses You can then select the appropriate source by specifying its Comms address in the Comms address field Select Triggers 1 and or 2 to switch the corresponding...

Page 49: ...requency DAC mode Specifies the operation of the optional 517 DAC Module Choose No DAC if there is no DAC module or DAC Tape to use the DAC for a tape loop or second room system DAC Variable DAC Fixed...

Page 50: ...Save from the File menu or click the Save toolbar button to save the changes you have made to the settings file to your PC hard disk If the download was successful the 562V will switch itself to stand...

Page 51: ...46 Configuring the multimedia controller using a computer...

Page 52: ...solutions to typical problems that may occur when setting up the multimedia controller If you are still not able to resolve a difficulty with the help of this guide and the suggestions in the followi...

Page 53: ...hum on the LP input The LP input is the most sensitive input on the multimedia controller Check that the tone arm is connected to the technical ground of the multimedia controller Check that the tone...

Page 54: ...roduct to different AC outlets Communication is not working between the 562V Multimedia Controller and other Meridian products Check that all products are interconnected using the correct comms leads...

Page 55: ...ertain that the multimedia controller is completely dry To clean the audio and video connections The audio and video sockets on the rear of the multimedia controller are gold plated and need no cleani...

Page 56: ...ate of purchase will be required Guarantee The 562V Multimedia Controller is guaranteed against defects in material and workmanship for two years from the date of purchase The guarantee is void if the...

Page 57: ...Troubleshooting 52...

Page 58: ...23 Audio inputs analogue 19 digital 18 Audio outputs analogue 19 digital 19 Automatic setup 25 B Balancing input levels 32 C Changing the display 12 Cleaning 50 the audio and video connections 50 the...

Page 59: ...usic System 3 Meridian Digital Theatre 4 Meridian DSP loudspeakers connecting 22 Meridian DSP6000 Digital Loudspeakers 3 Meridian DVD Player 3 connecting 24 Muting the sound 12 O Optical connections 1...

Page 60: ...a PC 41 video inputs 10 Sources icon 36 41 Specification 5 Standard settings selecting 28 Standby mode 9 Storing settings 45 Switching on from standby 9 Switching to standby 9 T Toolbar buttons 37 Tr...

Page 61: ...Index 56...

Reviews: