background image

Section 4 - Maintenance

90-8M0113986   

eng

  DECEMBER  2015

Page  33

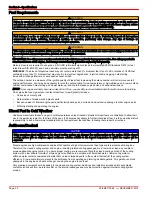
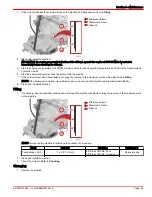
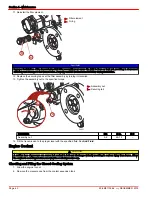
6. Discard the oil filter and O‑ring.

a -

Drain plug

b -

Oil filter cover

c -

O‑ring

d -

Oil filter

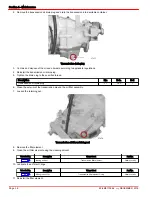
7. Apply sealant to the threads of the oil filter housing drain plug and install.

Tube Ref No.

Description

Where Used

Part No.

9

Loctite 567 PST Pipe Sealant

Drain plug threads

92-809822

8. Tighten the oil filter housing drain plug to the specified torque.

Engine Coolant Oil Cooler

Description

Nm

lb‑in.

lb‑ft

Drain plug

19

168

9. Install a new O‑ring onto the oil filter cover and lubricate with engine oil.
10. Push the filter element into the cover until it is locked. Listen for a click.
11. Install the oil filter housing cover onto the oil filter housing and tighten to the specified torque.

IMPORTANT: Overtightening the cover may cause an oil leak.

Engine Coolant Oil Cooler

Description

Nm

lb‑in.

lb‑ft

Engine oil filter housing cover

25

18

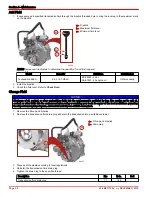
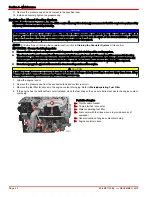
12. Remove the dipstick.

a -

Oil fill cap

b -

Dipstick

a

b

b

c

d

53087

a

b

53363

Summary of Contents for 92-8M0069603

Page 1: ...www mercurymarine com P O Box 1939 Fond du Lac WI 54936 1939 USA www brunswick marine com Parc Industriel de Petit Rechain B 4800 Verviers Belgium Mercury Marine All rights reserved Printed in U S A 90 8M0113986 NOVEMBER 2015 2 0L Diesel Engine Inboard Models OPERATION MAINTENANCE MANUAL ...

Page 2: ......

Page 3: ...these special instructions while performing the service plus common sense operation are major accident prevention measures WARNING Indicates a hazardous situation which if not avoided could result in death or serious injury CAUTION Indicates a hazardous situation which if not avoided could result in minor or moderate injury NOTICE Indicates a situation which if not avoided could result in engine o...

Page 4: ...MerCruiser Mercury Mercury with Waves Logo Mercury Marine Mercury Precision Parts Mercury Propellers Mercury Racing MotorGuide OptiMax Quicksilver SeaCore Skyhook SmartCraft Sport Jet Verado VesselView Zero Effort Zeus 1 On the Water and We re Driven to Win are registered trademarks of Brunswick Corporation Pro XS is a trademark of Brunswick Corporation Mercury Product Protection is a registered s...

Page 5: ...in Plug and Bilge Pump 16 Starting Shifting and Stopping 16 Before Starting the Engine 16 Important Information SmartStart 16 Starting a Cold Engine 16 Engine Warm Up 17 Starting a Warm Engine 17 Shifting 17 Engine Shut Down Stopping 17 Protecting People in the Water 18 While Boat is in Operation 18 While the Boat is Stationary 18 High Speed and High Performance 18 Passenger Safety In Pontoon Boat...

Page 6: ... Steering Pump Belt Inspection 56 Serpentine Belt Inspection 57 Battery 58 Battery Precautions for Multiple Engines 58 Section 5 Storage Cold Weather Freezing Temperature Seasonal Storage and Extended Storage 62 Cold Weather Freezing Temperature Storage 62 Preparing Your Power Package for Seasonal or Extended Storage 62 Seasonal Storage 63 Extended Storage Instructions 64 Battery 64 Recommissionin...

Page 7: ...90 8M0113986 eng DECEMBER 2015 Page iii Section 8 Maintenance Log Scheduled Maintenance Log 74 Vessel Maintenance Notes 75 ...

Page 8: ...Page iv 90 8M0113986 eng DECEMBER 2015 ...

Page 9: ... Link Digital Gauges 3 Switches 4 Emergency Stop Switch 4 Lanyard Stop Switch 5 Keep the Lanyard Stop Switch and Lanyard Cord in Good Operating Condition 6 Digital Throttle and Shift 6 Remote Controls 6 Panel Mount Features 6 Console Mount Features 7 Engine Electrical System Overload Protection 7 Vessel Integration Panel VIP Overload Protection 8 Engine Guardian System 8 Identification 9 Specifica...

Page 10: ...er Refer to Maintenance Water Separating Fuel Filter Cooling system water pressure or engine temperature problem Stop the engine and check the water intake holes in the lower unit for obstruction Low engine oil level Refer to Fuel and Oil Checking and Adding Engine Oil Instrumentation VesselView Your power package may be connected to a SmartCraft VesselView display VesselView 7 is a comprehensive ...

Page 11: ...ls on the warning functions monitored by the system refer to the manual provided with your gauge package System Link Digital Gauges Some instrumentation packages include gauges that augment the information provided by VesselView and the SmartCraft tachometer and speedometer The owner and operator should be familiar with all the instruments and their functions on the boat Have your boat dealer expl...

Page 12: ...be started NOTE The key can only be removed with the key switch in the OFF position b Bilge blower switch if equipped Operates the bilge blower if equipped Emergency Stop Switch An emergency stop E stop switch is used to turn off the engines in an emergency situation such as a person overboard or a tangled propeller When activated an E stop switch interrupts the power supply to the engine and tran...

Page 13: ...st a Lanyard cord clip b Lanyard decal c Lanyard stop switch Accidental ejections such as falling overboard are more likely to occur in Low sided sport boats Bass boats High performance boats Accidental ejections can also occur from Poor operating practices Sitting on the seat or gunwale at planing speeds Standing at planing speeds Operating at planing speeds in shallow or obstacle infested waters...

Page 14: ... Operator s Manual Remote Controls Your boat may be equipped with Mercury Precision Parts or Quicksilver remote controls All controls may not have all features shown Consult your dealer for a description or demonstration of your remote control Panel Mount Features a Neutral lock button b Throttle only button c Lanyard stop switch d Control handle tension adjustment screw e Control handle Neutral l...

Page 15: ...l handle Refer to the instructions provided with the remote control for complete adjustment instructions Engine Electrical System Overload Protection If an electrical overload occurs a fuse will open blow Find and correct the cause of the electrical overload before replacing the fuse NOTE In an emergency when the engine must be operated and the cause of the electrical overload cannot be located an...

Page 16: ...ssel circuit breaker 10 A Engine Guardian System The Engine Guardian system monitors the critical sensors on the engine for any early indications of problems Engine Guardian is functional whenever your engine is operating so you never have to be concerned about whether or not you are protected The system will respond to a problem by sounding the warning horn for six seconds and or reducing engine ...

Page 17: ...ial number and part number label with bar codes b Engine data label Engine Data Label A tamper resistant engine data label is affixed to the engine at the time of manufacture It contains important information Note that the engine data label will not affect the fit function or performance of the engine and neither boatbuilders nor dealers may remove the engine data label or the engine component it ...

Page 18: ...ge Page 10 90 8M0113986 eng DECEMBER 2015 Technodrive Transmissions The transmission identification plate indicates gear ratio serial number and model 27943 Technodrive TM 345 identification plate 24657 Technodrive TM 485 A identification plate ...

Page 19: ...t 16 Starting a Cold Engine 16 Engine Warm Up 17 Starting a Warm Engine 17 Shifting 17 Engine Shut Down Stopping 17 Protecting People in the Water 18 While Boat is in Operation 18 While the Boat is Stationary 18 High Speed and High Performance 18 Passenger Safety In Pontoon Boats and Deck Boats 18 Boats Having An Open Front Deck 18 Boats With Front Mounted Raised Pedestal Fishing Seats 19 Wave and...

Page 20: ...r passengers are boarding unloading or are near the back stern of the boat Shifting the drive unit into neutral is not sufficient Use personal flotation devices Federal law requires that there be a U S Coast Guard approved life jacket personal flotation device correctly sized and readily accessible for every person onboard plus a throwable cushion or ring We strongly advise that everyone wear a li...

Page 21: ...further assistance from local law enforcement Carbon Monoxide Exposure Be Alert To Carbon Monoxide Poisoning Carbon monoxide CO is a deadly gas that is present in the exhaust fumes of all internal combustion engines including the engines that propel boats and the generators that power boat accessories By itself CO is odorless colorless and tasteless but if you can smell or taste engine exhaust you...

Page 22: ...ation Information Launching IMPORTANT Install the bilge drain plug before launching the boat Duty Cycle Rating Requirements IMPORTANT Damage caused by incorrect application or failure to operate the power package within the specified operating parameters will not be covered by the Mercury Marine Limited Warranty Mercury Diesel engines must be used in applications that meet the operation specificat...

Page 23: ...mited Warranty NOTICE Water trapped in the seawater section of the cooling system can cause corrosion or freeze damage Drain the seawater section of the cooling system immediately after operation or before any length of storage in freezing temperatures If the boat is in the water keep the seacock closed until restarting the engine to prevent water from flowing back into the cooling system If the b...

Page 24: ...perations upon initial start switch activation To begin the SmartStart sequence turn the ignition key switch to the START position and release or turn the ignition key switch to the run position and press and release the start stop switch Rather than holding the start button or key switch in position until the engine starts SmartStart controls the starting process automatically When the start swit...

Page 25: ...cility if you are unable to determine the problem Starting a Warm Engine 1 Turn on and run the engine compartment bilge blower if equipped for 5 minutes Or open the engine hatch to air out the bilge before attempting to start the engine 2 Place the remote control handle in neutral 3 Turn the key switch to START position and release the key when the engine starts 4 Ensure that all the instrumentati...

Page 26: ... before allowing people in the water near the boat High Speed and High Performance If your boat is considered a high speed or high performance boat we recommend that you never operate it at its high speed capability without first requesting an initial orientation and demonstration ride with your dealer or an operator experienced with your boat For additional information refer to the Hi Performance...

Page 27: ...ly veer in a new direction Such a sharp change in direction or turn can cause occupants to be thrown out of their seats or out of the boat There is another less common hazardous result from allowing your boat to launch off of a wave or wake If the bow of your boat pitches down far enough while airborne upon water contact it may penetrate under the water surface and submarine for an instant This wi...

Page 28: ...package Conditions Affecting Operation Weight Distribution Passengers and Gear Inside the Boat Shifting weight to rear stern Generally increases speed and engine RPM Causes bow to bounce in choppy water Increases danger of following wave splashing into the boat when coming off plane At extremes can cause the boat to porpoise Shifting weight to front bow Improves ease of planing Improves rough wate...

Page 29: ...re has been completed IMPORTANT Never operate the starter motor longer than 15 seconds at a time to avoid overheating the starter motor If the engine does not start wait one minute to allow the starter motor to cool then repeat the starting procedure 1 Refer to the appropriate Starting Shifting and Stopping section and start the engine 2 Operate the engine at a fast idle until it has reached norma...

Page 30: ...n throttle RPM End of First Season Checkup At the end of the first season of operation contact an authorized repair facility to discuss or perform scheduled maintenance items If you are in an area where the product is operated continuously year round you should contact your dealer at the end of the first 100 hours of operation or once yearly whichever occurs first ...

Page 31: ...015 Page 23 Section 3 Specifications Table of Contents Fuel Requirements 24 Diesel Fuel in Cold Weather 24 Antifreeze Coolant 24 Engine Oil 25 Engine Specifications Inboard Models 25 Fluid Specifications 26 Engine 26 Transmission 26 Approved Paints 26 3 ...

Page 32: ... NOTE If your engine suddenly becomes noisy after a fill up you possibly received substandard fuel with a low cetane rating On engines that use high sulphur content diesel fuel this will greatly increase Corrosion on metal parts Deterioration of elastomer and plastic parts Excessive wear of internal engine parts particularly bearings and corrosion and extensive damage to other engine parts Difficu...

Page 33: ...aintenance for respective change intervals Tube Ref No Description Where Used Part No 122 Extended Life Antifreeze Coolant Closed cooling system 92 877770K1 Engine Oil NOTICE Discharge of oil coolant or other engine drive fluids into the environment is restricted by law Use caution not to spill oil coolant or other fluids into the environment when using or servicing your boat Be aware of the local...

Page 34: ...proper fluid level indicator to determine the exact quantity of oil or fluid required Engines with Closed Cooling System Oil Cooler 2 0L System Capacity Fluid Type Part Number Engine oil with filter 5 2 L 5 5 US qt 5W 30 Full Synthetic TDI Engine Oil 92 8M0069603 Closed cooling system 7 7 L 8 1 US qt Extended Life Coolant Antifreeze concentrated 92 8M0070979 Transmission NOTE Capacities are for th...

Page 35: ... Change Fluid 38 Engine Coolant 40 Checking and Filling the Closed Cooling System 40 Draining the Closed Cooling System 42 Air Filter 43 Removal 43 Inspection 44 Installation 44 Water Separating Fuel Filter 45 Draining 45 Replacing 46 Filling 48 Fuel System 49 Priming 49 Filling Bleeding 49 Fuel Tank Cleaning and Flushing 49 Seawater System 49 Draining the Seawater System 49 Checking the Seawater ...

Page 36: ...mpartment may be an irritant cause difficulty breathing or may ignite resulting in a fire or explosion Always ventilate the engine compartment before servicing the power package IMPORTANT Refer to Maintenance Schedule for a complete listing of all scheduled maintenance to be performed Some listings can be done by the owner or operator while others should be performed by a Mercury Diesel authorized...

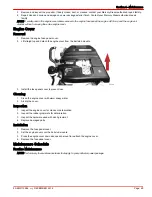
Page 37: ...e panel cover 2 Lift straight up and detach the engine cover from the ball stud mounts 53354 3 Install the fuse panel cover to prevent loss Cleaning 1 Clean the engine cover with warm soapy water 2 Air dry the cover Inspection 1 Inspect the engine cover for cracks or deterioration 2 Inspect the rubber grommets for deterioration 3 Inspect the hardware used with each grommet 4 Replace damaged parts ...

Page 38: ...ally Touch up the power package with paint and spray with Corrosion Guard Clean the transmission oil filter and change the transmission oil Every 100 hours or annually whichever occurs first Check the steering system and the remote control for loose missing or damaged parts Lubricate the cables and linkages Check the engine alignment Torque the engine mounts Check the electrical system for loose d...

Page 39: ...ne carefully The oil level must be maintained between the minimum and the maximum oil level mark on the dipstick To ensure that you are not getting a false reading observe the following before checking the oil level If the boat is in the water ensure that the boat is at rest If the boat is on a trailer raise or lower the bow until the boat is sitting as it does at rest in the water Allow five minu...

Page 40: ... with oil always use the dipstick to confirm the oil level 3 Install the oil fill cap Changing Oil and Filter Refer to the Maintenance Schedule for the change interval Change the engine oil before placing the boat in storage IMPORTANT Change the engine oil when the engine is warm from operation Warm oil flows more freely carrying away more impurities Use only recommended engine oil Engine Oil 2 0L...

Page 41: ...to the specified torque Engine Coolant Oil Cooler Description Nm lb in lb ft Drain plug 19 168 9 Install a new O ring onto the oil filter cover and lubricate with engine oil 10 Push the filter element into the cover until it is locked Listen for a click 11 Install the oil filter housing cover onto the oil filter housing and tighten to the specified torque IMPORTANT Overtightening the cover may cau...

Page 42: ...ipstick 18 Remove the oil fill cap and fill the engine with oil Refer to Filling IMPORTANT When filling the engine with oil always use the dipstick to determine how much oil is required 19 Replace and secure the oil fill cap 20 Start the engine and check for leaks 21 Dispose of the waste oil filter and O ring as directed by local ordinances TM 345 Technodrive Transmission Fluid Checking 1 Remove t...

Page 43: ... oil level is low add transmission oil to bring the level up to the maximum mark on the dipstick See Filling NOTE If the transmission oil level was extremely low see your local Mercury Diesel authorized repair facility 8 Clean and install the dipstick Filling 1 If necessary add the specified transmission oil through the dipstick receptacle to bring the level up to the maximum mark on the dipstick ...

Page 44: ...tion Nm lb in lb ft Transmission oil drain plug 17 150 6 Clean the exterior of the transmission around the oil filter assembly 7 Loosen the retaining nut 27978 Transmission oil filter retaining nut 8 Remove the filter element 9 Clean the oil filter element using the cleaning solvent Tube Ref No Description Where Used Part No Cleaning solvent Transmission filter element Obtain Locally 10 Lubricate ...

Page 45: ...aded hole NOTE The fluid level may be somewhat over the maximum mark as some of the fluid from the transmission fluid cooler and hoses may have drained back into the transmission 3 If the fluid level is below the minimum mark on the dipstick add transmission fluid See Add Fluid a Dipstick b Maximum fluid level c Minimum fluid level IMPORTANT To accurately check the fluid level operate the engine a...

Page 46: ...Fluid NOTICE Discharge of oil coolant or other engine drive fluids into the environment is restricted by law Use caution not to spill oil coolant or other fluids into the environment when using or servicing your boat Be aware of the local restrictions governing the disposal or recycling of waste and contain and dispose of fluids as required 1 Remove the fill cap and dipstick 2 Remove the transmiss...

Page 47: ...e the securing tab in the direction shown a Assembly nut b Securing tab 8 Remove the filter element a Filter element 9 Clean the filter element with a mild cleaning solvent obtained locally 10 Lubricate the O rings with SAE Engine Oil 30W Tube Ref No Description Where Used Part No 80 SAE Engine Oil 30W Transmission filter element O ring Obtain Locally 24608 a b 24618 a ...

Page 48: ...mbly by turning it clockwise 13 Tighten the assembly nut to the specified torque a Assembly nut b Securing tab Description Nm lb in lb ft Assembly nut 5 8 48 72 14 Fill the transmission to the proper level with the specified fluid See Add Fluid Engine Coolant CAUTION A sudden loss of pressure can cause hot coolant to boil and discharge violently resulting in serious injury from burns Allow the eng...

Page 49: ...ller neck 6 If the boat is out of the water both the engine and sterndrive must be supplied with cooling water Refer to Flushing the Seawater System section of this manual NOTICE Without sufficient cooling water the engine the water pump and other components will overheat and suffer damage Provide a sufficient supply of water to the water inlets during operation 7 Do not install the pressure cap S...

Page 50: ...ar round with the required coolant If the engine will be exposed to freezing temperatures ensure that the closed cooling section is filled with a solution of low silicate ethylene glycol antifreeze and deionized purified water properly mixed to protect the engine to the lowest temperature to which it will be exposed Do not use propylene glycol antifreeze in the closed cooling section of the engine...

Page 51: ...n the closed cooling system See your local Mercury Diesel authorized repair facility 8 Install and tighten the engine coolant drain plug 9 Install the water separating fuel filter Refer to Water Separating Fuel Filter Replacing 10 Fill the system with the specified coolant Refer to Checking and Filling the Closed Cooling System Air Filter Removal 1 Loosen the clamp and remove the oil separator ven...

Page 52: ...IMPORTANT The air filter element is an integral component and must be clean and dry for proper filtration and engine performance Do not apply oil to the air filter element 1 Slide the air filter element onto the air filter housing Ensure that the element covers all of the holes on the air filter housing a Air filter element b Air filter housing 2 Install the air filter housing onto the turbocharge...

Page 53: ...er This fuel filter needs to be replaced at specified intervals or whenever water is detected in the fuel whichever comes first The operator may be alerted that the WIF sensor has detected water in the fuel depending upon the boat instrumentation package and if equipped A fault code may be displayed on a system viewer The audio warning system may sound See Features and Controls Drain or replace th...

Page 54: ... be cleaned and reused It must be replaced 1 Disconnect both battery cables from the battery 2 Disconnect the WIF sensor wires if equipped 3 Remove the water separating fuel filter and sealing ring from the mounting bracket Do not use a filter wrench Typical a Water separating fuel filter NOTE It may be necessary to keep the existing drain cap and use it on the new filter Be sure to replace the O ...

Page 55: ...et Twist the filter by hand to secure the filter to the bracket Do not use a filter wrench Typical a Water separating fuel filter 9 Ensure that the drain cap is securely tightened 10 Connect the WIF sensor wires if equipped 11 Fill the water separating fuel filter with fuel Refer to Filling 12 Check the filter and drain cap for fuel leaks 13 Connect the battery cables 14 Start and operate the engi...

Page 56: ...fuel filter with the hand pump and primer plunger to ensure that unfiltered fuel does not get into the fuel system NOTE Follow this procedure after installing a new filter or if the fuel has been drained from the filter checking for water 1 Loosen the air vent bleed screw on the fuel filter bracket Typical a Air vent screw 2 Move the primer plunger up and down repeatedly The filter is full when an...

Page 57: ... the diesel fuel tank every 1000 hours or five years whichever occurs first Seawater System Draining the Seawater System CAUTION Water can enter the bilge when the drain system is open damaging the engine or causing the boat to sink Remove the boat from the water or close the seacock disconnect and plug the seawater inlet hose and ensure the bilge pump is operational before draining Do not operate...

Page 58: ...of the seawater system 4 Attach a temporary drain hose to the barbed fitting of the seawater drain valve Coolant oil cooler a Seawater drain valve b Oil filter housing 5 Open the seawater drain valve 6 A small diameter wire bore brush or stiff piece of wire can be used to clear the seawater drain valve of any debris 7 Disconnect the seawater inlet hose from the connector on the seawater pump a Sea...

Page 59: ...se clamps to the specified torque Description Nm lb in lb ft Hose clamp 5 6 50 Checking the Seawater Pickups 1 Ensure that the water inlet holes for the seawater pickup are clean and not obstructed Typical through hull seawater pickup Typical through transom seawater pickup a Water inlet holes Cleaning the Seawater Strainer NOTE Visually inspect the seawater strainer through its clear cover NOTICE...

Page 60: ...lean out any debris from the strainer housing and flush with clean water 5 Place the strainer back into strainer housing Ensure that it is fully and evenly seated into the bottom of the strainer housing 6 Inspect the strainer cover s O ring seal and replace if damaged or leaking 7 Install the strainer cover by turning it clockwise by hand Ensure that the strainer cover O ring is properly located a...

Page 61: ...rmation Whenever two or more dissimilar metals such as those found on this power package are submerged in a conductive solution such as saltwater polluted water or water with a high mineral content a chemical reaction takes place causing electrical current to flow between metals The electrical current flow causes the metal that is most chemically active or anodic to erode This erosion is known as ...

Page 62: ... of erosion Do not use a steel brush which might leave deposits that could accelerate corrosion 1 Remove the deposits 2 Inspect and measure the anode Compare the measurements to the specifications for a new sacrificial anode and replace the anode assembly when deteriorated 50 NOTE Sacrificial anodes are available only as an assembly Replace both the plug and anode as a unit Anode assembly a Anode ...

Page 63: ...n 4 Ensure that both the sterndrive and engine seawater pickup pumps are supplied sufficient cooling water 5 Start the engine and check for leaks Antifouling Paint IMPORTANT Corrosion damage that results from the improper application of anti fouling paint is not covered by the limited warranty In some areas it may be advisable to paint the bottom of the boat to help prevent marine growth Contact a...

Page 64: ...he ignition key before adjusting tension or inspecting belts 2 0L front cover removed a Serpentine belt b Power assisted steering belt Power Assisted Steering Pump Belt Inspection The 2 0 diesel engine uses a stretch belt to drive the power assisted steering pump The stretch belt is engineered to have a certain amount of elasticity and designed to have self tensioning and vibration damping charact...

Page 65: ...d to drive the power assisted steering pump This belt must be removed to service the serpentine belt Stretch belt service and maintenance procedures differ significantly from those that apply to standard accessory drive belts Should the serpentine belt need replacement consult your Mercury Diesel authorized repair facility 1 Inspect the serpentine belt for proper tension and for the following Exce...

Page 66: ...ng or charging battery produces gas that can ignite and explode spraying out sulfuric acid which can cause severe burns Ventilate the area around the battery and wear protective equipment when handling or servicing batteries Battery Precautions for Multiple Engines Alternators Alternators are designed to charge a single battery that supplies electrical power to the individual engine on which the a...

Page 67: ...sition In an emergency another engine s battery can be used to start an engine with a dead battery Battery Isolators Isolators can be used to charge an auxiliary battery used for powering accessories in the boat They should not be used to charge the battery of another engine in the boat unless the type of isolator is specifically designed for this purpose Generators The generator s battery should ...

Page 68: ...Section 4 Maintenance Notes Page 60 90 8M0113986 eng DECEMBER 2015 ...

Page 69: ... of Contents Cold Weather Freezing Temperature Seasonal Storage and Extended Storage 62 Cold Weather Freezing Temperature Storage 62 Preparing Your Power Package for Seasonal or Extended Storage 62 Seasonal Storage 63 Extended Storage Instructions 64 Battery 64 Recommissioning 64 5 ...

Page 70: ...ing operated for one month or more The length of time varies depending on the geographic location of the boat in storage Seasonal storage precautions and procedures include all of the steps for cold weather freezing temperature storage and some additional steps that must be taken when storage will last longer than the short time of cold weather freezing temperature storage Extended storage means s...

Page 71: ...cturer s recommendations 3 Fill a container with approximately 5 6 L 6 0 US qt of propylene glycol antifreeze and tap water mixed to manufacturer s recommendation to protect the engine to the lowest temperature to which it will be exposed during cold weather or extended storage 4 Disconnect the seawater inlet hose from the seawater pump Using an adapter if required temporarily connect an appropria...

Page 72: ...aining the Seawater System and drain the propylene glycol into a suitable container Dispose of the propylene glycol in accordance with federal state and local laws and guidelines 3 Ensure that all cooling system hoses are in good condition connected properly and clamped tightly Verify that all drain valves and drain plugs are installed and tight 4 Inspect all drive belts 5 Perform all lubrication ...

Page 73: ...ms 66 Troubleshooting Charts 66 Starter Motor Will Not Crank Engine or Cranks Slow 66 Engine Will Not Start or Is Hard to Start 66 Engine Runs Rough Misses or Backfires 66 Poor Performance 66 Incorrect Engine Temperature 67 Low Engine Oil Pressure 67 Battery Will Not Charge 67 Remote Control Operates Hard Binds Has Excessive Free play or Makes Unusual Sounds 67 6 ...

Page 74: ...ent Faulty electrical stop circuit Have a Mercury Diesel authorized repair facility service the electrical stop circuit Clogged fuel filters Replace fuel filters Stale or contaminated fuel Drain tank Fill with fresh fuel Fuel line or tank vent line kinked or clogged Replace kinked lines or blow out the lines with compressed air to remove obstruction Air in fuel injection system Purge fuel injectio...

Page 75: ... collapse Replace hose with wire reinforced design Faulty thermostats Replace See a Mercury Diesel authorized repair facility Low Engine Oil Pressure Possible Cause Remedy Faulty senders Have system checked by a Mercury Diesel authorized repair facility Insufficient oil in crankcase Check and add oil Excessive oil in crankcase causing it to become aerated Check and remove required amount of oil Ch...

Page 76: ...Section 6 Troubleshooting Page 68 90 8M0113986 eng DECEMBER 2015 Possible Cause Remedy Improper shift cable adjustment Have adjustment checked by a Mercury Diesel authorized repair facility ...

Page 77: ...ervice Away From Home 70 Stolen Power Package 70 Attention Required After Submersion 70 Replacement Service Parts 70 Parts and Accessories Inquiries 70 Resolving a Problem 70 Contact Information for Mercury Marine Customer Service 71 Customer Service Literature 71 English Language 71 Other Languages 72 Ordering Literature 72 United States and Canada 72 Outside the United States and Canada 72 7 ...

Page 78: ...e in both fresh and saltwater environments These conditions require numerous special parts Exercise care when replacing marine engine parts because specifications are different from those of the standard automotive engine For example one of the most important special replacement parts is the cylinder head gasket Marine engines cannot use steel type automotive head gaskets because saltwater is high...

Page 79: ...erviers Belgium Fax 32 87 31 19 65 Mexico Central America South America Caribbean Telephone 1 954 744 3500 Mercury Marine 11650 Interchange Circle North Miramar FL 33025 U S A Fax 1 954 744 3535 Japan Telephone 072 233 8888 Kisaka Co Ltd 4 130 Kannabecho Sakai shi Sakai ku 5900984 Osaka Japan Fax 072 233 8833 Asia Singapore Telephone 65 65466160 Brunswick Asia Pacific Group T A Mercury Marine Sing...

Page 80: ...r Mercury Marine power package contact your nearest Mercury Marine dealer or contact Mercury Marine Telephone Fax Mail 920 929 5110 USA only 920 929 4894 USA only Mercury Marine Attn Publications Department P O Box 1939 Fond du Lac WI 54936 1939 Outside the United States and Canada Contact your nearest Mercury Marine authorized service center to order additional literature that is available for yo...

Page 81: ...Section 8 Maintenance Log 90 8M0113986 eng DECEMBER 2015 Page 73 Section 8 Maintenance Log Table of Contents Scheduled Maintenance Log 74 Vessel Maintenance Notes 75 8 ...

Page 82: ...ame Signature Date 200 Hours Actual Hours Service Notes Dealer Name Signature Date 300 Hours Actual Hours Service Notes Dealer Name Signature Date 400 Hours Actual Hours Service Notes Dealer Name Signature Date 500 Hours Actual Hours Service Notes Dealer Name Signature Date 600 Hours Actual Hours Service Notes Dealer Name Signature Date ...

Page 83: ...og 90 8M0113986 eng DECEMBER 2015 Page 75 Vessel Maintenance Notes Record all general maintenance performed on your power package here Save all work orders and receipts Date Engine Hours Maintenance Completed Servicing Dealer ...

Page 84: ......

Page 85: ...www mercurymarine com P O Box 1939 Fond du Lac WI 54936 1939 USA www brunswick marine com Parc Industriel de Petit Rechain B 4800 Verviers Belgium Mercury Marine All rights reserved Printed in U S A 90 8M0113986 NOVEMBER 2015 2 0L Diesel Engine Inboard Models OPERATION MAINTENANCE MANUAL ...

Reviews: