background image

Section 2 - Getting to Know Your Power Package

90-8M0074352   

eng

  OCTOBER  2012

Page  31

Helm Transfer

!

 WARNING

Avoid serious injury or death from loss of boat control. The boat operator should never leave the active station while engine is

in gear. Helm transfer should only be attempted while both stations are manned. One‑person helm transfer should only be

performed while engine is in neutral.

NOTE: Neutral position is preferred when doing a station transfer. If conditions do not allow the remote control to be placed in

the neutral position, a helm transfer can be done while in gear.

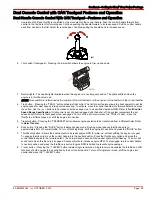
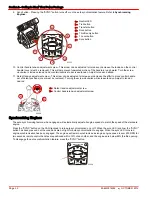
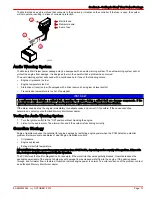
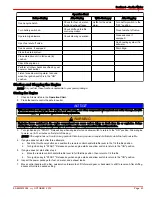
The helm transfer function allows the boat operator to select which helm is in control of engine operation. Pressing the

"TRANSFER" button two times allows engine control to be transferred to a new helm. When a helm transfer is initiated, the

control will automatically start adjusting engine RPM and gear position to match the control handle setting at the new helm.

Adjust the control handles to the desired throttle and gear position.
Once the "TRANSFER" button is pressed, the transfer LED will light up and one beep will sound. Press the "TRANSFER"

button again to complete the helm transformation. When helm transformation is complete, another beep will sound and the

transfer LED will turn off.

NOTE: There is a 10 second time frame to complete a helm transfer. If the helm transfer is not completed, the action will be

cancelled and a double beep will sound. Pressing the "TRANSFER" button again will reinitiate a helm transfer.

SYNC

1 LEVER

NEUTRAL

TROLL

THROTTLE
     ONLY

DOCK

TRANSFER

+

-

22593

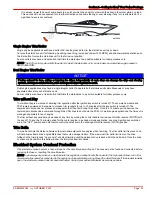
Synchronizing Helms Prior to Transfer

Pressing the "TRANSFER" button allows the boat operator 10 seconds to match up the control handle settings at the new helm

with the handle settings that are at the old (to be inactive) helm. If the handles are not matched, the neutral lights will flash. The

light blinks faster as the handles are nearing match position. Once the light stays on continuously, the handles are matched and

the button can be pressed again to complete the transfer. This completes the transfer process, and gives control to the new

station. If the helm transfer is not completed within 10 seconds, the action will be cancelled.

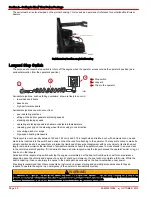
Zero Effort Features

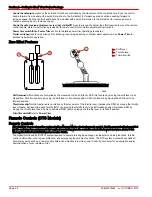
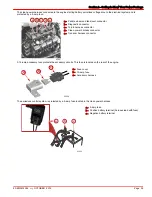
a -

Shift lever

b -

Throttle lever

c -

Trim/tilt switch

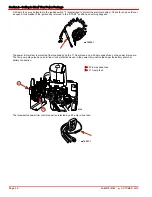
Shift lever 

‑ 

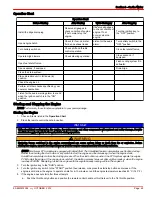
Shift functions are controlled by the movement of the shift lever. Shift into reverse by moving the shift lever to its

aft position. Shift into neutral by moving the shift lever to its center position. Shift into forward by moving the shift lever to its

forward position.

c

a

b

5656

Summary of Contents for 8.2 MAG HO

Page 1: ...t Code 1322 Country Norway ID Number 0575 Conformity assessment module used for exhaust emissions B C B D B E B F G H Conformity assessment module used for noise emissions A Aa G H Other Community Directives applied Electromagnetic Compatibility Directive 2004 108 EC Description of Engines and Essential Requirements Engine Type Fuel Type Combustion Cycle z or sterndrive with integral exhaust Petro...

Page 2: ...tive document method Technical file Please specify in more detail mandatory standard Annex 1 B Exhaust Emissions B 1 engine identification B 2 exhaust emission requirements EN ISO 8178 1 1996 B 3 durability B 4 owner s manual ISO 8665 1995 Annex 1 C Noise Emissions C 1 Noise emission levels EN ISO 14509 C 2 Owner s manual Owner s manual This declaration of conformity is issued under the sole respo...

Page 3: ...njoy using this product for many boating seasons To ensure maximum performance and carefree use we ask that you thoroughly read this manual The Operation Maintenance and Warranty Manual contains specific instructions for using and maintaining your product We suggest that this manual remain with the product for ready reference whenever you are on the water Thank you for purchasing one of our Mercur...

Page 4: ...in death or serious injury CAUTION Indicates a hazardous situation which if not avoided could result in minor or moderate injury NOTICE Indicates a situation which if not avoided could result in engine or major component failure IMPORTANT Identifies information essential to the successful completion of the task NOTE Indicates information that helps in the understanding of a particular step or acti...

Page 5: ... Non Emissions Control Commercial Use Corrosion 14 MAG Sterndrive Series Non Emissions Control Government Use Corrosion 14 Global Warranty Application Charts 8 2 MAG H O SeaCore Non ECT 15 SeaCore Sterndrive Series Non Emissions Control Recreational Use 15 SeaCore Sterndrive Series Non Emissions Control Commercial Use 15 SeaCore Sterndrive Series Non Emissions Control Government Use 16 SeaCore Ste...

Page 6: ...ng Seats 48 Wave and Wake Jumping 48 Impact with Underwater Hazards 49 Drive Unit Impact Protection 49 Operating with Low Water Inlets in Shallow Water 50 Conditions Affecting Operation 50 Weight Distribution Passengers and Gear Inside the Boat 50 The Bottom of the Boat 50 Cavitation 50 Ventilation 50 Elevation and Climate 51 Propeller Selection 51 Getting Started 51 20 Hour Break In Period 51 Aft...

Page 7: ...4 Boat Out of the Water Bravo Sterndrive 94 Boat in the Water Bravo Sterndrive 95 Boat Out of the Water Alternative Water Pickups 96 Boat in the Water Alternative Water Pickups 96 SeaCore Power Package Flushing Procedure 97 Models Using the Sterndrive Water Pickup 97 Section 6 Storage Cold Weather or Extended Storage 102 Preparing Power Package for Storage 102 Engine and Fuel System Preparation 10...

Page 8: ...ersion 118 Replacement Service Parts 118 Parts and Accessories Inquiries 118 Resolving a Problem 118 Contact Information for Mercury Marine Customer Service 119 Customer Service Literature 119 English Language 119 Other Languages 120 Ordering Literature 120 United States and Canada 120 Outside the United States and Canada 120 Section 9 Checklists Predelivery Inspection PDI 122 Customer Delivery In...

Page 9: ...10 How to Obtain Warranty Coverage Under This Limited Warranty 10 What is Not Covered 10 Expense of Claiming This Limited Warranty 11 Transfer of Warranty Australia and New Zealand Policy 11 Global Warranty Application Charts 8 2 MAG H O Non ECT 12 MAG Sterndrive Series Non Emissions Control Recreational Use 12 MAG Sterndrive Series Non Emissions Control Commercial Use 12 MAG Sterndrive Series Non...

Page 10: ...signated as the purchaser s copy must be given to you immediately after the card has been completely filled out by the selling distributor or dealer This card represents your factory registration identification and should be retained by you for future use when required Should you ever require warranty service on this product your dealer may ask you for the warranty registration card to verify date...

Page 11: ...ders that successfully complete the program and meet all certification requirements earn Installation Quality System Certified Manufacturer status and receive an additional one 1 year of Mercury limited factory warranty coverage on all MerCruiser powered boats that are registered on and after the boatbuilder s certification date for all worldwide registrations Mercury has designated a section of o...

Page 12: ...uct is first sold to a commercial use retail purchaser or the date on which the product is first put into service whichever occurs first Commercial users of these products receive warranty coverage for either one 1 year from the date of first retail sale or the accumulation of 500 hours of operation whichever occurs first Commercial use is defined as any work related or employment related use of t...

Page 13: ...its recommended RPM range see the Operation Maintenance Warranty manual Operation of the product in a manner inconsistent with the recommended operation and duty cycle section of the Operation Maintenance Warranty manual Neglect Accident Submersion Improper installation proper installation specifications and techniques are set forth in the installation instructions for the product Improper service...

Page 14: ...ine to distribute the product in the country in which the sale occurred and then only after the Mercury Marine specified pre delivery inspection process is completed and documented Warranty coverage becomes available upon proper registration of the product by the authorized dealer Corrosion prevention devices specified in the Operation Maintenance Warranty manual must be in use on the boat and rou...

Page 15: ...ne to distribute the product in the country in which the sale occurred and then only after the pre delivery inspection process specified by Mercury Marine is completed and documented Warranty coverage becomes available upon proper registration of the product by the authorized dealer Corrosion prevention devices specified in the Operation Maintenance Warranty manual must be in use on the boat and r...

Page 16: ...d to the engine in a visible location at the time of manufacture by Mercury MerCruiser Please note that the low emissions certification will not affect the fit function or performance of the engine Boatbuilders and dealers may not remove the label or the part it is affixed to before sale If modifications are necessary contact Mercury MerCruiser about the availability of replacement decals before p...

Page 17: ...rc_info mercmarine com What is Covered Mercury Marine warrants its new products to be free of defects in material and workmanship during the period described below The benefits to the consumer given by the warranty are in addition to other rights and remedies of the consumer under a law in relation to the goods or services to which the warranty relates Guarantees Under Australian Consumer Law Our ...

Page 18: ...the product by the authorized dealer Inaccurate warranty registration information regarding recreational use or subsequent change of use from recreational to commercial unless properly registered may void the warranty at the sole discretion of Mercury Marine Routine maintenance must be performed according to the maintenance schedule in the Operation Maintenance and Warranty manual in order to obta...

Page 19: ...idental or consequential damages are not covered by this limited warranty Also expenses associated with the removal or replacement of boat partitions or other material in order to gain access to the product are not covered by this limited warranty No individual or entity including Mercury Marine authorized dealers has been given authority by Mercury Marine to make any affirmation representation or...

Page 20: ...Quality Certified Boat Manufacturer Americas Excluding Brazil 1 Year 2 Years Latin America 1 Year 2 Years Brazil 2 Years 2 Years Europe CIS South Africa 2 Years 3 Years Middle East Africa 1 Year 2 Years Australia New Zealand 2 Years 2 Years Japan 2 Years Starting 01 01 2013 2 Years Starting 01 01 2013 South Pacific 2 Years 2 Years Other Asian Regions 1 Year 1 Year MAG Sterndrive Series Non Emissio...

Page 21: ... Hours Middle East Africa 1 Year or 500 Hours 1 Year or 500 Hours Australia New Zealand 1 Year or 500 Hours 1 Year or 500 Hours Japan 1 Year or 500 Hours 1 Year or 500 Hours South Pacific 1 Year or 500 Hours 1 Year or 500 Hours Other Asian Regions 1 Year or 500 Hours 1 Year or 500 Hours MAG Sterndrive Series Non Emissions Control Recreational Use Corrosion Recreational Application Standard Limited...

Page 22: ... Zealand 1 Year or 500 Hours Japan 1 Year or 500 Hours South Pacific 1 Year or 500 Hours Other Asian Regions 1 Year or 500 Hours MAG Sterndrive Series Non Emissions Control Government Use Corrosion Government Application Standard Limited Corrosion Warranty by Region for All Boat Manufacturers Region All Engines MAG High Output Americas Excluding Brazil 3 Years Latin America 1 Year or 500 Hours Bra...

Page 23: ...rs Starting 01 01 2013 South Pacific 2 Years 2 Years Other Asian Regions 1 Year 1 Year SeaCore Sterndrive Series Non Emissions Control Commercial Use Commercial Application Standard Limited Warranty by Region and Boat Manufacturer All Engines MPI MAG High Output Region Non Installation Quality Certified Boat Manufacturer Installation Quality Certified Boat Manufacturer Americas Excluding Brazil 1 ...

Page 24: ... Hours Middle East Africa 1 Year or 500 Hours 1 Year or 500 Hours Australia New Zealand 1 Year or 500 Hours 1 Year or 500 Hours Japan 1 Year or 500 Hours 1 Year or 500 Hours South Pacific 1 Year or 500 Hours 1 Year or 500 Hours Other Asian Regions 1 Year or 500 Hours 1 Year or 500 Hours SeaCore Sterndrive Series Non Emissions Control Recreational Use Corrosion Recreational Application Standard Lim...

Page 25: ...cluding Brazil 3 Years Latin America 1 Year or 500 Hours Brazil 1 Year or 500 Hours Europe CIS South Africa 1 Year or 500 Hours Middle East Africa 1 Year or 500 Hours Australia New Zealand 1 Year or 500 Hours Japan 1 Year or 500 Hours South Pacific 1 Year or 500 Hours Other Asian Regions 1 Year or 500 Hours Emission Control Warranty Information Important Information To identify the applicable emis...

Page 26: ...ered by a separate emission control component warranty The product s Mercury MerCruiser manufacturer s warranty is not affected by the engine s designation under Federal EPA or California emission control regulations ECI Label Standard of Compliance FAMILY XXXXXXXXXXXX EMISSION CONTROLINFORMATION NOT FOR SALE IN US THIS ENGINE IS SOLELY FOR EXPORT AND IS THEREFORE EXEMPT UNDER 40 CFR 1068 230 FROM...

Page 27: ...4 Panel Mount Features 25 Console Mount Features 25 Zero Effort Features 26 Remote Controls DTS Models 26 Remote Controls 26 Panel Mount Features 27 Console Mount Features Single Engine 27 Slim Binnacle Console Mount Features Single Engine 28 Dual Console Control with CAN Trackpad Features and Operation 29 Dual Handle Console Control With CAN Trackpad Features and Operation 29 Synchronizing Engine...

Page 28: ...turer s key to numerous details which apply to your MerCruiser power package When contacting MerCruiser about service always specify model and serial numbers Information Decal The information decal is located on the coolant reservoir a Smartphone link b Service point information c Engine serial number d Transom serial number e Sterndrive serial number f Specifications Smartphone Link Scan the smar...

Page 29: ... port side of the sterndrive 33533 Bravo sterndrive information on ground plate The serial number is also stamped on the driveshaft housing behind the back cover This is used as a permanent reference for authorized MerCruiser dealers 44426 Bravo sterndrive serial number stamping Bravo Transom Serial Number The Bravo transom serial number is stamped in the U bolt plate of the Bravo transom assembly...

Page 30: ...witch and a snap on the other end for attaching to the operator The lanyard is coiled to make its at rest condition as short as possible to minimize the likelihood of lanyard entanglement with nearby objects Its stretched out length is made to minimize the likelihood of accidental activation should the operator choose to move around in an area close to the normal operator s position If it is desir...

Page 31: ...anyard from the operator Instrumentation Troll Control Speed Range Specification Troll Control Speed Range Specification Engine Model RPM 8 2 Mag 600 1000 8 2 Mag H O 650 1200 Digital Gauges A Mercury SmartCraft System instrument package can be purchased for this product A few of the functions the instrument package will display are engine RPM coolant temperature oil pressure requires a SmartCraft...

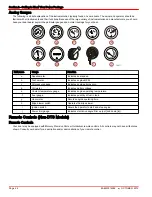
Page 32: ... d e f g h i j 14671 Reference Gauge Function a Speedometer Indicates boat speed b Tachometer Indicates engine RPM c Oil pressure gauge Indicates engine oil pressure d Voltmeter Indicates battery voltage e Coolant temperature gauge Indicates engine operating temperature f Fuel gauge Indicates quantity of fuel in tank g Hour meter Records engine operating time h Bilge blower switch Operates the bil...

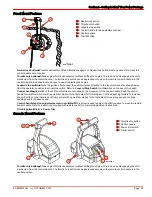
Page 33: ... for information on the use of this switch Control handle Operation of the shift and throttle are controlled by the movement of the control handle Push the control handle forward from neutral with a quick firm motion to the first detent for forward gear Continue pushing forward to increase speed Pull the control handle back from neutral with a quick firm motion to the first detent for reverse gear...

Page 34: ...ng the shift lever to its aft position Shift into neutral by moving the shift lever to its center position Shift into forward by moving the shift lever to its forward position Throttle lever Throttle functions are controlled by the movement of the throttle lever Increase the RPM by moving the throttle lever forward Achieve wide open throttle WOT by placing the throttle lever in its full forward po...

Page 35: ...justment screw This screw can be adjusted to increase or decrease the effort required to move the control handle out of the detent positions cover must be removed Turning the screw clockwise will increase tension Control handle friction adjustment screw This screw can be adjusted to increase or decrease the tension on the control handle cover must be removed This will help prevent unwanted motion ...

Page 36: ...etent for forward gear Continue pushing forward to increase speed Pull the control handle back from neutral with a quick firm motion to the first detent for reverse gear and continue pushing back to increase speed Trim tilt switch if equipped Refer to Power Trim Active light The active light is illuminated to show the remote control is active and ready for use Neutral light The neutral light is il...

Page 37: ...maximum RPM Refer to Troll Control Speed Range Specification If troll control is set at a desired speed and then shut off the system remembers the set speed and will return to that speed when reengaged To turn off the troll control press the TROLL button move the throttle to a different speed or shift the engine into neutral 5 Transfer button Pressing the TRANSFER button allows engine operation to...

Page 38: ...oved Turning the screw clockwise will increase tension Adjust to tension desired a Detent tension adjustment screw b Control handle tension adjustment screw Synchronizing Engines The auto synchronizing feature when engaged will automatically adjust all engine speeds to match the speed of the starboard engine Press the SYNC button on the CAN trackpad to turn auto synchronization on or off When the ...

Page 39: ... helm transformation is complete another beep will sound and the transfer LED will turn off NOTE There is a 10 second time frame to complete a helm transfer If the helm transfer is not completed the action will be cancelled and a double beep will sound Pressing the TRANSFER button again will reinitiate a helm transfer SYNC 1 LEVER NEUTRAL TROLL THROTTLE ONLY DOCK TRANSFER 22593 Synchronizing Helms...

Page 40: ...ng launching low speed below 1200 RPM engine speed and shallow water operation WARNING Excessive trim can cause serious injury or death at high speeds Use caution when trimming the sterndrive and never trim out beyond the gimbal ring support flanges while the boat is underway or at engine speeds above 1200 RPM For best performance trim the sterndrive unit so that the boat bottom is at a 3 5 angle ...

Page 41: ...nd module and PCM remain powered and are able to process trim requests for up to 15 minutes after the key switch is turned off The command module does not process any requests other than trim during this period Once the 15 minute period expires the command module sends a command through the CAN lines to shut down the PCM On multi engine applications the timeout is managed separately for each engin...

Page 42: ...of the starter solenoid protects the engine wiring harness if an electrical overload occurs 43202 Four fuses protect the main power fuel pump ignition and accessory circuits Four 10 amp fuses protect the O2 sensors These fuses are located near the 14 pin harness connector a Good fuse b Bad fuse c Alternator and fuel pump circuit 20 amp fuse d Power to 14 pin helm harness 20 amp fuse e ECM driver p...

Page 43: ...ostic connector c 14 pin harness connector d Clean power harness connector e Transom harness connector A 15 amp accessory fuse protects the accessory circuits This fuse is located on the rear of the engine a Fuse cover b 15 amp fuse c Accessory harness The emissions control system is protected by a 5 amp fuse located in the clean power harness a 5 amp fuse b Positive battery terminal harness lead ...

Page 44: ...s turned to the START position and nothing happens mc70525 1 The power trim system is protected from overload by both a 110 amp fuse and a 20 amp spade fuse on the power trim pump The trim pump may also have an in line circuit protection device in the power trim positive lead near the battery switch or battery connection a 20 amp spade fuse b 110 amp fuse The three button power trim control panel ...

Page 45: ...zardous situation If the alarm sounds stop the engine immediately Investigate cause and correct it if possible If the cause cannot be determined contact your authorized Mercury MerCruiser dealer Testing the Audio Warning System 1 Turn the ignition switch to the ON position without cranking the engine 2 Listen for the audio alarm The alarm will sound if the system is functioning correctly Guardian ...

Page 46: ...Section 2 Getting to Know Your Power Package Notes Page 38 90 8M0074352 eng OCTOBER 2012 ...

Page 47: ... 44 Operation Chart 45 Starting and Stopping the Engine 45 Starting the Engine 45 Stopping the Engine 46 Throttle Only Operation 46 Trailering the Boat 47 Freezing Temperature Operation 47 Drain Plug and Bilge Pump 47 Protecting People in the Water 47 While You Are Cruising 47 While Boat Is Stationary 47 High Speed and High Performance Operation 47 Passenger Safety in Pontoon Boats and Deck Boats ...

Page 48: ...otation device one per person onboard Watch for signs of weather change and avoid foul weather and rough sea boating Tell someone where you are going and when you expect to return Passenger boarding Stop the engine whenever passengers are boarding unloading or are near the back stern of the boat Shifting the drive unit into neutral is not sufficient Use personal flotation devices Federal law requi...

Page 49: ...t beyond first aid 3 there is damage to boats or other property where the damage value exceeds 500 00 or 4 there is complete loss of the boat Seek further assistance from local law enforcement Carbon Monoxide Exposure Be Alert To Carbon Monoxide Poisoning Carbon monoxide CO is a deadly gas that is present in the exhaust fumes of all internal combustion engines including the engines that propel boa...

Page 50: ...ith no forward hatches open station wagon effect Basic Boat Operation Non DTS Models Launching and Boat Operation IMPORTANT Install the bilge drain plug prior to launching the boat Follow these guidelines when operating your boat to avoid possible water ingestion Do not turn the key off when the engine is above idle speed Do not use the lanyard stop switch to shut off the engine when operating abo...

Page 51: ...sufficient supply of water to the water inlets during operation WARNING Explosive fumes contained in the engine compartment can cause serious injury or death from fire or explosion Before starting the engine operate the bilge blower or vent the engine compartment for at least five minutes 3 Turn ignition key to START Release key when engine starts and allow switch to return to the ON position Allo...

Page 52: ...eutral position Moving the control lever from the idle neutral position to the idle forward or idle reverse position without pressing the throttle only button will shift the unit into the chosen gear Trailering the Boat Your boat can be trailered with the sterndrive unit in the up or down position Adequate clearance is required between the road and sterndrive when transporting If adequate road cle...

Page 53: ...TICE Without sufficient cooling water the engine the water pump and other components will overheat and suffer damage Provide a sufficient supply of water to the water inlets during operation WARNING Explosive fumes contained in the engine compartment can cause serious injury or death from fire or explosion Before starting the engine operate the bilge blower or vent the engine compartment for at le...

Page 54: ... The control system will not allow the engine to start if the lanyard stop switch is activated Throttle Only Operation NOTE When operating in throttle only neutral mode the DTS control system will not allow the engine speed to increase above 3500 RPM Zero effort remote controls Zero effort remote controls have separate throttle control and shift control levers Advancing the throttle control lever ...

Page 55: ...oving even coasting and the gear shift is in neutral there is sufficient force by the water on the propeller to cause the propeller to rotate This neutral propeller rotation can cause serious injury While Boat Is Stationary WARNING A spinning propeller a moving boat or any solid device attached to the boat can cause serious injury or death to swimmers Stop the engine immediately whenever anyone in...

Page 56: ... jumping can cause serious injury or death from occupants being thrown within or out of the boat Avoid wave or wake jumping whenever possible mc79680 1 Operating recreational boats over waves and wakes is a natural part of boating However when this activity is done with enough speed to force the boat hull partially or completely out of the water certain hazards arise particularly when the boat ree...

Page 57: ...or any broken or loose parts If damage is present or suspected the power package should be taken to an authorized Mercury MerCruiser dealer for a thorough inspection and necessary repair The boat should be checked for hull fractures transom fractures and water leaks Operating with damaged underwater drive components rudder or boat bottom could cause additional damage to other parts of the power pa...

Page 58: ...r The Bottom of the Boat To maintain maximum speed the boat bottom should be Clean free of barnacles and marine growth Free of distortion nearly flat where it contacts the water Straight and smooth fore and aft Marine vegetation may accumulate when the boat is docked This growth must be removed before operation it may clog the water inlets and cause the engine to overheat Cavitation Cavitation occ...

Page 59: ... After initial propeller selection the following common problems may require that the propeller be changed to a lower pitch Warmer weather and greater humidity cause a loss of RPM Operating in a higher elevation causes a loss of RPM Operating with a dirty boat bottom causes a loss of RPM Operating with increased load additional passengers pulling skiers causes a loss of RPM For better acceleration...

Page 60: ...ed Mercury MerCruiser dealer to discuss or perform scheduled maintenance items If you are in an area where the product is operated continuously year round you should contact your dealer at the end of the first 100 hours of operation or once yearly whichever occurs first 1 Require fluid and filter change after the first 25 hours and then every 100 hours ...

Page 61: ... Reformulated Oxygenated Gasoline USA Only 54 Gasoline Containing Alcohol 54 Engine Specifications 54 8 2 MAG 8 2 MAG H O and SeaCore 8 2 MAG 8 2 MAG H O 54 Engine Oil 55 Fluid Specifications 56 Engine 56 Bravo Sterndrives 56 Power Assisted Steering and Power Trim Fluids 56 Approved Power Assisted Steering Fluids 56 Approved Power Trim Fluids 57 4 ...

Page 62: ...alcohol content in the gasoline We do not know what percentage your boat s fuel system will withstand Contact your boat manufacturer for specific recommendations on your boat s fuel system components fuel tanks fuel lines and fittings Be aware that gasoline containing alcohol may cause increased Corrosion of metal parts Deterioration of rubber or plastic parts Fuel permeation through the rubber fu...

Page 63: ...tion requirements for catalyzed engines differ from the requirements for noncatalyzed engines Some marine grade lubricants contain high levels of phosphorus which can damage the catalyst system on MerCruiser engines Although these high phosphorus lubricants may allow acceptable engine performance exposure over time will damage the catalyst Catalysts damaged by lubricants containing high levels of ...

Page 64: ...ngine Oil 20W 40 Seawater cooling system winterization use only 20 L 21 US qt Propylene glycol and purified water Closed cooling system 17 4 L 18 4 US qt Mercury Extended Life Coolant Antifreeze or extended life ethylene glycol 5 100 antifreeze mixed 50 50 with purified water NOTICE Using propylene glycol antifreeze in the closed cooling system can damage the cooling system or the engine Fill the ...

Page 65: ... 4 Specifications 90 8M0074352 eng OCTOBER 2012 Page 57 Approved Power Trim Fluids Description Part Number Power Trim and Steering Fluid 92 858074K01 SAE Engine Oil 10W 30 Obtain locally SAE Engine Oil 10W 40 ...

Page 66: ...Section 4 Specifications Notes Page 58 90 8M0074352 eng OCTOBER 2012 ...

Page 67: ...on 75 Lubrication 76 Steering System 76 Throttle Cable 78 Shift Cable Typical 78 Shift Cable DTS 78 Sterndrive U Joint Shaft Splines and O Rings Sterndrive Unit Removed 79 Engine Coupler 79 Driveshaft Extension Models 79 Propellers 80 Propeller Repair 80 Bravo Sterndrive Propeller Removal 80 Bravo One Models 80 Bravo Two Models 81 Bravo Three Models 82 Bravo Sterndrive Propeller Installation 83 Br...

Page 68: ... fill out the Warranty Registration Card completely and mail it to the factory immediately upon sale of the new product Maintenance WARNING Performing service or maintenance without first disconnecting the battery can cause product damage personal injury or death due to fire explosion electrical shock or unexpected engine starting Always disconnect the battery cables from the battery before mainta...

Page 69: ...wer package often and at regular intervals to help maintain its top operating performance and correct potential problems before they occur The entire power package should be checked carefully including all accessible engine parts Check for loose damaged or missing parts hoses and clamps tighten or replace as necessary Check plug leads and electrical leads for damage Remove and inspect the propelle...

Page 70: ... U joints and tailstock input and output bearings Every 300 hours or 3 years Check the engine mount nuts for tightness and torque if necessary Replace spark plugs Inspect the spark plug wires and replace as necessary Check the electrical system for loose damaged or corroded fasteners Check the cooling system and the exhaust system hose clamps for tightness Inspect both systems for damage or leaks ...

Page 71: ...l restrictions governing the disposal or recycling of waste and contain and dispose of fluids as required Checking 1 Stop the engine Allow approximately five minutes for the oil to drain into the oil pan The boat must be at rest in the water 2 Remove the dipstick Wipe the dipstick clean and install it fully into the dipstick tube Wait 60 seconds to allow trapped air to vent a Oil dipstick handle b...

Page 72: ...g range mark on the dipstick Recheck the oil level 3 Replace the fill cap All Models Capacity Fluid Type Engine oil with filter 6 5 L 7 US qt Mercury Full Synthetic MerCruiser Engine Oil 20W 40 Engine Oil and Filter Replace the oil filter at every oil change See Maintenance Schedule for the change interval Engine oil should be changed before placing the boat in storage IMPORTANT Change engine oil ...

Page 73: ...red Replace the dipstick 6 Add the required amount of the recommended oil to bring the level up to the bottom of the OK range on the dipstick 7 With the boat at rest in the water repeat steps 5 and 6 if necessary NOTE Adding 0 95 L 1 US qt of engine oil raises the level from the bottom of the operating range to the top of the operating range All Models Capacity Fluid Type Engine oil with filter 6 ...

Page 74: ...e cause and correct Closed Cooling System Coolant Requirement NOTICE Using propylene glycol antifreeze in the closed cooling system can damage the cooling system or the engine Fill the closed cooling system with an ethylene glycol antifreeze solution suitable to the lowest temperature to which the engine will be exposed NOTE All factory installed closed cooling systems come filled with Extended Li...

Page 75: ...system can damage the cooling system or the engine Fill the closed cooling system with an ethylene glycol antifreeze solution suitable to the lowest temperature to which the engine will be exposed The coolant section of the closed cooling system must be filled with a 50 50 mixture of Extended Life Antifreeze Coolant and distilled water Tube Ref No Description Where Used Part No 122 Extended Life A...

Page 76: ...rge violently resulting in serious injury from burns Allow the engine to cool down before removing the coolant pressure cap 7 After the engine has cooled completely recheck the coolant level and add coolant if necessary 8 If the reservoir was completely emptied of coolant a significant amount of air remains in the cooling system Refill the reservoir to the FULL mark repeat the warm up cool down cy...

Page 77: ... gear lube monitor must be checked and filled if necessary at the beginning of each day when the engine is cold If the gear lube alarm sounds during the day s activity add the appropriate amount of gear lube to the monitor bottle NOTE If filling the entire sterndrive see Changing 1 Remove the gear lube monitor cap 2 Fill the monitor with the specified fluid until the gear lube is at the recommende...

Page 78: ...ing washer IMPORTANT If any water drains from the unit or if the fluid appears milky the sterndrive unit is leaking See your authorized Mercury MerCruiser dealer 7 Lower the sterndrive unit so the propeller shaft is level IMPORTANT Use only Mercury Quicksilver High Performance Gear Lubricant in the sterndrive unit 8 Fill the sterndrive unit through the oil fill and drain hole with specified gear l...

Page 79: ...y 14 Install the propeller Refer to Propellers 15 Check the oil level after the first use IMPORTANT Oil level in the gear lube monitor rises and falls during operation Always check the oil level when the sterndrive is cool and the engine is off Power Trim Fluid Checking IMPORTANT Check the oil level with the sterndrive unit in the full down in position only 1 Place the sterndrive unit in full down...

Page 80: ...of voltage at the engine s battery The voltage may go below the ECMs minimum required voltage Also the alternator on the other engine may now start charging This could cause a voltage spike in the engine s electrical system In either case the ECM could shut off When the voltage returns to the range that the ECM requires the ECM will reset itself and the engine will operate normally The ECM shuts o...

Page 81: ...amp to the specified torque Description Nm lb in lb ft Flame arrester clamp 6 2 55 5 Install the silencer Cleaning the IAC Muffler Non DTS Models Only WARNING Fuel is flammable and explosive Ensure that the key switch is off and the lanyard is positioned so that the engine cannot start Do not smoke or allow sources of spark or open flame in the area while servicing Keep the work area well ventilat...

Page 82: ...eration or at least once a year whichever occurs first 1 Pull the PCV valve out of the intake manifold and remove the PCV valve from the hose a Hose from plenum to PCV valve b PCV valve 2 Inspect the PCV valve and replace if necessary 3 Install the PCV valve into the intake manifold 4 Ensure that the PCV valve is tightly seated into the intake manifold We recommend the use of Mercury MerCruiser re...

Page 83: ...r cap 7 Unseat the filter assembly by grasping the filter assembly handle and pulling upward Do not remove the filter assembly from the Cool Fuel Module at this time 8 Allow any fuel that may be in the filter assembly to drain out through the bottom of the filter assembly and into the Cool Fuel Module filter reservoir 9 Remove the filter cup from the filter cap by grasping the filter cap and rotat...

Page 84: ...xist stop the engine immediately Recheck the filter installation clean spilled fuel and properly ventilate the engine compartment If leaks continue stop engine immediately and contact your authorized Mercury MerCruiser dealer Lubrication Steering System WARNING Incorrect cable lubrication can cause hydraulic lock leading to serious injury or death from loss of boat control Completely retract the e...

Page 85: ...ring pin a Steering pin Tube Ref No Description Where Used Part No Synthetic Blend MerCruiser Engine Oil SAE25W 40 Steering pin 92 883725K01 4 On dual engine boats Lubricate the tie bar pivot points Tube Ref No Description Where Used Part No Synthetic Blend MerCruiser Engine Oil SAE25W 40 Tie bar pivot points 92 883725K01 5 Upon first starting the engine turn the steering wheel several times to st...

Page 86: ...ivot points and guide contact surfaces 92 883725K01 Shift Cable Typical Lubricate the pivot points and the guide contact surfaces a Pivot points b Guide contact surfaces Shift Cable DTS Lubricate the pivot points and the guide contact surfaces a Pivot points b Guide contact surfaces Tube Ref No Description Where Used Part No Synthetic Blend MerCruiser Engine Oil SAE25W 40 Shift cable pivot points ...

Page 87: ...pproximately 8 10 pumps of grease from a typical hand operated grease gun NOTE If the boat is operated at idle for prolonged periods of time coupler should be lubricated every 50 hours Bravo drive coupler a Grease fitting Tube Ref No Description Where Used Part No 91 Engine Coupler Spline Grease Coupler 8M0071842 NOTE The coupler and shaft splines can be lubricated without removing the sterndrive ...

Page 88: ...ntact your authorized Mercury MerCruiser dealer Bravo Sterndrive Propeller Removal WARNING Rotating propellers can cause serious injury or death Never operate the boat out of the water with a propeller installed Before installing or removing a propeller place the drive unit in neutral and engage the lanyard stop switch to prevent the engine from starting Place a block of wood between the propeller...

Page 89: ...m the propeller shaft Bravo One models a Propeller shaft splines b Forward thrust hub c Flo Torque II drive hub d Propeller e Drive sleeve adapter f Tab washer g Propeller nut Bravo One XR models a Propeller shaft b Propeller hub insert with snubbers c Propeller d Thrust washer e Washer f Washer g Propeller nut Bravo Two Models 1 Straighten the bent tabs of the tab washer on the propeller shaft a ...

Page 90: ...dels 1 Place a block of wood between the propeller blade and the sterndrive s anti ventilation plate 2 Remove the bolt and washers securing the propeller shaft anode 3 Remove the propeller shaft anode a Propeller b Propeller shaft nut c Propeller shaft anode d Propeller shaft anode screw e Flat washer f Star washer 4 Turn aft propeller shaft nut counterclockwise to remove nut 5 Slide propeller and...

Page 91: ... engage the lanyard stop switch to prevent the engine from starting Place a block of wood between the propeller blade and the anti ventilation plate a Wood block b Propeller c Propeller nut under socket Bravo One Models IMPORTANT Use the correct rotation propeller The propeller rotation must match the direction of rotation of the propeller shaft 1 Coat the propeller shaft spline with one of the fo...

Page 92: ...75 55 NOTE Bravo One XR models do not use the tab washer 4 Models equipped with the tab washer Continue to tighten the propeller nut until the three tabs on the tab washer align with the grooves on the spline washer 5 Bend the three tabs down into the grooves a Propeller b Tab washer c Drive sleeve adapter d Tab bent down e Propeller nut Bravo Two Models IMPORTANT Use the correct rotation propelle...

Page 93: ...ntil the three tabs on the tab washer align with the grooves on the spline washer 5 Bend the three tabs down into the grooves a Propeller b Tab washer c Drive sleeve adapter d Tab bent down e Propeller nut Bravo Three 1 Coat the propeller shaft spline with one of the following Quicksilver lubricants Tube Ref No Description Where Used Part No 34 Special Lubricant 101 Propeller shaft splines 802859A...

Page 94: ...nstall the aft propeller 7 Install the propeller nut and tighten to the specified torque Description Nm lb in lb ft Bravo Three rear propeller nut 81 60 8 Install the propeller shaft anode and the screw and tighten to the specified torque Bravo Three a Rear propeller nut b Rear propeller c Rear propeller thrust hub d Front propeller nut e Front propeller f Front propeller thrust hub g Propeller sh...

Page 95: ...ernator pulley b Idler pulley c Power steering pump pulley d Water circulating pump pulley e Crankshaft pulley f Tensioner pulley g Seawater pump pulley h Belt routing diagram Checking Inspect the drive belt for Proper belt tension deflection Excessive wear Cracks Fraying Glazed surfaces Proper tension Use moderate thumb pressure on the belt at the location with the longest distance between two pu...

Page 96: ...pring tension slowly 1 Use a breaker bar and appropriate socket to relieve the tensioner Rotate the tensioner away from belt until it stops 2 Remove the belt from the idler pulley and slowly relieve the tension on the breaker bar a Tensioner pulley b Socket and breaker bar c Water circulating pump pulley d Idler pulley 3 Remove the belt and route the replacement belt according to the belt routing ...

Page 97: ...use a battery charger to maintain a minimum battery charge of 12 6 volts or above Boats equipped with a MerCathode system that do not have access to shore power must be operated often enough to maintain a minimum battery charge of 12 6 volts or above at all times Anodes and MerCathode System Locations IMPORTANT Replace sacrificial anodes if eroded 50 percent or more The following sacrificial anode...

Page 98: ...ects to the electrode harness 20340 Anode kit if equipped Mounted to the boat transom 20341 Trim cylinder anodes Mounted on each of the trim cylinders 20342 Bearing carrier anode Bravo One Located in front of the propeller between the front side of the propeller and the gear housing 20343 Propshaft anode Bravo Three Located behind the aft propeller 20344 Checking the Quicksilver MerCathode System ...

Page 99: ...tom Care To achieve maximum performance and fuel economy the boat bottom must be kept clean Accumulation of marine growth or other foreign matter can greatly reduce boat speed and increase fuel consumption To ensure best performance and efficiency periodically clean the boat bottom in accordance with manufacturer s recommendations In some areas it may be advisable to paint the bottom to help preve...

Page 100: ... 2 in unpainted area around transom assembly NOTE Sterndrive and transom assembly can be painted with a good marine paint or an antifouling paint that does not contain copper or any other material that could conduct electrical current Do not paint drain holes anodes the MerCathode system or items specified by the boat manufacturer NOTICE Washing the MerCathode assembly can damage components and le...

Page 101: ...802878 1 Spray all electrical connections with sealant Tube Ref No Description Where Used Part No 25 Liquid Neoprene All electrical connections 92 25711 3 Inspect the sacrificial trim tab or anode plate if equipped at regular intervals and replace it before it is half gone If a stainless steel propeller is installed additional anodes or a MerCathode system will be required Inspect the propeller sh...

Page 102: ...es low water dual water and side pickups Dual water pickups require the flushing attachment 44357Q 2 and the flush seal kit 881150K 1 low water pickups require the flushing attachment 849996T 1 and side pickups require the flushing attachment 44357Q 2 5752 5771 5773 Dual water pickup Low water pickup Side pickup Boat Out of the Water Bravo Sterndrive IMPORTANT Flushing the power package is most ef...

Page 103: ... water is clear 12 Slowly return the throttle to idle speed position 13 Stop the engine 14 Immediately shut off the supply water and remove the flushing attachment 15 Install the propeller Refer to the appropriate Mercury MerCruiser sterndrive service manual Boat in the Water Bravo Sterndrive IMPORTANT Flushing the power package is most effective when performed with the boat and sterndrive out of ...

Page 104: ...t hose from the seawater pump 5 Using a suitable adapter connect the flushing hose from the water source to the water inlet of the seawater pump NOTICE Flushing the engine when it is not operating will result in water collecting in the exhaust system damaging the engine Do not supply flush water for more than 15 seconds without the engine operating 6 With the sterndrive in the normal operating pos...

Page 105: ...inutes 11 For engine packages operated in saltwater brackish water mineral laden water or polluted water continue to operate the engine until the discharge water is clear 12 Slowly return the throttle to the idle speed position 13 Stop the engine 14 Immediately shut off the supply water and remove the flushing attachment 15 Tag the ignition switch with an appropriate tag requiring the seacock to b...

Page 106: ...lied with the engine 6 Attach the quick connect fitting to a water hose a Quick connect fitting water hose end b Water hose 7 Snap the quick connect fitting with the water hose into the flush socket on the engine a Water hose b Quick connect fitting water hose end c Flush socket 8 Open the water source of the water hose to a full flow 9 Allow the water to flush the sterndrive for 30 seconds 10 Pla...

Page 107: ... button 17 Remove the quick connect fitting from the water hose a Quick connect fitting water hose end b Water hose 18 Retain the quick connect fitting with the water hose end for repeated use by storing it separately in a storage compartment on the boat for easy access IMPORTANT Do not store the quick connect fitting in the flush socket on the engine Doing so would allow the seawater pump to suck...

Page 108: ...talled in the flush socket a Dust cover b Flush socket IMPORTANT If the unit is to be stored in the water the seacock should remain closed until time of usage If unit is to be stored out of the water open the seacock 20 Open the seacock if equipped or reconnect the alternative water inlet source prior to operating the engine a b 43065 ...

Page 109: ...Draining the Seawater System 103 Drain System Identification 104 Air Actuated Single Point Drain System 104 Manual Drain System 104 Air Actuated Single Point Drain System 105 Boat in the Water 105 Boat Out of the Water 106 Manual Drain System 107 Boat in the Water 107 Boat Out of the Water 108 Draining Water from the Cool Fuel Module 109 Draining the Sterndrive 109 Battery Storage 110 Recommission...

Page 110: ...ning in the tank Refer to Fuel Requirements for additional information 4 Flush the cooling system Refer to the Maintenance section 5 Supply cooling water to engine Refer to the Maintenance section 6 Operate the engine sufficiently to bring it up to normal operating temperature and allow fuel with Mercury Quicksilver Gasoline Stabilizer to circulate through the fuel system Shut off the engine 7 Cha...

Page 111: ...cing installing or removing engine or drive components WARNING Fuel vapors trapped in the engine compartment may be an irritant cause difficulty breathing or may ignite resulting in a fire or explosion Always ventilate the engine compartment before servicing the power package IMPORTANT Refer to the maintenance schedule for the complete listing of all scheduled maintenance to be performed A repair ...

Page 112: ...in System Identification Air Actuated Single Point Drain System a Manual pressure release valve b Threaded cap for air connection c Green indicators a Starboard side air actuated drain location b Port side air actuated drain location Manual Drain System a Starboard side blue drain plugs b Port side blue drain plug a b c 50399 a b 50407 b 50408 a ...

Page 113: ...rd side a Manual release valve b Air pump lever locked c Air pump d Air connection e Green indicators extended 8 Verify that water is draining from each opening If not use the Manual Drain System instructions a Starboard side air actuated drain location b Port side air actuated drain location 9 Allow the system to drain for a minimum of five minutes Pump air as necessary to keep the green indicato...

Page 114: ...tached to the engine However any air source can be used 1 Place the boat on a level surface and ensure that the boat is level 2 Obtain the air pump 3 Ensure that the lever on top of the pump is flush with the handle horizontal 4 Install the air pump on the air connection 5 Pull the lever on the air pump vertical to seal the pump to the air connection 6 Pump air into the system until both green ind...

Page 115: ... engine to start 11 Remove the air pump from the air manifold and return it to the mounting bracket 12 Mercury MerCruiser recommends leaving the drain system open while transporting the boat or while performing other maintenance This helps ensure that all water is drained 13 Before launching the boat pull up on the manual release valve Verify that the green indicators are no longer extended a Manu...

Page 116: ...he engine Boat Out of the Water NOTE Use this procedure if the air actuated single point drain system fails NOTE It may be necessary to lift bend or lower hoses to allow water to completely drain when hoses are disconnected 1 Place the boat on a level surface to ensure complete draining of the system 2 Remove the port side blue drain plug 3 Remove two blue drain plugs from the seawater pickup pump...

Page 117: ...drain plug to finger tight a Gen 3 Cool Fuel Module b Drain plug c O ring Tube Ref No Description Where Used Part No 19 Perfect Seal Drain plug threads 92 34227Q02 Draining the Sterndrive NOTE This procedure is needed only for salty brackish mineral laden or polluted water applications and for freezing temperatures or extended storage 1 Insert a small wire repeatedly to ensure that vent holes wate...

Page 118: ... be sure the cells are full of water and the battery is fully charged and in good operating condition It should be clean and free of leaks Follow the battery manufacturer s instructions for storage Recommissioning the Power Package 1 Ensure that all cooling system hoses are connected properly and hose clamps are tight CAUTION Disconnecting or connecting the battery cables in the incorrect order ca...

Page 119: ...ks Slowly 112 Engine Will Not Start or Is Hard to Start 112 Engine Runs Rough Misses or Backfires 113 Poor Performance 113 Excessive Engine Temperature 113 Insufficient Engine Temperature 113 Low Engine Oil Pressure 114 Battery Will Not Recharge 114 Remote Control Is Difficult to Move Has Excessive Play or Makes Unusual Sounds 114 Steering Wheel Jerks or Is Difficult to Turn 114 Power Trim Does No...

Page 120: ...f Guardian System has been activated reduce throttle speed The horn will turn off when throttle speed is within the allowable limit Consult an authorized Mercury MerCruiser dealer for assistance Troubleshooting Charts Starter Motor Will Not Crank Engine or Cranks Slowly Possible Cause Remedy Battery switch turned off Turn the switch on Remote control not in neutral position Position the control le...

Page 121: ...d or redistribute load more evenly Flame arrestor dirty Clean the flame arrestor Boat bottom fouled or damaged Clean or repair as necessary Ignition problem See Engine Runs Rough Misses or Backfires Engine overheating See Excessive Engine Temperature EFI system fault Have EFI system checked by an authorized Mercury MerCruiser dealer Excessive Engine Temperature Possible Cause Remedy Water inlet or...

Page 122: ...ottle linkage fasteners Lubricate Obstruction in shift or throttle linkages Remove obstruction Loose or missing shift and throttle linkages Check all linkages If any are loose or missing see authorized Mercury MerCruiser dealer immediately Shift or throttle cable kinked Straighten cable or have authorized Mercury MerCruiser dealer replace cable if damaged beyond repair Steering Wheel Jerks or Is D...

Page 123: ...M0074352 eng OCTOBER 2012 Page 115 Power Trim Does Not Operate Motor Operates but Sterndrive Unit Does Not Move Possible Cause Remedy Trim pump oil level low Fill pump with oil Drive unit binding in gimbal ring Check for obstruction ...

Page 124: ...Section 7 Troubleshooting Notes Page 116 90 8M0074352 eng OCTOBER 2012 ...

Page 125: ... Away From Home 118 Stolen Power Package 118 Attention Required After Submersion 118 Replacement Service Parts 118 Parts and Accessories Inquiries 118 Resolving a Problem 118 Contact Information for Mercury Marine Customer Service 119 Customer Service Literature 119 English Language 119 Other Languages 120 Ordering Literature 120 United States and Canada 120 Outside the United States and Canada 12...

Page 126: ... their life They are also expected to operate in both fresh and saltwater environments These conditions require numerous special parts Exercise care when replacing marine engine parts because specifications are different from those of the standard automotive engine For example one of the most important special replacement parts is the cylinder head gasket Marine engines cannot use steel type autom...

Page 127: ...Europe Middle East Africa Telephone 32 87 32 32 11 Brunswick Marine Europe Parc Industriel de Petit Rechain B 4800 Verviers Belgium Fax 32 87 31 19 65 Mexico Central America South America Caribbean Telephone 1 954 744 3500 Mercury Marine 11650 Interchange Circle North Miramar FL 33025 U S A Fax 1 954 744 3535 Japan Telephone 072 233 8888 Kisaka Co Ltd 4 130 Kannabecho Sakai shi Sakai ku 5900984 Os...

Page 128: ...rsepower Year United States and Canada For additional literature for your Mercury Marine power package contact your nearest Mercury Marine dealer or contact Mercury Marine Telephone Fax Mail 920 929 5110 USA only 920 929 4894 USA only Mercury Marine Attn Publications Department P O Box 1939 Fond du Lac WI 54935 1939 Outside the United States and Canada Contact your nearest Mercury Marine authorize...

Page 129: ...Section 9 Checklists 90 8M0074352 eng OCTOBER 2012 Page 121 Section 9 Checklists Table of Contents Predelivery Inspection PDI 122 Customer Delivery Inspection CDI 123 9 ...

Page 130: ...ners tight Battery of proper rating fully charged secured with protective covers in place All electrical connections tight Exhaust system hose clamps tight All fuel connections tight Correct propeller selected installed and tightened to specifications Throttle shift and steering system fasteners tightened to specifications Test OBDM warning system and MIL light operation EC models only Steering op...

Page 131: ... Resident of California CARB hang tag in boat CARB decal properly affixed to boat hull Customer Delivery Inspection CDI IMPORTANT This checklist is for packages that are not equipped with Axius For engine packages equipped with Axius use the Axius specific checklist which appears in Section 5 of the Axius Operation Manual Perform these tasks after the Predelivery Inspection PDI This inspection mus...

Page 132: ...f SmartCraft accessories if applicable Off season storage and maintenance schedule Engine starting stopping shifting using throttle Boat lights battery switch location fuses breakers Trailer if applicable Registration Complete and submit warranty registration provide the customer with a copy ...

Reviews: