background image

17

Cleaning Table

Cleaners listed 

(Table 5-1)

 are available from supermarkets or 

electrical retailers as stated. 
For enamelled surfaces use a cleaner that is approved for use 

on vitreous enamel. 
Regular cleaning is recommended. For easier cleaning, wipe 

up any spillages immediately.

Hotplate

Part 

Finish

Recommended Cleaning Method

Hob top

Enamel or stainless steel

Hot soapy water, soft cloth. Any stubborn stains remove gently 
with a nylon scourer.

Ceramic/induction hob

Toughened glass

Hot soapy water; cream cleaner/scourer if necessary.

Griddle plate (some models only)

Non-stick surface

Allow to cool. Wash in hot soapy water. Do not use abrasive 
cleaners/scourers. Dishwasher.

Warming zone (some models only) Toughened glass

Hot soapy water, cream cleaner/scourer if necessary.

Outside of Cooker

Part

Finish

Recommended Cleaning Method

Door, door surround and storage 
drawer exterior

Enamel or paint

Hot soapy water, soft cloth. 
Any stubborn stains, remove gently with a liquid detergent.

Stainless steel

E-cloth or microfibre all purpose cloth


(supermarket).

Sides and plinth

Painted surface

Hot soapy water, soft cloth.

Splashback/rear grille

Enamel or stainless steel

Hot soapy water, soft cloth. Cream cleaner, with care, if necessary.

Control panel

Paint, enamel or stainless steel

Warm soapy water. Do not use abrasive cleaners on lettering.

Control knobs/handles & trims

Plastic/chrome, aluminium, 
copper or lacquered brass

Warm soapy water, soft cloth.

Brass

Brass polish.

Oven door glass/glass lid

Toughened glass

Hot soapy water, cream cleaner/scourer if necessary.

Oven and Grill

Part

Finish

Recommended Cleaning Method

Sides, floor & roof of oven 

NOT 

COOK & CLEAN’ OVEN PANELS 

(see below)

Enamel

Any proprietary oven cleaner that is suitable for enamel.
CAUTION: CORROSIVE/CAUSTIC OVEN CLEANERS: FOLLOW 
MANUFACTURER’S INSTRUCTIONS.
Do not allow contact with the oven elements.

‘Cook & Clean’ oven panels (some 
models only)

Special enamel that partly 
cleans itself

This surface cleans itself at 200 °C and above, or the panels can be 
removed and washed with hot soapy water and a nylon brush. 

Oven shelves, Handyrack, grill 
trivet, Handygrill rack

Chrome

An oven interior cleaner that is suitable for chrome. Soap filled 
pad. Dishwasher.

Grill pan/meat tin (some models 
only)

Enamel

Hot soapy water. Soap filled pad. Dishwasher.

Table 5-1

Summary of Contents for 1082 Dual Fuel

Page 1: ...1082 Dual Fuel USER GUIDE INSTALLATION INSTRUCTIONS ...

Page 2: ...conventional oven shelf level 2 160 C fan oven or gas mark 4 2 Line one large or 2 shallow trays with Bake o Glide 3 Cream the butter and sugar together until light and fluffy and pale in colour 4 Add the eggs gradually to the sugar and butter whisking continuously 5 Carefully fold in the sifted cocoa and flour and chopped walnuts 6 Spread evenly in the baking tray s 7 Bake for about 25 minutes or...

Page 3: ...ate Burners 14 Stainless Steel Main Top 14 Griddle Optional Extra 15 Glide out Grill 15 Control Panel and Oven Doors 16 Ovens 16 Tall Oven 16 Cleaning Table 17 6 Troubleshooting 18 7 Installation 20 Dear Installer 20 Safety Requirements and Regulations 20 Provision of Ventilation 20 Location of Cooker 21 Conversion 21 Positioning the Cooker 22 Moving the Cooker 22 Fitting the Flue and Vent 23 Conv...

Page 4: ...ii ...

Page 5: ... become hot during use and will retain heat even after you have stopped cooking Keep babies and children away from the cooker and never wear loose fitting or hanging clothes when using the appliance DO NOT use a steam cleaner on your cooker Always keep combustible materials e g curtains and flammable liquids a safe distance away from the cooker DO NOT spray aerosols in the vicinity of the cooker w...

Page 6: ...d Therefore make sure that the kitchen is well ventilated keep natural ventilation holes open or install a powered cookerhood that vents outside If you have several hotplates burners on or use the cooker for a long time open a window or turn on an extractor fan Maintenance It is recommended that this appliance is serviced annually DO NOT use cooking vessels on the hotplate that overlap the edges U...

Page 7: ...sperse The inside door face is constructed with toughened safety glass Take care NOT to scratch the surface when cleaning the glass panel Accidental damage may cause the door glass panel to fracture Keep oven vent ducts unobstructed DO NOT use harsh abrasive cleaners or sharp metal scrapers to clean the oven door glass since they can scratch the surface which may result in shattering of the glass ...

Page 8: ...clean around any burner while another burner is on otherwise an electric shock could result Hob Care NEVER allow anyone to climb or stand on the hob DO NOT use the hob surface as a cutting board DO NOT leave utensils foodstuffs or combustible items on the hob when it is not in use e g tea towels frying pans containing oil DO NOT place plastic or aluminium foil or plastic containers on the hob Alwa...

Page 9: ... prevents the flow of gas if the flame goes out When a hotplate control knob is pressed in sparks will be made at every burner this is normal Do not attempt to disassemble or clean around any burner while another burner is on otherwise an electric shock could result To light a burner push in the selected burner control knob and turn it to the high position as indicated by the large flame symbol Fi...

Page 10: ...overlap the edges Wok Burner The wok burner is designed to provide even heat over a large area They are ideal for large pans and stir frying Fig 2 8 For heating smaller pans the aforementioned hotplate burners may be more efficient You should wipe the enamel top surface of the cooker around the hotplate burners as soon as possible after spills occur Try to wipe them off while the enamel is still w...

Page 11: ...Open the door and pull the grill pan carriage forward using the handle Fig 2 13 The grill has two elements that allow either the whole area of the pan to be heated or just the right hand half Adjust the heat to suit by turning the knob To heat the whole grill turn the knob clockwise Fig 2 14 To heat the right hand half turn the knob counter clockwise The neon indicator light by the grill control w...

Page 12: ...ome foods too quickly so we recommend that the food be positioned in the lower half of the oven to cook The oven temperature may also need to be lowered Ovens References to left hand and right hand ovens apply as viewed from the front of the appliance The left hand oven is a multi function oven while the right hand tall oven is a fan oven Multi function Oven As well as the oven fan and fan element...

Page 13: ... controls a function selector and a temperature setting knob Fig 2 16 Turn the function selector control to a cooking function Fig 2 17 shows the control set for convectional oven cooking Turn the oven temperature knob to the temperature required Fig 2 17 The oven heating light will glow until the oven has reached the temperature you selected It will then cycle on and off during cooking as the ove...

Page 14: ...standard shelf Fig 2 20 1 drop shelf Fig 2 21 1 telescopic shelf with runners Fig 2 22 1 set of side supports Fig 2 23 Right hand Oven 4 flat cooking shelves Fig 2 24 1 plate warming shelf Fig 2 25 1 set of side supports Fig 2 26 ArtNo 324 0009 Tall oven shelf Fig 2 20 Fig 2 22 Fig 2 24 Fig 2 26 Fig 2 21 Fig 2 23 Fig 2 25 ...

Page 15: ...s and lever the shelf clear Fig 2 28 Tilt the front of the shelf downwards and then lift clear of the runners Fig 2 29 To Remove the Telescopic Shelf Runners Firstly remove the shelf as in the To Remove a Shelf from the Telescopic Shelf Runners section Place a finger on the underside of the telescopic runner and lift Open the catch on top of the runner and pull the runner forward and down to remov...

Page 16: ...3 and 232mm 91 8 by 321mm 125 8 in the tall oven When the oven is on do not leave the door open for longer than necessary otherwise the knobs may get very hot Always leave a finger s width between dishes on the same shelf This allows the heat to circulate freely around them To help keep your oven clean cover meat when roasting with foil or use a roasting bag To reduce fat splashing when you add ve...

Page 17: ...40 minutes according to size 2 3 hours 45 60 minutes 40 45 minutes 2 to 3 hours 20 30 minutes 15 20 minutes 15 20 minutes per 500g Steaks according to thickness Conventional Oven Temperature C Shelf Position 160 C 200 C 160 C 200 C 160 C 200 C 160 C 200 C 160 C 200 C 160 C 200 C 140 150 C 220 C 140 C B 150 C B 150 C B 160 C B 170 C B 200 C B 170 C B 170 C B 200 C B 180 C B 180 C B 210 C B 100 C B ...

Page 18: ...ple by build up of fats or grease On Natural Gas the burners flames should be a bluish colour with at most a slight yellowish fringe On LP gas the flames may be softer The cooktop burner flames may have a slight yellowish tip If the flame burns with a long white tip you should call for service Cleaning for Spills For spills and boil overs that occur while cooking as soon as possible turn off the b...

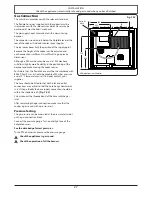
Page 19: ... gloves Wash the grill pan trivet and grill tray in hot soapy water Alternatively wash the grill pan in a dishwasher After grilling meats or any foods that soil leave to soak for a few minutes in the sink immediately after use Stubborn particles may be removed from the grid by using a nylon brush To remove the grill pan pull the tray assembly forwards Fig 5 4 and then lift the grill pan clear of t...

Page 20: ...s and wipe with a lint free cloth and hot soapy water The panels should then be dried and replaced and the oven heated at 200 C for about one hour This will make sure that the panels are working effectively n n Do not use steel wool or any other materials that will scratch the surface n n Do not use oven cleaning pads The Oven Shelf Supports The shelf supports on the oven sides can be removed for ...

Page 21: ... Sides and plinth Painted surface Hot soapy water soft cloth Splashback rear grille Enamel or stainless steel Hot soapy water soft cloth Cream cleaner with care if necessary Control panel Paint enamel or stainless steel Warm soapy water Do not use abrasive cleaners on lettering Control knobs handles trims Plastic chrome aluminium copper or lacquered brass Warm soapy water soft cloth Brass Brass po...

Page 22: ...is in your interest to track down your original installer Food is cooking too slowly too quickly or burning Cooking times may differ from your previous oven Check that you are using the recommended temperatures and shelf positions see the oven cooking guide The oven control settings and cooking times are intended to be used only as a guide Individual tastes may require the temperature to be altere...

Page 23: ...y hot when the cooker is in use then the cooling fan may have failed Should this occur please contact your installer a qualified repair engineer or Customer Service to arrange for its repair The knobs get hot when I use the oven or the grill Can I avoid this Yes this is caused by heat rising from the oven or the grill and heating them up Do not leave the oven door open Make sure that the grill pan...

Page 24: ...and Use regulations The relevant Building IEE regulations In the Republic of Ireland the cooker must be installed in accordance with The installation must be carried out by a competent person and installed in accordance with the current edition of IS813 Domestic Gas Installations the current Building Regulations and reference should be made to the current ETCI rules for electrical installation Pro...

Page 25: ...the following equipment to complete the cooker installation satisfactorily Stability bracket If the cooker is to be supplied with gas through a flexible hose a stability bracket or chain MUST be fitted These are not supplied with the cooker but are available at most builders merchants Gas pressure tester manometer Flexible gas hose Must be in accordance with the relevant standards Multimeter For e...

Page 26: ...iture and walls at the sides and rear of the appliance should be heat splash and steam resistant Certain types of vinyl or laminate kitchen furniture are particularly prone to heat damage and discolouration We cannot accept responsibility for damage caused by normal use of the cooker to any material that de laminates or discolours at temperatures less than 65 C above room temperature We recommend ...

Page 27: ... backwards off the pack base Remove the pack base tray Position the cooker close to its final position leaving just enough space to get behind it n n DO NOT use the door handles or control knobs to manoeuvre the cooker Fitting the Flue and Vent Fitting the Flue Remove the four screws from the grill flue opening Offer the removable flue up to grill flue opening Making sure that the removable flue b...

Page 28: ...the rear side panel tab 1 to the rear cooktop slot Fig 7 12 making sure to align the rear slotted tab 4 to the flue slot B Slide the side panel bottom locating slot 2 onto the rear bracket washer Fig 7 13 and push back Fig 7 14 C Locate the front panel side tab 3 to the front cooktop slot Fig 7 15 D Make sure the rear slotted tab 4 locates properly with the slot in the flue vent Fig 7 16 E With fi...

Page 29: ...INSTALLATION Check the appliance is electrically safe and gas sound when you have finished 25 4 Gasket 4 1 3 Bracket Locating slot 2 Fig 7 12 Fig 7 13 Fig 7 14 Fig 7 15 Fig 7 16 Fig 7 18 Fig 7 17 ...

Page 30: ...re that the gas hose is not caught As you progress make sure that both the electricity cable and gas hose always have sufficient slack to allow the cooker to move With a stability chain fitted release it as you ease the cooker out Do not forget to refit it when you replace the cooker When you replace the cooker again check behind to make sure that the electricity cable and gas hose are not caught ...

Page 31: ... make moving the cooker easier For Natural Gas the flexible hose must be in accordance with BS669 For LP Gas it should be capable of 50mbar pressure and a 70 C temperature risel If in doubt contact your supplier The hose should be fitted so that both inlet and outlet connections are vertical so that the hose hangs downwards in a U shape Ideally the hose supply connection should be within the shade...

Page 32: ...le to the correct terminals for your electrical supply type Fig 7 24 and Fig 7 25 Check that the links are correctly fitted and that the terminal screws are tight Secure the mains cable using the cable clamp Final Checks Hotplate Check Check each burner in turn refer to the Hotplate Burners section at the front of the instructions Grill Check Turn on the grill control and check that the grill heat...

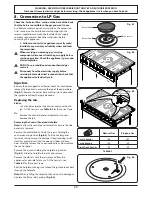
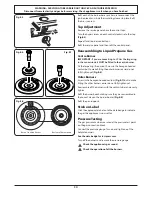
Page 33: ...ectrically safe Injectors Remove the pan supports and burner heads For each burner remove the large brass venturi on the top of the burner base Fig 8 1 Remove the burner base making sure to disconnect the ignition lead from the spark electrode Replacing the Jets Either Use a long box spanner to access and remove the old jets Fit the new jets see Table 8 1 for the correct type Or Remove the control...

Page 34: ...ing the outer burners easier do not fully tighten yet Fig 8 6 Outer Burners Screw in the hexagon headed venturis Fig 8 7 but to make fitting the other burners easier do not fully tighten yet Reassemble all the burners with the venturi tubes and evenly tighten Refit the burner heads making sure they are reassembled in the correct way on the burner bodies Fig 8 8 Refit the pan supports Stick on Labe...

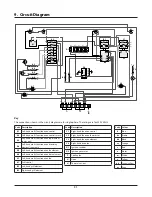
Page 35: ... element A7 Left hand multi function oven fan B1 Grill control B2 Left hand grill element B3 Right hand grill element Code Description C1 Right hand fan oven control C2 Right hand fan oven thermostat C3 Right hand fan oven element C4 Right hand oven fan D1 Ignition switches D2 Ignition generator F Cooling fan G Neon H Thermal cut out 1 2 P028728 6 P6 5 P5 4 P4 7 P7 8 P8 2 P2 1 P1 3 P3 P095199 1 2 ...

Page 36: ...tplate Bypass Screw Natural Gas 20 mb L P Gas Injector Injector Wok burner 57 5kW 78 5 kW 364 g h 53 Rapide Large Burner 40 3 kW 134 3 0 kW 210 g h 87 Semi Rapide Medium Burner 32 1 7kW 109 1 7 kW 124 g h 68 Auxiliary Small Burner 28 1 75 1 0 kW 73 g h 51 The valves in this cooker are fitted with adjustable bypass screws The cooker is supplied with the bypass screws set for Natural Gas For LPG con...

Page 37: ...er Semi Rapide Medium Burner EE gas burner 60 8 Semi Rapide Medium Burner EE gas burner Rapide Large Burner EE gas burner 58 5 Rapide Large Burner EE gas burner 58 5 Rapide Large Burner EE gas burner 58 5 Ultra Rapide large burner EEGas Burner 55 4 Wok EE gas burner Wok EE gas burner Hotplate EE gas hob 58 3 Information marked thus is not required with mixed fuel hobs ...

Page 38: ...ight hand Efficiency Fuel type Electric Cavity type Fanned Power conventional Power forced air convection 2 5 Volume Litres 82 Energy consumption electricity conventional kWh cycle Energy consumption electricity forced air convection kWh cycle 0 79 Energy efficiency index conventional Energy efficiency index forced air convection 88 3 Energy class A Additional Information The oven complies with EN...

Page 39: ...organisations other than those authorised to act on behalf of AGA Rangemaster Exceptions Items not included under the free 3 year guarantee include pan supports griddles wok rings baking trays grill pans trivets filters light bulbs and other consumable accessories Any damage caused other than through normal use Breakdowns associated with cooking spillage Cosmetic deterioration deemed to be normal ...

Page 40: ...and thus alterations take place periodically Whilst every effort is made to produce up to date literature this booklet should not be regarded as an infallible guide to current specification nor does it constitute an offer for the sale of any particular appliance For over 45 years Divertimenti Mercury s sister company has been the ultimate destination for food lovers and serious chefs alike With it...

Reviews: