background image

1

2

3

4

5

6

7

8

9

50mm Screw QTY 105 

40mm Screw QTY 20 

Felt Tacks QTY 132

25mm Screw QTY 72

30mm Screw QTY 147

35mm Bolt QTY 4 

10mm Screw QTY 36

30mm Black Screw QTY 2

Nail Bag

P 2

10

11

12

13

14

15

20      

Butt Hinge QTY 14

Door Handle QTY 2

Turn Button QTY 2

“L” Bracket QTY 2

21      

22      

23      

24      

Press Lock

25      

Barrel Bolt QTY 6

26      

“U” Channel

Roof Support Block - 140mm QTY 6                 

27      

03VER1008-V1 

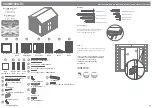
Overall Dimensions:


Length = 3028mm 

Width = 2484mm 

Height = 2569mm 

Base Dimensions: 

Length = 2974mm 

Width = 2360mm 

Please retain product label and instructions for future reference


Before assembly  

please make sure you have a 

suitable base ready to erect your 

building 


MADE IN GREAT BRITAIN

Door Panel

Sml Panel

QTY 2

Window

 Panel Right

Window

 Panel Left

Back  Panel 

QTY 2

Gable Top 

QTY 2

Floor 

QTY 2

Roof

Sheet QTY 4

Master

Door

Slave

Door

Side

Door

Ridge Bar - 1462mm QTY 2

Eaves Frame - 1001mm QTY 6

Roof Support Bar - 1302mm QTY 6

Roof Support Brace - 490mm QTY 6

16

Cover Trim - 1976mm QTY 7

17

Fascia - 1333mm QTY 4

18

Finial QTY 2

19

Rain Guard - 680mm QTY 2

Pre Assembly

Remove the transportation blocks from 

the bottom and top of each panel

before beginning assembly

20

Step 1

Attach the side doors to the inside framing

of the door panel using 3x butt hinges per

door.

* Fix to the door using 3x25mm screws &

3x30mm screws to the framing per hinge,

ensure the doors open freely,

folding back into the building

unrestricted.

18x25mm Screws

18x30mm Screws

Pre drill 

hole

25mm 

screw

30mm 

screw

11

11


Summary of Contents for Vermont 03VER0808-V1

Page 1: ...o ensure the product is placed on a suitable base BUILDING A BASE When thinking about where the building and base is going to be constructed Ensure that there will be access to all sides for maintenance work and annual treatment Whilst all products manufactured are made to the highest standards of Safety and in the case of childrens products independently tested to EN71 level we cannot accept resp...

Page 2: ... building MADE IN GREAT BRITAIN Door Panel Sml Panel QTY 2 Window Panel Right Window Panel Left Back Panel QTY 2 Gable Top QTY 2 Floor QTY 2 Roof Sheet QTY 4 Master Door Slave Door Side Door Ridge Bar 1462mm QTY 2 Eaves Frame 1001mm QTY 6 Roof Support Bar 1302mm QTY 6 Roof Support Brace 490mm QTY 6 16 Cover Trim 1976mm QTY 7 17 Fascia 1333mm QTY 4 18 Finial QTY 2 19 Rain Guard 680mm QTY 2 Pre Asse...

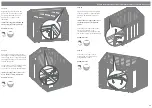
Page 3: ...ore fixing to the door Fix the door handles to the outside of the master and slave door using the 35mm bolts provided 36x10mm Screws 4x25mm Screws 4x35mm Bolts Pre drill hole 10mm screw 25mm screw 24 Step 4 Place the floor panels upside down onto a firm and level base Ensure the base has suitable drainage free from areas where standing water can collect Secure the floors together using 8x50mm scre...

Page 4: ...e roof is fitted 9x50mm Screws Pre drill hole 50mm screw 5 4 Step 8 Place the gable tops onto the window panels ensuring the boards interlock Secure in place using 4x50mm screws per gable top screwing in an alternating pattern 8x50mm Screws Pre drill hole 50mm screw Step 9 Connect the ridge bars together with the metal U channel using 10x30mm screws Attach the L brackets to each end of the bunk su...

Page 5: ...rs into the ridge bar with 1x50mm screw per bar screwing at an angle as shown in the illustration Ensure to stagger the screws so as not to hit one screw with another 2x50mm Screws Pre drill hole 50mm screw Step 12 Fix the roof support blocks centrally to the back and door panel upright framing with 2x50mm screws per block Ensure the roof support bars meet the blocks and are level with the gables ...

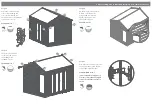
Page 6: ...ilding securing in place with 11x30mm screws Fix the first eaves frame onto the roof sheet seceuring with 3x30mm screws Fix the remaining roof sheets to the building using 11x30mm screws per sheet Fix the next eaves frame to the roof with 3x30mm screws Secure the remaining eaves frame to the center using 6x30mm screws 64x30mm Screws c c Pre drill hole 30mm screw Repeat this process for both sides ...

Page 7: ... to the front and back of the building using 12x40mm screws 12x40mm Screws Pre drill hole 40mm screw Step 20 Fix the rain guards above each window securing in place using 2x50mm screws per guard ensuring to screw through the framing 4x50mm Screws Pre drill hole 40mm screw Step 21 Attach the two turn buttons to the slave door at the top and bottom using 2x30mm black screws 2x30mm Black Screws These...

Page 8: ...apply wood treat ment immediately after the building has been assembled AFTER TREATMENT score around protective cover on glazing and carefuly peel covering back Please retain product label and instructions for future reference ...

Reviews: