background image

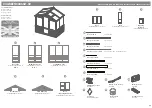
Side

Rear

Front

P 3

Please retain product label and instructions for future reference


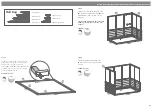
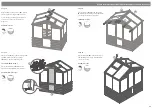
Step 1


Lay the base frame down as shown in the 

diagram. Ensure the base is square and 

layed on level ground, fix the base    

framing 

(No. 11) 

&

 (No. 12) 

together with 

2 x 70mm screws per corner - pre drill to 

avoid splitting the timber.


8x70mm screws. 

Pre drill 

hole

70mm 

screw

Nail Bag

30mm Screw x 33

20mm Screw x 6

50mm Screw x 60

70mm Screw x 8

40mm Screw x 8

16mm Screws x 6         

30mm Black Screw x 18

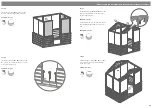
Step 2


Fix the corners of the Sml Window Side 

(No. 2)

 and the Lrg Window Side 

(No. 3)


with 3x50mm screws as shown in the 

diagram.

*The Panel which will be the rear of the 

building sits inbetween the two side 

panels.*


3x50mm screws. 

Pre drill 

hole

50mm 

screw

Side

Front

Rear

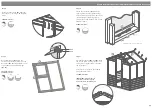
Step 3


Fix the remaining Sml Window Side 

(No. 2)

 at the corner using 3 x 50mm 

screws. 

3x50mm screws. 

Pre drill 

hole

50mm 

screw

Side

Front

Rear

11

11

12

12

3

2

2

Summary of Contents for 04GREEN0406SD-V2

Page 1: ...d but can be helped It is suggested that the outdoor building is sprayed with water during extended periods of warm sunshine and sheltered as much as possible during rain or snow Our buildings are pre...

Page 2: ...ROOFOW1217X1050 V1 Plain GableTop AI 04GREENPGT1864X426 V1 2 3 4 5 1 6 7 Roof AI 04GREENROOF1217X1050 V1 8 Door AI 04GREENDOOR550X1720 V2 9 Opening Window AI 04GREENOW560X460 V1 7 8 9 10 11 Fascia 107...

Page 3: ...w Nail Bag 30mm Screw x 33 20mm Screw x 6 50mm Screw x 60 70mm Screw x 8 40mm Screw x 8 16mm Screws x 6 30mm Black Screw x 18 Step 2 Fix the corners of the Sml Window Side No 2 and the Lrg Window Side...

Page 4: ...0mm screws per strip 6x30mm Screws Pre drill hole 30mm screw Step 6 Fix the Gable tops No 4 No 5 to the panels using 4x50mm screws per top as shown in the diagram 8x50mm Screws The building can now be...

Page 5: ...9 6 Step 10 Fix the Casement stay No 19 to the opening window then align the fixings onto the window panel frame Ensure the casement stay fits into fixings when closed before screwing them down using...

Page 6: ...door No 8 to the building using 16x30mm black screws per hinge No 18 as shown in the diagram 16x30mm Black Screws Fit the turn buttons No 23 to the building using 2x30mm black screws 2x30mm Black Scr...

Page 7: ...ater ingress Please note This image is for illustrative purpose and may differ from your product in regards to the number of windows however the principle is the same It is ESSENTIAL that you apply wo...

Reviews: