background image

P 6

Please retain product label and instructions for future reference


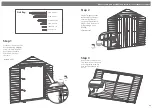
Cut the felt into four sheets 
measuring 3199mm. Lay 
them onto the building as 
shown in the diagram and 
fix using felt tacks at 
100mm intervals.

Step 9

170 x Felt tacks

Felt 

tacks 

HANDLE

WITH CARE

1

2

3

4

19

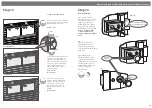
Fit the cover trims to the front 
and back of the building as 
shown in the illustration 
using 30mm screws. 

Trim the length of the cover 
trims to the required size 
before fitting if necessary.

Pre drill to avoid splitting.

Step 10

17

17

30mm 

screw

12x30mm Screws

17

Attach the fascias to the roof 
leaving a slight overhang at 
the top. Fit the fascias to the 
roof over the felt and secure in 
place with 40mm screws as 
shown. 

Pre drill to avoid splitting.

Step 11

12x40mm Screws

Pre drill 

hole

40mm 

screw

18

12

12

18

12

12

Summary of Contents for 01GRO1008DD-V1

Page 1: ...E When thinking about where the building and base is going to be constructed Ensure that there will be access to all sides for maintenance work and annual treatment Whilst all products manufactured ar...

Page 2: ...le Plain Gable Plain Side Window Side Floor Qty 2 Roof Qty 2 Master Door Slave Door Window Qty 2 Fixing Kit 20 11 12 13 14 15 16 17 18 19 10 Fascia 12x95x1480mm Qty 4 Door Frame Upright 12x45x1732mm Q...

Page 3: ...each strip The door frames should sit 15mm from the door aperture 12x30mm Screws 15mm 13 14 30mm screw Pre drill hole 42x30mm screws Step 2 Fix the T hinges onto the doors and door frame as shown usin...

Page 4: ...and fix using 10x50mm screws Alternate the fixing position along the length of the floors 10x50mm Screws 50mm screw Pre drill hole 7 7 Fix the corner with 3x 50mm screws as shown in diagram Step 5 50m...

Page 5: ...support Attach a corner brace at both ends of the ridge bar with 4x30mm screws 10x50mm screws 30mm screw Pre drill hole 50mm screw 8x30mm screws 10 11 25 Step 8 Fix the roof panels on either side of...

Page 6: ...to the front and back of the building as shown in the illustration using 30mm screws Trim the length of the cover trims to the required size before fitting if necessary Pre drill to avoid splitting S...

Page 7: ...he window panel as shown in the diagram 3x30mm Screws SCREW COUNT PER WINDOW 6x30mm Screws 6x16mm Screws 4x30mm Screws Step 12 9 Step 13 Rim lock fixing Fig 1 internal view Place the lock onto interna...

Page 8: ...30mm screw Pre drill hole 21 Step 15 Fix the casement stay to the opening window then align the fixings onto the window panel frame Ensure the casement stay fits into fixings when closed before screwi...

Reviews: