background image

ENGLISH 

29 

Citrus squeezer 

NOTE:

 Check that the appliance is switched off and that the power cord is unplugged. 

The cone cannot be removed from the citrus squeezer. 
Cut the food to be squeezed in half. 
Let the appliance do the work. The processing will not go faster because you press harder. Do not run the 
appliance for more than 30 seconds at a time. Allow it to cool for 1 minute before using it again. 

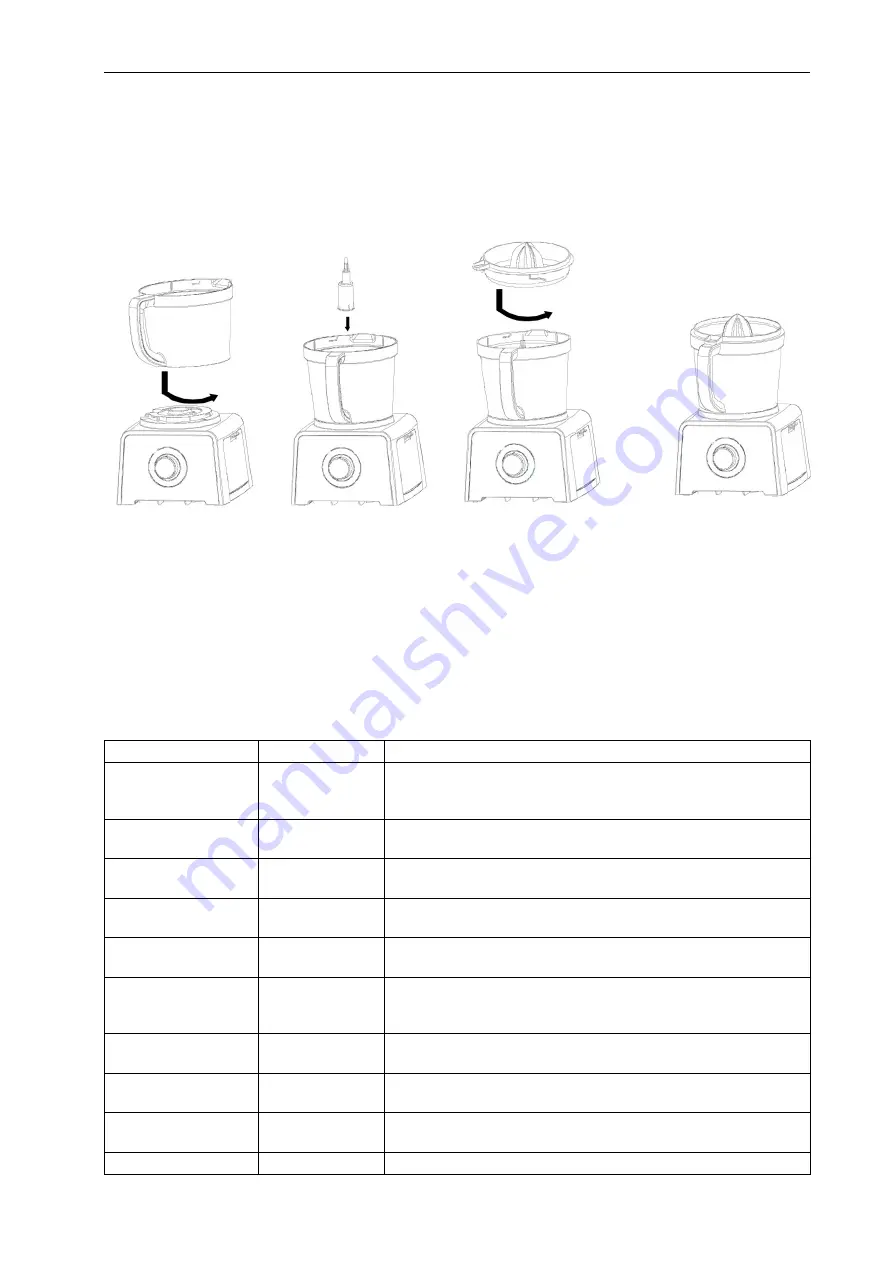
1. 

Lock the bowl in place on the motor unit. 

2. 

Check that the drive shaft is correctly fitted. 

3. 

Screw the citrus squeezer anticlockwise as far as it goes. 

4. 

Press the juice out of the fruit by selecting LOW and pressing the fruit against the squeezer. 

NOTE:

 Note the level in the bowl. Empty the bowl when it contains 5 dl of juice. 

TIPS 

1. 

Liquid with a temperature of up to 70°C can be placed in the bowl. 

2. 

Never process more than 5 dl of liquid at once – risk of spillage. 

Chopping 

FOOD QUANTITY 

INSTRUCTIONS 

BABY FOOD 

Up to 1 litre 

Place  up  to  1  litre of cooked vegetables and/or meat in the 
processing bowl together with 1/4 dl of water per dl of solid 
food. Process to the required consistency. 

BREADCUMBS 

Up to 10 slices. 

Cut fresh or dry bread into pieces, 3.5–5 cm. Put them in the 
bowl and process to crumbs of the required consistency. 

CAKE CRUMBS 

Up to 1.25 litres  Break  cakes/biscuits into pieces, 3.5–5 cm. Put them in the 

bowl and process to crumbs of the required consistency. 

BERRIES 

7.5 dl 

Process in PULSE mode to the required consistency. Add 
sugar, to taste. 

CHOPPED EGGS 

Up to 12. 

Shell and dry boiled eggs and cut in half. Put them in the bowl 
and process in PULSE mode to the required consistency. 

CHOPPED GARLIC  Up to 12 cloves.  Check that the bowl is dry. 

Start the appliance and add the cloves through the infeed 
opening. 

CHOPPED MEAT, 
RAW OR COOKED 

Max. 6 dl 

Dice the meat into 2.5 cm pieces. Put them in the bowl and 
process in PULSE mode to the required consistency. 

CHOPPED 
MUSHROOMS 

Up to 12 medium 
sized. 

Cut large mushrooms into smaller pieces, put them in the bowl 
and process in PULSE mode to the required consistency. 

CHOPPED NUTS 

5 dl  

Put  them  in  the  bowl and process in PULSE mode to the 
required consistency. 

CHOPPED ONION 

Up to 2 large 

Cut into slices and put them in the bowl. Run 1 or 2 pulses for 

Summary of Contents for 802-524

Page 1: ...for kjøkkenmaskin Instrukcja obsługi robota kuchennego User Instructions for Food Processor 802 524 SV Bruksanvisning i original NO Bruksanvisning i original PL Instrukcja obsługi w oryginale EN Operating instructions in original 20 12 2012 Jula AB ...

Page 2: ...ør første gangs bruk 13 Bruk av tilbehør 13 Skiving strimling 14 Sitruspresse 15 TIPS 15 Hakking 15 Riving 16 Skiving 16 Sitruspressing 17 VEDLIKEHOLD 17 Rengjøring 17 POLSKI 18 ZASADY BEZPIECZEŃSTWA 18 Obudowa 18 OPIS 19 Pokrętło regulacji 19 OBSŁUGA 20 Przed pierwszym użyciem 20 Stosowanie akcesoriów 20 Cięcie na plasterki paski 20 Wyciskarka do cytrusów 22 WSKAZÓWKI 22 Siekanie 22 Tarcie 23 Kro...

Page 3: ...USE 27 Before using for the first time 27 Using accessories 27 Slicing shredding 27 Citrus squeezer 29 TIPS 29 Chopping 29 Grating 30 Slicing 30 Citrus squeezing 31 MAINTENANCE 31 Cleaning 31 ...

Page 4: ...t inte sladden hänga över bords eller bänkkant eller vidröra heta ytor Håll alltid händer och redskap borta från rörliga knivar och skivor för att undvika risk för allvarlig personskada och eller egendomsskada Gummiskrapa kan användas men bara när apparaten inte är igång Knivbladen är mycket vassa Hantera dem försiktigt Var försiktig vid hantering av skivor för att undvika personskada Placera aldr...

Page 5: ...vor 5d Tunna skivor 6 Kniv 7 Lock med citruspress 8 Stor matare 9 Liten matare 10 Hölje Inställningsvred 1 PULSE pulsläge Läget PULSE används för kortvarig bearbetning Vrid inställningsvredet till läge PULSE för att starta och släpp vredet för att stoppa bearbetningen Detta gör att du kan kontrollera resultatet med jämna mellanrum ...

Page 6: ...dningsskålen är korrekt monterad på motorenheten och locket är korrekt monterat på skålen Kontrollera att den stora mataren är i låst läge Försök inte starta apparaten om inte beredningsskålen locket och den stora mataren är korrekt monterade Placera motorenheten på plant torrt och rent underlag före användning Användning av tillbehör 1 Placera produkten på en torr plan yta 2 Montera beredningsskå...

Page 7: ...t till läge OFF och vänta tills alla rörliga delar har stannat helt Vrid locket mot markeringen UNLOCK och ta av locket Stora livsmedel 1 Lås beredningsskålen på plats på motorenheten 2 Kontrollera att drivaxeln är korrekt monterad 3 Montera önskad skiva i skivhållaren och montera skivhållaren på drivaxeln 4 Sätt på och lås locket 5 Mata in stora livsmedel med den stora mataren med den lilla matar...

Page 8: ...ålen tillsammans med 1 4 dl vatten per dl fasta livsmedel Bearbeta till önskad konsistens STRÖBRÖD Upp till 10 skivor Skär färskt eller torrt bröd i bitar 3 5 5 cm Placera i skålen och bearbeta till smulor av önskad grovlek KAKSMULOR Upp till 1 25 liter Bryt sönder kakor kex i bitar 3 5 5 cm Placera i beredningsskålen och bearbeta till smulor av önskad grovlek BÄR 7 5 dl Bearbeta i läge PULSE till...

Page 9: ... imatningsöppningen CHEDDAROST Osten ska vara kall Dela i bitar som passar i inmatningsöppningen MOZZARELLA Dela i bitar som passar i inmatningsöppningen Lägg osten i frysen i 30 minuter Mata in genom imatningsöppningen med lätt tryck POTATIS Dela i bitar som passar i inmatningsöppningen ZUCCHINI Dela i bitar som passar i inmatningsöppningen Skivning LIVSMEDEL ANVISNINGAR ÄPPLE Halvera och kärna u...

Page 10: ...n och milt rengöringsmedel Dränk inte motorenheten i vatten eller annan vätska 4 Alla delar utom motorenheten kan diskas i diskmaskin Handdiska med varmt vatten och diskmedel Använd diskborste vid behov Vid maskindisk ska delarna placeras i den övre korgen inte i eller nära bestickkorgen 5 Använd inte slipande rengöringsmedel eller föremål 6 Vissa livsmedel till exempel morötter kan ge fläckar För...

Page 11: ...ningen henge over kanten av et bord eller en benk og ikke la den komme i kontakt med varme overflater Hold alltid hender og redskaper unna bevegelige kniver og skiver for å unngå fare for alvorlig personskade og eller eiendomsskade Gummiskraper kan brukes men bare når apparatet ikke er i bruk Knivbladene er svært skarpe De må behandles med forsiktighet Vær forsiktig når du håndterer skivene for å ...

Page 12: ...SKRIVELSE 1 Sokkel 2 Innstillingsbryter 3 Tilberedningsskål 4 Drivaksel 5 Skiveholder 5a Grovriving 5b Finriving 5c Tykke skiver 5a Tynne skiver 6 Kniv 7 Lokk med sitruspresse 8 Stor mater 9 Liten mater 10 Deksel ...

Page 13: ...hakke is i apparatet det skader beholderen og gjør knivene sløve Apparatet kan ikke brukes til å vispe male kaffebønner eller fete krydder eller til å skive eller strimle hardkokte egg marshmallows myk ost eller lignende VIKTIG Av sikkerhetsårsaker kan apparatet ikke startes hvis ikke tilberedningsskålen er korrekt montert på motorenheten og lokket er korrekt montert på skålen Kontroller at den st...

Page 14: ... i skiveholderen og monter skiveholderen på drivakselen 4 Sett på og lås lokket med den store materen 5 Mat inn små og eller lange matvarer med den lille materen Se retningslinjene nedenfor for tilberedningstips 6 Vri innstillingsbryteren til ønsket posisjon og mat inn matvarene med moderat kraft 7 Etter avsluttet bearbeiding vrir du innstillingsbryteren til posisjonen OFF og venter til alle beveg...

Page 15: ...ksom på nivået i tilberedningsskålen Tøm skålen når det har samlet seg 5 dl saft TIPS 1 Væske med temperaturer på opptil 70 C kan plasseres i skålen 2 Bearbeid aldri mer enn 5 dl væske om gangen fare for søl Hakking MATVARE MENGDE ANVISNINGER BARNEMAT Opptil 1 liter Legg opptil 1 liter kokte grønnsaker og eller kjøtt i tilberedningsskålen sammen med 1 4 dl vann per dl med faste matvarer Bearbeid t...

Page 16: ...matene i båter Legg dem i tilberedningsskålen og bearbeid med funksjonen PULSE til ønsket grovhet Riving MATVARE ANVISNINGER KÅL Del i biter som passer i innmatingsåpningen Trykk lett til bitene har passert riveskiven Tøm skålen når matvaren når opp til skiven GULRØTTER Mat inn gjennom innmatingsåpningen CHEDDAROST Osten skal være kald Del i biter som passer i innmatingsåpningen MOZZARELLA Del i b...

Page 17: ...llingsbryterne og føttene med en klut fuktet med mildt rengjøringsmiddel Flekker kan fjernes med en klut fuktet med vann og et mildt rengjøringsmiddel Ikke senk motorenheten ned i vann eller annen væske 4 Alle deler unntatt motorenheten kan vaskes i oppvaskmaskin Håndvask med varmt vann og oppvaskmiddel Bruk oppvaskbørste ved behov Ved maskinoppvask skal delene legges i den øvre kurven ikke i elle...

Page 18: ...l nie zwisał ze stołu lub blatu ani nie dotykał gorących powierzchni Zawsze trzymaj dłonie i przybory kuchenne z dala od ruchomych ostrzy i tarcz aby uniknąć ryzyka poważnego obrażenia ciała i lub mienia Można używać gumowej skrobaczki ale tylko wtedy kiedy urządzenie nie pracuje Ostrza noży są bardzo ostre Obchodź się z nimi ostrożnie Zachowaj ostrożność przy obchodzeniu się z tarczami aby unikną...

Page 19: ...nkie plastry 6 Nóż 7 Pokrywa z wyciskarką cytrusów 8 Popychacz duży 9 Popychacz mały 10 Obudowa Pokrętło regulacji 1 PULSE tryb pulsacyjny Tryb pulsacyjny stosuje się do krótkotrwałej obróbki Przekręć pokrętło w położenie PULSE aby włączyć obróbkę i zwolnij pokrętło aby ją zatrzymać Dzięki temu można w regularnych odstępach sprawdzać rezultat ...

Page 20: ...eżeli miska nie jest prawidłowo zamontowana na korpusie silnika a pokrywa prawidłowo założona na miskę Sprawdź czy duży popychacz znajduje się w położeniu zablokowanym Nie próbuj uruchomić urządzenia jeżeli miska pokrywa i duży popychacz nie są prawidłowo zamontowane Przed użyciem ustaw korpus silnika na płaskim suchym i czystym podłożu Stosowanie akcesoriów 1 Ustaw urządzenie na suchej płaskiej p...

Page 21: ...regulacji do żądanego położenia i podawaj produkty z umiarkowaną siłą 7 Po zakończeniu obróbki przekręć pokrętło regulacji w położenie OFF wył i odczekaj aż wszystkie ruchome części całkowicie się zatrzymają Przekręć pokrywę w kierunku oznaczenia UNLOCK odblokowana i zdejmij ją Duże produkty 1 Zablokuj miskę na korpusie silnika 2 Sprawdź czy wał napędowy jest prawidłowo zamontowany 3 Zamontuj odpo...

Page 22: ... niska prędkość i dociśnij owoc do wyciskarki UWAGA Zwróć uwagę na poziom soku w misce Opróżnij miskę jeżeli zbierze się 5 dl soku WSKAZÓWKI 1 W misce można umieścić płyn w temperaturze do 70 C 2 Nigdy nie wyciskaj na raz więcej niż 5 dl soku ryzyko rozlania Siekanie PRODUKT ILOŚĆ WSKAZÓWKI JEDZENIE DLA NIEMOWLĄT Do 1 litra Umieść w misce do 1 litra gotowanych warzyw i lub mięsa oraz 1 4 dl wody n...

Page 23: ...agodowe Umieść w misce posiekaj w położeniu PULSE a następnie obrabiaj w trybie ciągłym do uzyskania żądanej konsystencji SIEKANE POMIDORY 4 szt średniej wielkości Pokrój pomidory na kawałki Umieść w misce i obrabiaj w położeniu PULSE do uzyskania żądanej grubości Tarcie PRODUKT WSKAZÓWKI KAPUSTA Podziel na kawałki dopasowane wielkością do otworu wlotowego Lekko dociśnij aż kawałki przejdą przez t...

Page 24: ...i wyjmij wtyczkę z gniazdka 2 Jeżeli to możliwe opłucz części bezpośrednio po użyciu 3 Wyczyść korpus silnika wraz z pokrętłem regulacji oraz stopkami przy pomocy szmatki zwilżonej łagodnym środkiem czyszczącym Plamy usuwaj wilgotną szmatką i łagodnym środkiem czyszczącym Nie zanurzaj korpusu silnika w wodzie ani innych cieczach 4 Wszystkie części oprócz korpusu silnika można myć w zmywarce Zmywaj...

Page 25: ... over the edge of a table or worktop or to come into contact with hot surfaces Always keep your hands and utensils away from moving blades and slicers to avoid the risk of serious personal injury and or material damage A rubber scraper can be used but only when the appliance is not running The knife blades are very sharp Handle them with care Be careful when handling slicers to avoid personal inju...

Page 26: ...lade 5c Thick slices 5d Thin slices 6 Blade 7 Lid with citrus squeezer 8 Large feeder 9 Small feeder 10 Casing Control dial 1 PULSE pulse mode PULSE mode is used for short processing time Turn the control dial to PULSE mode to start and release the knob to stop the processing This allows you to keep checking the results at short intervals ...

Page 27: ...less the lid is properly fitted on the bow Check that the large feeder is in locked position Do not attempt to start the appliance if the bowl lid and the large feeder are not properly fitted Place the motor unit on a level dry and clean surface before use Using accessories 1 Place the product on a dry level surface 2 Fit the bowl and turn it anticlockwise until it locks in place 3 Insert and alig...

Page 28: ...ntrol dial to OFF and wait until all moving parts have completely stopped Turn the lid towards UNLOCK and take off Large food 1 Lock the bowl in place on the motor unit 2 Check that the drive shaft is correctly fitted 3 Fit the required slicer in the slicer holder and fit the holder on the drive shaft 4 Put the lid on and lock 5 Feed in large food with the large feeder with the small feeder in it ...

Page 29: ...together with 1 4 dl of water per dl of solid food Process to the required consistency BREADCUMBS Up to 10 slices Cut fresh or dry bread into pieces 3 5 5 cm Put them in the bowl and process to crumbs of the required consistency CAKE CRUMBS Up to 1 25 litres Break cakes biscuits into pieces 3 5 5 cm Put them in the bowl and process to crumbs of the required consistency BERRIES 7 5 dl Process in PU...

Page 30: ...e infeed opening MOZZARELLA Cut into pieces that fit through the infeed opening Put the cheese in the freezer for 30 minutes Feed in through the infeed opening with slight pressure POTATOES Cut into pieces that fit through the infeed opening COURGETTES Cut into pieces that fit through the infeed opening Slicing FOOD INSTRUCTIONS APPLES Cut into halves and remove the cores and feed through the infe...

Page 31: ...e removed with a cloth moistened with water and mild detergent Do not immerse the motor unit in water or any other liquid 4 All parts except the motor unit can be washed in a dishwasher Wash by hand in hot water and washing up liquid Use a dishbrush if necessary When using a dishwasher place the parts in the top basket not in or near the cutlery basket 5 Do not use abrasive detergents or objects 6...

Reviews: