6
Follow the assembly steps listed below, prior
to installation of the unit.
6)
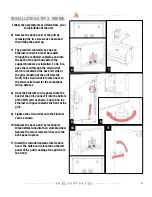
Remove the back panel of the grill by
removing the two screws as shown and
then lifting the panel up.
7)
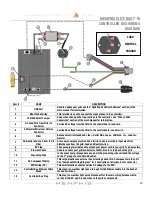
The prewired controller box has an
Ethernet cord which must be routed
through the controller cableway and into
the back of the grill body before the
support brackets are installed. To do this,
pass the cord through the strain relief
which is located on the back left side of
the grill. (Looking at the grill from the
front) This strain relief is located next to
the strain relief used for the component
wiring harness.
8)
Once the Ethernet cord is passed into the
back of the grill, connect it into the bottom
of the WiFi card as shown. The tab on the
Ethernet cord goes towards the front of the
grill.
9)
Tighten the strain relief onto the Ethernet
cord as shown.
10)
Replace the back panel by locating its
three bottom tabs into their slots provided.
Replace the two screws which secure the
back panel in place.
11)
Install the included antenna into its bulk
head. The bulk head is located on the left
panel of the grill (Looking at the grill from
the front).
INSTALLATION STEP 2: WIRING
6
7
8
9
10
11


