background image

5

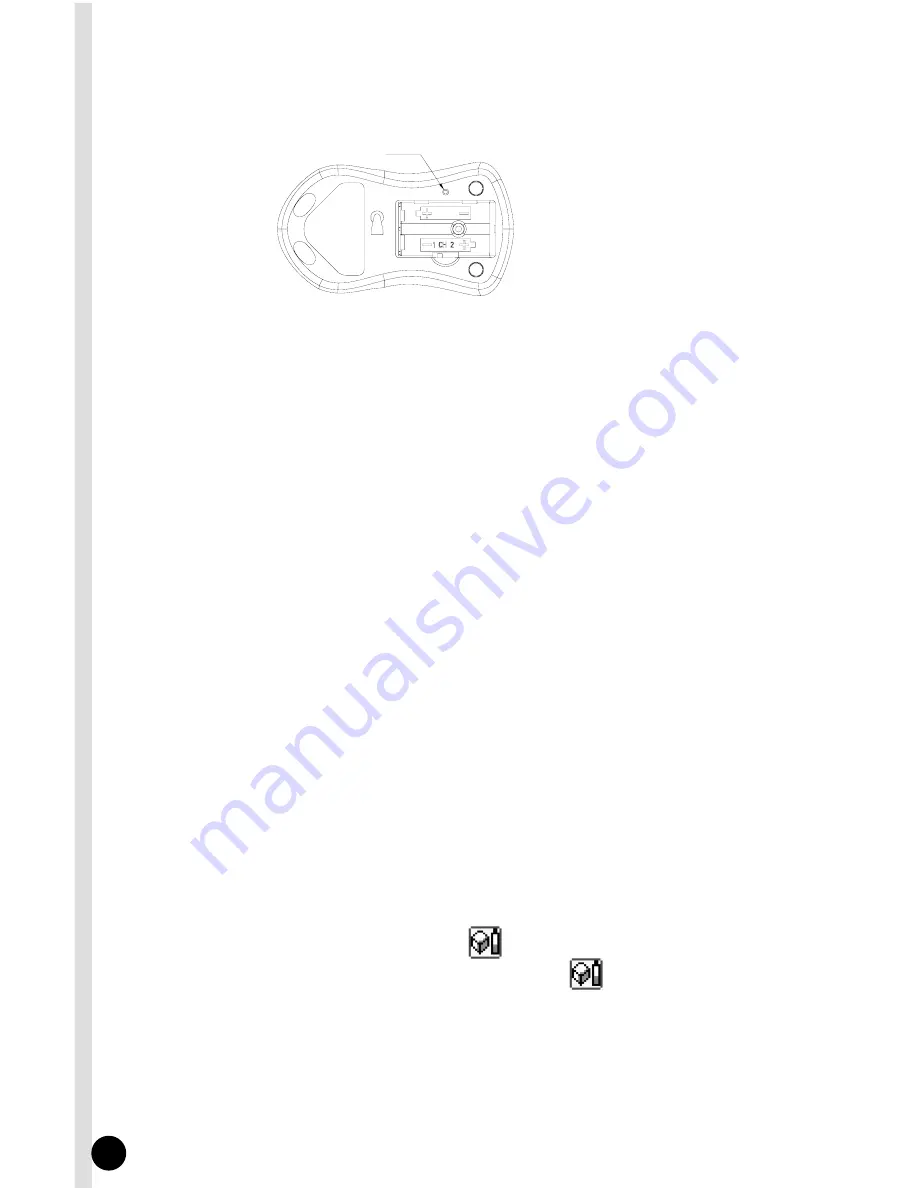
6. Turn the mouse over and locate the ID button on the left side of the mouse near 

the battery compartment.  Press the ID button firmly with a blunt pointed object
(like the tip of a ballpoint pen), then let go. The receiver should blink rapidly then
stop.

Important:

If 30 seconds pass before you complete step 6, you must repeat steps 5

and 6 to set the mouse ID.  If the ID button is pressed more than once time during
the mouse setup (step 6), you must start over with step 5 and set the receiver ID. You
do not need to reset the keyboard ID. 

7. To quickly verify that your new keyboard and mouse are properly synchronized,

depress a key or two on your keyboard.  If the LED on the Receiver blinks 
steadily, then it has made the connection.  For the mouse, simply move it around 
on a flat surface and click a button or two.  If the LED on the receiver blinks  
steadily, then the mouse has made the connection as well.  

8. Now both the keyboard and mouse should be communicating properly.  If they do

not seem to work please check for proper installation of the batteries and repeat
the steps again. 

9. After you have verified that both your keyboard and mouse are functioning 

properly, you should shut down your computer and remove your previous key-
board and mouse. 

Notes:

1. You must follow the procedure above to set the ID of the receiver, keyboard 

and mouse.

2. Once the receiver ID button is pressed you have 30 seconds to complete the 

entire process, or you will need to begin again.

3. Once the keyboard or mouse ID buttons have been pressed, the green receiver 

light will flash. Once the device ID is set, it will stop flashing and remain fully lit.  

3.2.2 Replacing Batteries and Resetting ID Buttons

When the batteries are low, a battery low icon          will show on the right-bottom corner
of the taskbar instead of the keyboard driver software icon        . At that time you must
replace the batteries.

IDs need to be reset when batteries are changed. 

When changing the batteries on one part of the product, you do not need to reset all the
IDs. Simply reset the ID for the receiver and the part that required new batteries. You must
press the receiver ID button first and then press the keyboard or mouse button.  Refer to
the steps 3 and 4 or 5 and 6 above.   

Synch Button

ID Button of Mouse 

ID Button

Summary of Contents for RF7000

Page 1: ...USER S GUIDE Wireless EZ Touch Wireless EZ Touch Keyboard Optical Mouse Keyboard Optical Mouse RF7000 VERSION 1 2 USER S GUIDE...

Page 2: ......

Page 3: ...out obligation to notify any person or organization of such changes In no event will the manufacturer be liable for direct indirect special incidental or consequential damages arising out of the use o...

Page 4: ......

Page 5: ...Touch Software 7 6 1 To Display the KeyMaestro Dialogue Box 7 6 2 To Display the Configure Button Dialogue Box 8 7 1 Using the Keyboard 9 7 1 Office Application Keys 9 7 2 Internet Keys 9 7 3 Applicat...

Page 6: ...er channel there is virtually no interference Additionally the RF7000 creates a fast efficient work environment for all your favorite functions and programs One touch editing features allow you to con...

Page 7: ...rance between the receiver and other electronic devices b There should be a minimum of 8 inches clearance between the receiver and the monitor c The distance between the receiver and the wireless mous...

Page 8: ...s 2 Battery life for the keyboard is approximately 3 4 months depending on the intensity of usage 3 Make sure the receiver is at least 8 inches away from the monitor and is placed in a location relati...

Page 9: ...er your Windows Operating System CD may be needed Once the USB Receiver is finished being detected continue to step 3 3 Press the ID button on the top of the receiver once The LED light will start to...

Page 10: ...ion of the batteries and repeat the steps again 9 After you have verified that both your keyboard and mouse are functioning properly you should shut down your computer and remove your previous key boa...

Page 11: ...e you will have to install the mouse driver software which is located on the included driver CD To install the mouse driver software Step 1 Make sure the driver CD is still in your computers CD ROM dr...

Page 12: ...them first To uninstall the keyboard driver software Step 1 Right click the driver icon and select Exit command to exit the driver program Step 2 Click Start menu on the left bottom taskbar Step 3 Mo...

Page 13: ...llowing manners Simply select what type of configuration you like by selecting the appropri ate circle and follow the steps below 6 2 1 Label In the Label box type the name of the applica tion that th...

Page 14: ...o the last page you viewed Returns to the page you viewed before selecting the back button If a page you are trying to view is taking too long to open click this button to stop Refreshes the current W...

Page 15: ...ting on page 15 for more information 7 4 MULTIMEDIA KEYS Mute Volume Up Volume Down Stop Mutes the sound Adjusts volume up Adjusts volume down Stops the playing of the CD player Previous Skips backwar...

Page 16: ...es the last action completed Reverses the action of the Undo command Replies to the selected e mail in Microsoft Outlook or Outlook Express Replies to all copied on the selected e mail in Microsoft Ou...

Page 17: ...only have to use the wheel to control this function 3 Works as Configure function page 4 Please refer to the description of the Smart Office Keyboard Software on page 5 for more information Copy Past...

Page 18: ...rowsing button Pointers folder allows you to choose your favorite pointer shape Cursor folder select the special cursor functions such as trails for your cursor or loop function Action folder re defin...

Page 19: ...Auto Panning Move the cursor and then the document will scroll slowly in the direction you just moved www Back Returns to the last page you viewed www Forward Returns to the page you viewed before se...

Page 20: ...After installing the Keyboard software the Keyboard icon will display on the system tray If you want to reinstall the software for some reason you must remove the Keyboard driver from your computer f...

Page 21: ...Off key does not work For Windows 98 SE Me 2000 XP the default of Log Off function must be enabled in before you use the log off key Enable the Log Off function key by opening the Windows Start Menu S...

Page 22: ...LACEMENT OF ANY DEFECTIVE PRODUCT THIS WARRANTY AND REMEDY IS EXCLUSIVE AND WE SPECIFICALLY DISCLAIM ANY AND ALL OTHER EXPRESS OR IMPLIED WARRANTIES IN NO EVENT SHALL MEMOREX OR ANY SUPPLIER OR SELLER...

Page 23: ...e equipment off and on the user is encouraged to try to correct the interference by one or more of the following measures Reorient or relocate the receiving antenna Increase the separation between the...

Page 24: ...2003 Memorex Products Inc Santa Fe Springs CA 90670 www memorex com All other brand or product names are trademarks or registered trademarks of their respective owners 5395 6196...

Reviews: