background image

38

DVD SETUP MENU (CONTINUED)

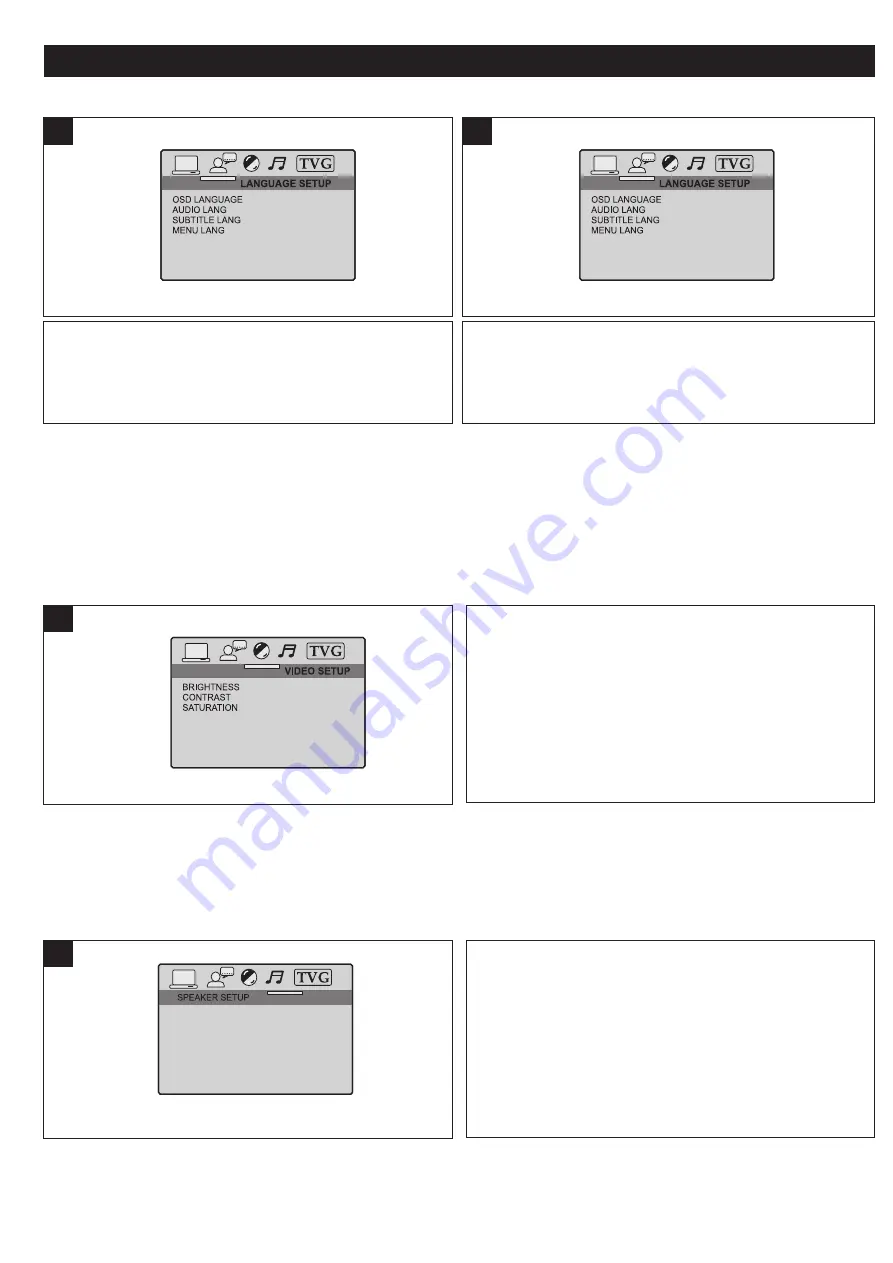
Select the language the subtitles will be in (ENGLISH,

SPANISH OR FRENCH). The DVD must be recorded in the

selected language, otherwise the default language of the

DVD will be shown. Select OFF to turn the subtitles off.

1

Select the language the disc menu will be in (ENGLISH,

SPANISH OR FRENCH). The DVD’s disc menu must be

made in the selected language, otherwise the default

language of the DVD will be shown.

1

SUBTITLE LANGUAGE

PICTURE SETTINGS

MENU LANGUAGE

VIDEO SETUP MENU:

Press the SETUP button to enter the menu, select VIDEO SETUP using the Navigation (

,

®

) buttons, then press the

Navigation (

) button to select it. Use the Navigation (

π

,

) buttons to select one of the Setup options, then press the

ENTER/Play/Pause (

®p

) or Navigation (

®

) button to select it. Use the Navigation (

π

,

) buttons to change the desired

setting, then press the ENTER/Play/Pause (

®p

) or Navigation (

®

) button to return to the previous setting. Return to the

previous menu as described on page 35.

Adjust the settings as follows:

Brightness:

Adjust to lighten or darken the picture.

Contrast:

Adjust to increase or decrease the contrast.

Saturation:

Adjust to increase or decrease the overall

saturation.

1

SPEAKER SETUP MENU:

Press the SETUP button to enter the menu, select SPEAKER SETUP using the Navigation (

,

®

) buttons, then press the

Navigation (

) button to select it. Select/change the Setup option as described on page 35.

LT/RT:

Select to hear the sound in theatrical downmix

mode.

STEREO:

Select to hear the sound in stereo

downmix mode.

DOWNMIX

1

DOWNMIX

All manuals and user guides at all-guides.com

Summary of Contents for MVUC821 - DVD LCD TV Kitchen Clock Radio

Page 1: ...Before operating this product please read these instructions completely User s Guide 8 TFT DVD Player with AM FM Radio MVUC821 All manuals and user guides at all guides com a l l g u i d e s c o m ...

Page 2: ...e 33 EQ Bass 33 Guide 34 Audio 34 Scale Mode 34 Adjusting the Picture 34 DVD Setup Menu 35 General Setup Menu 36 Language Setup Menu 37 Video Setup Menu 38 Speaker Setup Menu 38 TVG TV Guardian 39 Basic Operation 42 Resume 42 Volume 42 Mute 42 EQ Bass 42 Playback of a DVD 43 Skip 44 Fast Search 44 Zoom 44 Pause 44 Title Chapter Time Search 45 Repeat Playback 45 A B Repeat Playback 45 Title Menu 46...

Page 3: ... not installed and used in accordance with the instructions may cause harmful interference to radio communications However there is no guarantee that interference will not occur in a particular installation If this equipment does cause harmful interference to radio or television reception which can be determined by turning the equipment off and on the user is encouraged to try to correct the inter...

Page 4: ...rface This product should never be placed near or over a radiator or heat source This product should not be placed in a built in installation such as a bookcase or rack unless proper ventilation is provided or the manufacturer s instructions have been adhered to 10 POWER SOURCES This product should be operated only from the type of power source indicated on the marking label If you are not sure of...

Page 5: ...determine that the product is in proper operating condition 21 WALL OR CEILING MOUNTING The product should be mounted to a wall or ceiling only as recommended by the manufacturer 22 DAMAGE REQUIRING SERVICE Unplug the product from the wall outlet and refer servicing to qualified service personnel under the following conditions a When the power supply cord or plug is damaged b If liquid has been sp...

Page 6: ... Warning Cleaning and adjustment of lenses and or other components of playback mechanism should be performed by a qualified service technician NOTES ON MOISTURE CONDENSATION Moisture condensation damages this unit Please read the following carefully Moisture condensation occurs for example when you pour a cold drink into a glass on a warm day Drops of water form on the outside of the glass In the ...

Page 7: ...ed downwards as shown 4 With a screwdriver not an electric screwdriver or drill fasten the four screws into the spacer holder holes or fasten the screw to your set if spacers were not needed Start screwing at two opposite corners of the unit for better support 5 Push the release latch pull down the screen to a maximum of 180 and rotate 6 IMPORTANT NOTES Since the unit is rather heavy be careful wh...

Page 8: ...ns 11 Open Close Button 12 Play Pause p Button 13 Stop X Button 14 Navigation Skip o Button 15 Navigation π Button 16 Power Button 17 Remote Sensor 18 CLOCK Button 19 Navigation Button 20 Navigation Skip n Button 21 TIMER Button 7 LOCATION OF CONTROLS FRONT 4 5 6 8 9 10 12 11 13 15 16 14 21 7 3 1 2 20 19 1718 All manuals and user guides at all guides com ...

Page 9: ...IDEO Input Jack 4 ANT INPUT Jack 5 AUDIO Left Right Input Jack 6 FM Wire Antenna 7 AM Antenna Terminals AM LOOP ANTENNA PART NO 129E 0002711 00 SPACER PART NO 3111 001005 30000 SCREW PART NO 0431 150361 10002 Consumer Replaceable Part See page 55 to order REAR 2 3 5 7 1 1 6 4 All manuals and user guides at all guides com ...

Page 10: ...NER BAND Button 15 DTV Button 16 DISC Button 17 OPEN CLOSE Button 18 MUTE Button 19 GOTO Button 20 EQ BASS Button 21 PROGRAM Button 22 Navigation π Button 23 VOLUME Up Down Buttons 24 ENTER Play Pause p Button 25 Navigation Search l Button 26 Navigation Button 27 Stop X Button 28 TITLE Button 29 TIMER Button 30 CLOCK Button 31 SCALE MODE Button 32 ANGLE Button 33 AUDIO Button REMOTE CONTROL PART N...

Page 11: ... 2 Use only the size and type of battery specified 3 Be sure to follow the correct polarity when installing the battery as indicated next to the battery compartment A reversed battery may cause damage to the device 4 If the device is not to be used for a long period of time remove the battery to prevent damage or injury from possible battery leakage 5 Do not try to recharge a battery not intended ...

Page 12: ...300 ohm twin lead wire use a 300 75 ohm matching transformer NOT SUPPLIED AM ANTENNA Connect the black AM Loop Antenna wire to the black AM Antenna terminal and the white AM Loop Antenna wire to the white AM Antenna terminal FM ANTENNA For best FM reception extend the FM Wire Antenna to its full length NOTES To improve the AM signal move the AM Loop Antenna away from the system AC Adaptor and othe...

Page 13: ...UX IN will appear in the display and press PLAY on the external unit From VCR OUT jacks INCOMING CATV CABLE VCR CONNECTION USING AUDIO VIDEO CABLES Follow the instructions below to connect an external unit such as a VCR or second DVD player to your unit using Audio Video cables CABLES NOT INCLUDED VCR or second DVD Adjust the 8 TFT LCD screen as follows ADJUSTING THE SCREEN Push the area as shown ...

Page 14: ...e will appear in the display and the unit will list the folders tracks MP3 is the abbreviation of MPEG1 Audio Layer 3 MPEG Audio is a format that compresses the audio portion only IMPORTANT NOTES Due to many variables including recording condition type of disc writing software etc this unit does not guarantee playback of all MP3 discs IMPORTANT It is important that you read the manual that accompa...

Page 15: ... for home and other limited viewing uses only unless otherwise authorized by Macrovision Corporation Reverse engineering or disassembly is prohibited Region Management Information This DVD Player is designed and manufactured to respond to the Region Management Information that is recorded on a DVD disc If the Region number described on the DVD disc does not correspond to the Region number of this ...

Page 16: ...PM setting 2 1 2 SETTING THE TIME Press the CLOCK button again the minute digits will blink 3 Press the CLOCK button again and the clock will be set 5 Press the Navigation π 1 and or 2 button to set the current minute NOTE While in the DTV Aux In or Disc mode press the CLOCK button to show the time in the display Press again to return to the previous mode 2 1 4 All manuals and user guides at all g...

Page 17: ...minutes 2 1 2 SETTING THE TIMER This unit has a convenient countdown timer set as shown below Press the TIMER button again to confirm the Timer Indicator will appear in the display and the timer will count down 3 To cancel the Timer feature press the TIMER button again the Timer indicator will disappear from the display To shut the timer off press the TIMER button 4 All manuals and user guides at ...

Page 18: ...y tune a station press and hold the Navigation Search m button 1 and or Navigation Search l button 2 for approximately one second the unit will automatically tune in the next strong broadcasting station When a strong FM station is received the FM Stereo indicator will light 2 1 5 Adjust the volume as desired using the VOLUME Up 1 and Down 2 buttons Repeatedly press the EQ BASS button 3 to select o...

Page 19: ...de 2 SETTING AND RECALLING RADIO PRESETS Press the PROGRAM button STORE 1 will appear in the display 3 TO RECALL PRESETS While in Radio mode AM FM To recall a radio preset press the Channel Up Skip n button 1 to increase and or the Channel Down Skip o button 2 to decrease the Radio Preset number 2 1 5 Select the desired preset using the Navigation π 1 and or 2 button then press the PROGRAM button ...

Page 20: ...s The Captions will appear in places on the screen where they will least interfere with the picture usually on the bottom of the screen News programs will usually show three line Closed Captions which scroll onto the screen Most other shows provide two or three lined Captions placed near the character who is speaking so the viewer can follow the dialogue Words in italics or underlined describe tit...

Page 21: ...OG CAPTION Select OFF to turn the analog closed captions off CC1 CC4 to select one of the closed captions or T1 T4 to select one of the text modes DIGITAL CAPTION Select OFF to turn the digital closed captions off or SERVICE1 to SERVICE 6 to select one of the service digital closed captions FONT SIZE Select a font size for the captions FONT COLOR Select the desired font color for the captions FONT...

Page 22: ...it the setup menu 2 1 4 Select the desired Language English Spanish or French using the Navigation π 1 and or 2 button to set as desired 2 1 3 Daylight saving Off DEFAULT 2 1 3 Press the ENTER Play Pause p button 1 again to select it Press the ZOOM EXIT button 2 to exit the setup menu 2 1 2 Select the Setup menu as described in steps 1 and 2 above Press the Navigation π 1 and or 2 button to select...

Page 23: ...ss the Navigation π 2 and or 3 button to select the Setup menu Daylight saving Off 1 3 1 2 3 2 1 Press the ENTER Play Pause p button 1 again to set 2 1 4 Select the desired Time Zone using the Navigation π 1 and or 2 button to set as desired 2 1 3 Press the ZOOM EXIT button to exit the setup menu 6 Press the Navigation π 1 and or 2 button to select the DAYLIGHT SAVINGS option then press the ENTER ...

Page 24: ...el menu 1 3 1 2 Press the ENTER Play Pause p button 1 to enter the Channel menu Press the Navigation π 2 and or 3 button to select the AUTO PROGRAM option then press the ENTER Play Pause p button 1 again 2 Select OK by pressing the ENTER Play Pause p button to start the Auto Programming The unit will automatically cycle through all the ATSC channels and store active channels into memory When Auto ...

Page 25: ...L PROGRAM option then press the ENTER Play Pause p button 1 again 2 Select OK by pressing the ENTER Play Pause p button 1 to start the Manual Programming Press the number 0 9 buttons 2 or the Navigation Search m button 3 and or Navigation Search l button 4 to select the channels 1 4 3 2 3 Press the ENTER Play Pause p button 1 again to scan the channel Repeat steps 3 and 4 to set the desired channe...

Page 26: ...ss the Navigation π 2 and or 3 button to select the Channel menu 1 3 1 2 Press the ENTER Play Pause p button 1 to enter the Channel menu Press the Navigation π 2 and or 3 button to select the FAVORITE EDIT option then press the ENTER Play Pause p button 1 again 2 EDITING THE FAVORITE LIST 3 2 1 Press the Navigation π 1 and or 2 button to select a channel then press the ENTER Play Pause p button 3 ...

Page 27: ... then press ZOOM EXIT button 4 to exit the setup menu 2 SELECTING THE FAVORITE CHANNEL LIST 3 4 2 1 SETTING THE VIDEO Press the ENTER Play Pause p button 1 to enter the Video menu Press the Navigation π 2 and or 3 button to select one of the video options Brightness Saturation or Contrast 3 2 1 2 With the power on and the DTV mode selected press the SETUP button 1 the menu will appear Press the Na...

Page 28: ...he Parental Lock submenu appears NOTE The default password is 1234 2 PARENTAL CONTROL SET UP NOTE See page 31 to change the password 3 1 2 With the power on and the DTV mode selected press the SETUP button 1 the menu will appear Press the Navigation π 2 and or 3 button to select the Parental Control menu 1 2 1 3 Press the Navigation π 1 and or 2 button to select the LOCK option then press the ENTE...

Page 29: ...is blocked 3 4 TV PARENTAL GUIDE SET UP 3 2 1 2 1 3 2 4 3 1 You can also block some or all criteria for each level for Fantasy Violence FV Sexual Dialogue D Language L Sexual Situations S or Violence V While in a column for a particular rating level i e TV PG use the Navigation Search m button 1 and or Navigation Search l button 2 to select the desired criteria then press the ENTER Play Pause p bu...

Page 30: ... button to select a rating and then the ENTER Play Pause p button 3 to Block ratings at or above cannot be viewed or Unblock ratings at or under can be viewed NOTE A Lock indicates that the rating is blocked 3 4 MPAA SET UP 3 2 1 2 1 3 When finished press the ZOOM EXIT button three times to exit the menus G All ages PG Parental Guidance PG 13 Parental Guidance less than 13 years old R Under 17 yea...

Page 31: ...ve cannot be viewed or Unblock ratings at or under can be viewed See below for rating descriptions NOTE A Lock indicates that the rating is blocked 3 4 CANADIAN ENGLISH FRENCH RATING SET UP 3 2 1 2 1 3 When finished press the ZOOM EXIT button three times to exit the menus C Children C8 Children 8 years and older G General programming suitable for all audiences PG Parental guidance 14 Viewers 14 ye...

Page 32: ... the ZOOM EXIT button twice to exit the menus 2 1 3 1 Once in the Parental Control Menu Press the Navigation π 1 and or 2 button to select the DOWNLOADABLE RRT option then press the ENTER Play Pause p button 3 again Then the RRT Setting Region Rating Table Setting menu will appear Use the Navigation π 1 and or 2 button to select the desired rating level and press the ENTER Play Pause p button 3 to...

Page 33: ...wer button to turn the unit on the STANDBY indicator will turn off 1 For proper operation before selecting channels they must be set into the unit s program memory see page 23 Press and release the Channel Up Skip n button 1 or Channel Down Skip o button 2 The TV automatically stops at the next channel set into memory ATSC Direct Channel Selection buttons 0 9 3 Use these buttons to select a channe...

Page 34: ...emote a sub menu will display on the top left coner of the screen showing the status of existing signal e g Language Channel Signal Signal Strength etc This screen will disappear after few seconds 1 VOLUME Press the VOLUME Up 1 Down 2 buttons to adjust the sound level 1 2 1 Repeatedly press the EQ BASS button to select one of the EQ settings Flat Classic Rock Jazz or Pop or press and hold to turn ...

Page 35: ...tedly to scroll through all available language programs 1 SCALE MODE While using DTV press the SCALE MODE button to set the desired screen mode NORMAL FILL or OVERSCAN 1 ADJUSTING THE PICTURE Press the BAND button 1 on the main unit repeatedly to select one of the video options BRIGHTNESS Saturation and Screen type Wide Screen or normal Adjust as desired using the Navigation buttons 2 2 1 2 1 All ...

Page 36: ...SC button 2 to select the DVD mode 2 Press the SETUP button 3 to enter the Setup menu 3 Select one of the Setup icons at the top of the screen using the Navigation buttons 4 then press the Navigation button 4 to select it 4 Use the Navigation π buttons 4 to select one of the Setup options then press the Navigation button 4 to select it 5 Use the Navigation π buttons 4 to select the desired setting...

Page 37: ...ck band at the top or bottom 16 9 Wide Select to fit the whole image on the screen 1 SCREEN SAVER TV TYPE To change the password press the Navigation button to enter the password input section Enter the default password 1234 using the Number buttons if this is the first time entering the password then press the ENTER Play Pause p button to confirm When the correct password is entered the Lock icon...

Page 38: ...ory settings 1 POWER RESUME DEFAULT LANGUAGE SETUP MENU Press the SETUP button to enter the menu select LANGUAGE SETUP using the Navigation buttons then press the Navigation button to select it Select change the Setup option as described on page 35 Select the desired language ENGLISH SPANISH OR FRENCH for the On Screen display to display text Note that the DVD must have the language included in or...

Page 39: ...f the Setup options then press the ENTER Play Pause p or Navigation button to select it Use the Navigation π buttons to change the desired setting then press the ENTER Play Pause p or Navigation button to return to the previous setting Return to the previous menu as described on page 35 Adjust the settings as follows Brightness Adjust to lighten or darken the picture Contrast Adjust to increase or...

Page 40: ...ou may use TVGuardian for the life of your unit Then the TVG Password menu will appear Input your password then press the ENTER Play Pause p button 2 to enter the TVG Setup menu NOTE The default password is 1234 Please refer to page 31 for how to change the TVG password 1 2 1 TVG TV GUARDIAN TVGuardian Feature T This product supports TVGuardian Foul Language Filtering Technology offering your fami...

Page 41: ...ion π buttons 1 to select between Filtered and Off select Filtered to filter the word subset then press the ENTER Play Pause p button 2 to confirm 1 2 2 TVGuardian Setup Menu TVG Modes Off No filtering Tolerant Filters only the most offensive foul language Moderate Increased standards for language filtering Strict Filters out all common offensive language See the following page for TVG notes Word ...

Page 42: ...an Web site as well as some additional information Press the SETUP button 3 to exit the screen NOTE TVG filters 95 of foul language in closed captioned words TVG does not filter out scenes or do voice overs Errors in the CC can cause TVG to miss words phrases TVG works on media that includes CC information You can verify whether a DVD supports CC by looking for the CC logo on the back cover of the...

Page 43: ...m the screen 1 RESUME To stop playback press the Stop X button 1 PRE STOP will appear on the TV screen Because the unit will remember where you stopped simply press the ENTER Play Pause p button 2 to resume playback where you left off resuming playback If the Stop X button 1 is pressed twice the unit will stop completely 2 1 1 VOLUME Press the VOLUME Up 1 Down 2 buttons to adjust the sound level 1...

Page 44: ...em then press the ENTER Play Pause p button Please make sure to refer to the disc s jacket or case for additional information Resuming playback may not work on all discs Press the CLOCK button to show the time in the display and press again to show the Title Chapter playback time PLAYBACK OF A DVD IMPORTANT NOTES INVALID KEY will appear on the TV screen during operation if you try to access a func...

Page 45: ...d or backward at high speed until the ENTER Play Pause p button 3 is pressed normal playback will resume at that point 2 1 1 SKIP FAST SEARCH Press the ENTER Play Pause p button once to pause the picture Press again to resume normal playback 1 PAUSE Press the EXIT ZOOM button 1 once and the unit will zoom in 2x Press a second or third time and the unit will zoom in 3x 4x Press a fourth time and th...

Page 46: ... time While in the Playback mode press the REPEAT button once CHAPTER will appear on the screen for a few seconds and the currently playing Chapter will repeat continuously Press the REPEAT button a second time TITLE will appear on the screen for a few seconds and the currently playing Title will repeat continuously Press the REPEAT button once more to cancel Repeat mode 1 While in the Playback mo...

Page 47: ...OSD INFO button once to display the disc type track chapter and elapsed playing time Press a second time to display the Language Language type Audio type Subtitle mode and Angle Press a third time and the OSD information will disappear from the display 1 DVD MENU OSD INFO When in the DVD mode press the BAND button 1 on the main unit repeatedly to select one of the video options BRIGHTNESS Saturati...

Page 48: ... Navigation π buttons 2 to move the cursor NOTE To enter a title or chapter number larger than 9 simply enter the two digit number 1 2 TO CLEAR ALL THE PROGRAMS Use the Navigation π button to select CLEAR at the bottom of the Program menu then press the ENTER Play Pause p button TO MODIFY A PROGRAM To modify the programmed order use Navigation π buttons to highlight the modified item and re enter ...

Page 49: ...button 1 is pressed twice the unit will stop completely 2 1 3 PLAYBACK OF A CD Press the CLOCK button to show the time in the display and press again to show the CD playback time Press the ENTER Play Pause p button once to pause the CD Press again to resume normal playback 1 PAUSE Press the Number buttons 0 9 corresponding to the track number you would like to play and the unit will playback the d...

Page 50: ...lowing options REP 1 will repeat the selected track continuously until the STOP button is pressed REP ALL will repeat the entire disc continuously until the STOP button is pressed or OFF 1 FORWARD REVERSE REPEAT ONE ALL PLAY When in the CD playback mode press the OSD INFO button once to display the track Repeat mode and elapsed playing time Press a second time and the OSD information will disappea...

Page 51: ... the currently playing file and the yellow cursor indicates the file to be selected You can press the Navigation π and ENTER Play Pause button to select the Music or Picture logo at the bottom of the screen which will show the music or picture files inside the disc 5 Press the Navigation button 1 and select the desired folder using the Navigation π buttons 1 Then press the ENTER Play Pause p butto...

Page 52: ...n is pressed or OFF 1 REPEAT ONE ALL PLAY When in the MP3 playback mode press the OSD INFO button once to display the track Repeat mode and elapsed playing time Press a second time and the OSD information will disappear from the display 1 OSD INFO MP3 FAQs Frequently Asked Questions Please read before playing an MP3 disc What is an MP3 file An MP3 file is a computer format that makes a usually lar...

Page 53: ...ture After the slideshow is done it will go to thumbnail view You can press the Stop X button 3 to stop the slideshow before it is finished then the thumbnail view will appear In thumbnail view you can press the Navigation π button 2 to select the desired picture or go to the next previous page Select the desired picture and then press the ENTER Play Pause p button 1 to view it 1 3 2 2 2 2 3 NOTES...

Page 54: ...e in the display and press again to show the AUX IN 2 1 1 PLAYBACK OF A UNIT CONNECTED TO THE AV JACKS Press the BAND button 1 on the main unit repeatedly to select one of the video options BRIGHTNESS Saturation and Screen type Wide Screen or normal Adjust as desired using the Navigation buttons 2 Note For the Volume Control Mute EQ BASS please refer to page 33 2 1 2 1 ADJUSTING THE PICTURE All ma...

Page 55: ...he disc This is normal on some discs Select the TV type 4 3PS 4 3LB 16 9 desired Install fresh batteries Install batteries according to the diagram Aim the remote at the sensor Operate within approx 5 meters or reduce the light in the room Move obstacle POSSIBLE CAUSE AC cord unplugged Condensation has formed Wrong type of disc inserted Unit needs to be reset The disc is dirty or inserted incorrec...

Page 56: ...ock the DVD DVD not inserted or inserted upside down DVD is not selected The disc is not placed in the guide The disc is dirty Some features and functions are not available on all discs If the audio or subtitle language does not appear on the disc then the initial setting will not be seen heard Subtitles appear only when the discs contain them Subtitles not turned on Password forgotten FOR ADDITIO...

Page 57: ...the disc Never wipe in circular motions Discs should be stored in their cases after each use to avoid damage Do not expose discs to direct sunlight high humidity high temperatures or dust etc Prolonged exposure or extreme temperatures can warp the disc Do not stick or write anything on either side of the disc Sharp writing instruments or the ink may damage the surface Cleaning the Unit To prevent ...

Page 58: ... 4 3 and 16 9 Resolution 480 x 220 Contrast Ratio 300 1 Brightness 300 cd m2 Speaker Output Power 5W x 2 DTV Signal supported 480i 480p 720p 1080i TV Tuner ATSC Discs Played DVD VIDEO Disc 12cm single sided single layer 12cm single sided dual layer 12cm double sided single layer 8cm single sided single layer 8cm single sided dual layer 8cm double sided single layer COMPACT DISC 12cm disc 8cm disc ...

Page 59: ...Imation Electronics Products A Division of Imation Enterprises Corp Weston FL Printed in Hong Kong www memorexelectronics com 0521 001000 00000 All manuals and user guides at all guides com ...

Reviews: