background image

11

CONNECTION TO OUTPUT DVD (CONTINUED)

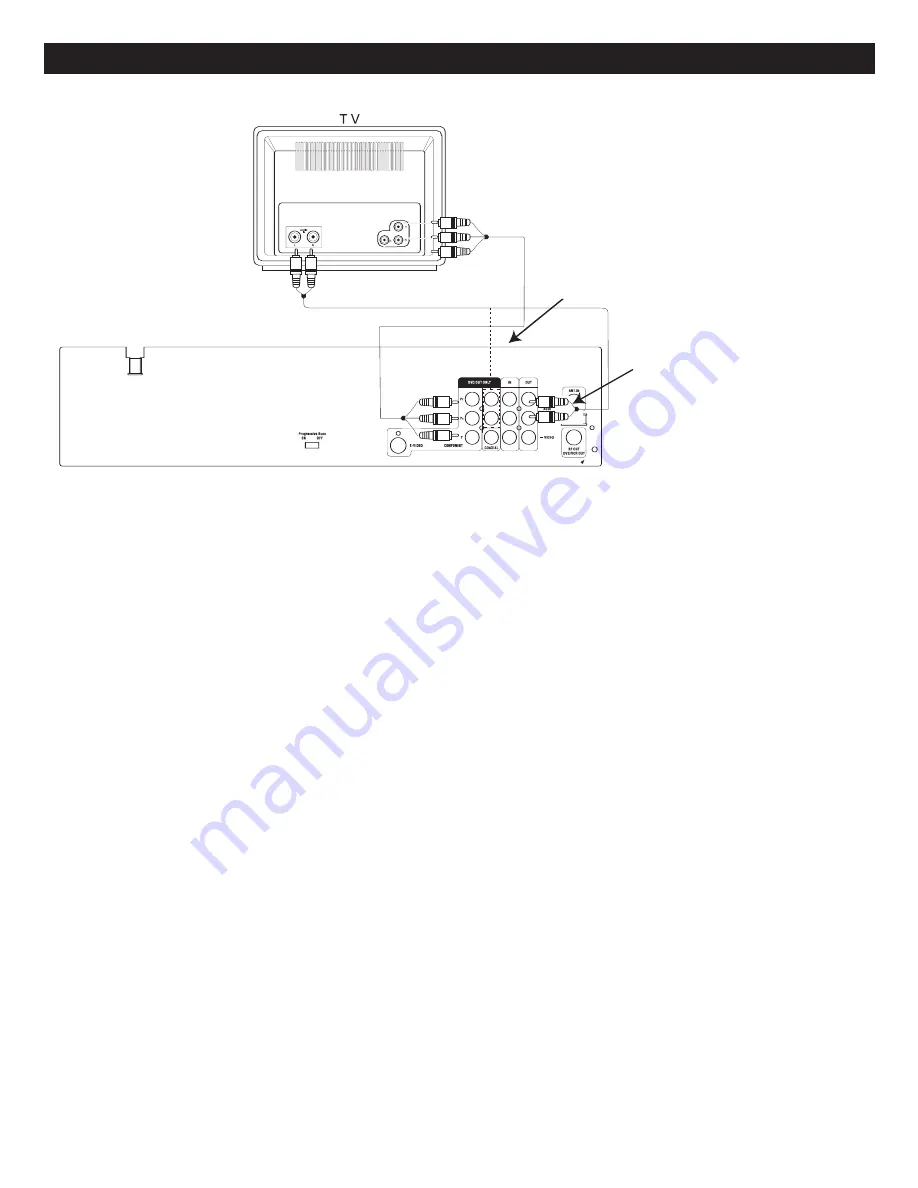
CONNECTING THE UNIT TO A TV USING THE Y, Pb/Cb, Pr/Cr JACKS

PROGRESSIVE (Y, P

B

, P

R

) VIDEO OUT:

Use these jacks to connect to a TV with progressive video input jacks, then set the PROGRESSIVE SCAN switch to ON.

Progressive Scan is a video scanning system that displays all lines in a frame in one pass, as opposed to the traditional

system, interlaced scan. This connection provides optimum quality. To ensure maximum picture quality, use three video-

grade cables for connections. Note that it is essential to match the color-coded connectors with a compatible TV. 

525 LINE DIGITAL PROGRESSIVE-SCAN COMPONENT VIDEO OUTPUT

Compared to standard interlaced video, Progressive Scan effectively doubles the amount of video information fed to your

TV or monitor. The result is a stable, flicker-free image. (Check your TV/monitor for compatibility with this feature.)

For the very highest picture quality, try watching a movie on DVD-Video on a Progressive-Scan compatible TV.

NOTES

If you connect a TV that is not compatible with a Progressive Scan signal and set the PROGRESSIVE SCAN switch to

ON, you will not be able to see any picture at all or "PSCAN" will appear on the screen. Slide the PROGRESSIVE

SCAN switch to the OFF position to turn the progressive scan function off.

•  CONSUMERS SHOULD NOTE THAT NOT ALL HIGH DEFINITION TELEVISION SETS ARE FULLY COMPATIBLE

WITH THIS PRODUCT AND MAY CAUSE ARTIFACTS TO BE DISPLAYED IN THE PICTURE. IN CASE OF 525

PROGRESSIVE SCAN PICTURE PROBLEMS, IT IS RECOMMENDED THAT THE USER SET THE PROGRESSIVE

SCAN SWITCH TO OFF. 

•  To turn off the Progressive Scan function, turn off the unit as described above and switch the Progressive Scan switch

OFF. The Progressive Scan function will turn off whenever you turn on the player and TV.

NOTES FOR CONNECTING:

•  Set the VIDEO OUT Option (on the GENERAL Menu

Page) to YUV if using the Component Video Out jack. 

• Your TV must have Y, Pb, Pr or Y, Cb, Cr Input jacks.

• Set the TV’s TV/VIDEO button or switch to the VIDEO

setting.

• When connecting, refer to the owner’s manual of the TV,

as well as this manual.

• When connecting, make sure the power is off and both

units are unplugged before making any connections.

•  Component Y, Pb/Cb, Pr/Cr Jacks can only be used for

DVD Playback, not for VCR or TV mode. 

•  If using a TV with a blue screen option, turn the option off,

on the TV for best results. 

If your TV has separate AUDIO IN

jacks for Composite Video and Y,

Pb/Cb, Pr/Cr Inputs, connect to

these jacks.

If your TV has one set of AUDIO IN

jacks for Composite Video and Y,

Pb/Cb, Pr/Cr Inputs, connect to

these jacks.

Summary of Contents for MVD4543 Suffix A

Page 1: ...Before operating this product please read these instructions completely User s Guide DVD CD VCD MP3 PHOTO CD Player and Video Cassette Recorder MVD4543...

Page 2: ...ex Number Search 29 VCR Options 30 VCR Operation 31 Loading Unloading 31 To Prevent Accidental Erasure 31 Tape Speed and Max Recording Time 31 Start Stop Playback 32 To Select the External Input 32 Co...

Page 3: ...cy energy and if not installed and used in accordance with the instructions may cause harmful interference to radio communications However there is no guarantee that interference will not occur in a p...

Page 4: ...acing the product on a bed sofa rug or other similar surface This product should never be placed near or over a radiator or heat source This product should not be placed in a built in installation suc...

Page 5: ...determine that the product is in proper operating condition 21 WALL OR CEILING MOUNTING The product should be mounted to a wall or ceiling only as recommended by the manufacturer 22 DAMAGE REQUIRING...

Page 6: ...llow that product s instructions Warning Cleaning and adjustment of lenses and or other components of playback mechanism should be performed by a qualified service technician NOTES ON MOISTURE CONDENS...

Page 7: ...nonpolarized AC outlet do not file or cut the wide blade It is the user s responsibility to have an electrician replace the obsolete outlet AC Plug AC Outlet 1 Video Cassette Tape Indicator When a vid...

Page 8: ...HANNEL Up Down Buttons 14 TV VCR Button 15 EJECT Button VCR 16 Video IN Audio L R Input Jacks For Video 2 7 LOCATION OF CONTROLS CONTINUED FRONT 1 Progressive Scan On Off Switch DVD ONLY 2 S Video Out...

Page 9: ...SP SLP Button VCR 16 AV1 AV2 Button 17 ANGLE Button 18 REPEAT Button 19 REPEAT A B Button 20 DISPLAY Button 21 TV VCR Button 22 COUNTER RESET Button 23 100 Button 24 PROGRAM Button VCR 25 FORWARD SEA...

Page 10: ...nstalling the batteries as indicated in the Battery Compartment Reversed batteries may cause damage to the device 3 Do not mix different types of batteries together e g Alkaline Rechargeable and Carbo...

Page 11: ...Page to S VIDEO if using the S Video Out jack The connections on this page can only be used for DVD Playback not for VCR playback If using a TV with a blue screen option turn the option off on the TV...

Page 12: ...creen Slide the PROGRESSIVE SCAN switch to the OFF position to turn the progressive scan function off CONSUMERS SHOULD NOTE THAT NOT ALL HIGH DEFINITION TELEVISION SETS ARE FULLY COMPATIBLE WITH THIS...

Page 13: ...best results If you place the unit near a tuner the radio broadcast sound might be distorted In this case move the unit away from the tuner The Digital Audio Output can only be used for DVD playback...

Page 14: ...ion turn the option off on the TV for best results NOTES The signal will be sent to the TV regardless if the unit is on or off You can use the VCR s tuner to change channels or you can use your TV s t...

Page 15: ...twin lead wire to a combiner NOT SUPPLIED Attach the combiner to the antenna jack NOTE If your VHF antenna has a twin lead wire use a 300 75 ohm matching transformer then connect the transformer to t...

Page 16: ...y Visit your local electronics supply store When finished connecting press the Power On Standby button to turn the unit on then press the SELECT DVD VCR button on the unit or the VCR button on the rem...

Page 17: ...VD disc as there are features that are on the player that cannot be used with certain DVDs There are also extra features on the DVD disc that are different for each DVD disc so they are not explained...

Page 18: ...Corporation and is intended for home and other limited viewing uses only unless otherwise authorized by Macrovision Corporation Reverse engineering or disassembly is prohibited Region Management Info...

Page 19: ...Stereo L Mono R Mono Mix Mono Dual Mono Dual Mono 1 1 Setup General Setup Page Normal PS Normal LB Wide TV Display PS TV Type NTSC Video Out Angle Mark ON OSD Lang ENG Captions OFF Screen Saver ON Set...

Page 20: ...PS TV Type NTSC Video Out Angle Mark ON OSD Lang ENG Captions OFF Screen Saver ON Select Video Output 1 Select ON to turn the anglemarks on and OFF to turn them off Anglemarks are not available on al...

Page 21: ...output to Stereo mode L MONO Select this to set the Dolby Digital output to left mono mode meaning it will reproduce the left mono signal to the Left and Right channels R MONO Select this to set the D...

Page 22: ...e default language of the DVD will be shown 1 PREFERENCE MENU this menu cannot be accessed if a disc is inserted Select Preference and then select the desired option using the Navigation buttons to na...

Page 23: ...for the month two digits for the day and two digits for the year using the Number buttons As each number is pressed the cursor will move to the right When finished the hour digits will blink 2 TO SET...

Page 24: ...ssed the cursor will move to the right When finished the REC CYCLE option will blink NOTE After the date has been set the day of the week i e Saturday will appear next to it 3 Press the Navigation but...

Page 25: ...on the screen temporality and the overlapped programs will flash on the screen In this case you should clear either one of the overlapped program See below to clear the program Enter the VCR mode and...

Page 26: ...t Add or Erase Add channels that are added can be accessed using the Navigation Channel Up Down buttons 1 Erase channels that are erased cannot be accessed using the Navigation Channel Up Down buttons...

Page 27: ...avigation button 1 Press the OK button 2 to select it the Language Select menu will appear 1 Press the Navigation button to select the desired language the On Screen Display will be in English Spanish...

Page 28: ...d on page 22 the Setup menu will appear Scroll to Search using the Navigation button 1 Press the OK button 2 to select it the Search will appear 1 Press the Navigation button 1 to select Counter Searc...

Page 29: ...ward to the next index point and then play from that point 2 INDEX SEARCH 1 2 1 2 With a prerecorded video cassette tape inserted enter the VCR mode and the Setup screen as described on page 22 the Se...

Page 30: ...Forward using the Navigation or button the unit will then rewind or fast forward to the desired Index Number and start playing from that point 4 2 1 1 NOTES For index number search function if the tap...

Page 31: ...lly turn off after 30 minutes when both the VCR and DVD are not being used NOTE There is no Auto Power Off function for the TV mode 3 Press the Navigation button 1 to select Output Channel Press the O...

Page 32: ...4 hours 6 hours To unload a video cassette press the EJECT button on the unit or press the OPEN CLOSE EJECT button on the remote control the tape will stop and it will eject out 1 1 Pull the cassette...

Page 33: ...omatically adjust the tracking to obtain the best possible picture 1 2 TO STOP PLAYBACK Press the STOP button the tape will stop but remain fully loaded and ready to play 1 TO SELECT THE EXTERNAL INPU...

Page 34: ...the PLAY PAUSE P button 2 to resume normal playback 2 1 1 NOTES Best results during speed search and still playback can be obtained with video cassettes recorded in the SP mode The audio output is mut...

Page 35: ...tion While in the VCR mode press the DISPLAY button to view the VCR mode counter speed Audio Setting Channel Video Source current day and time After 5 seconds the display will disappear on the screen...

Page 36: ...ton to begin recording the REC indicator will light in the display and on the screen 2 4 NOTES The TV VCR channel cannot be changed during recording If the Erase Prevention Tab is removed the tape wil...

Page 37: ...h Recording OTR 0 30 will appear on the screen and the unit will record for 30 minutes and then it will stop and turn off to the Standby mode 2 3 1 4 3 Within a few seconds press the REC button to inc...

Page 38: ...unit to VCR mode if the unit is in the DVD mode 1 Press the SP SLP button to select the desired tape speed See page 31 for more information on tape usage 3 2 Press the DVD button to select the DVD NOT...

Page 39: ...button this means that the corresponding function cannot be performed either on the disc inserted or in the selected mode DVD Disc Press the MTS AUDIO button to cycle through the audio mode include M...

Page 40: ...letely 2 1 4 NOTES If a MENU appears on the TV screen press the Navigation buttons to select the desired option item then press the OK button Please make sure to refer to the disc s jacket or case for...

Page 41: ...me normal playback by pressing the PLAY PAUSE p button 3 3 1 2 1 SKIP Press the PLAY PAUSE p button 1 to pause the picture Repeatedly press the STEP button 2 to play the DVD one frame at a time Press...

Page 42: ...time Hour Minutes Seconds playback will start immediately 1 2 3 1 TITLE CHAPTER SEARCH Use this feature to directly go to a specific title and or chapter TITLE CHAPTER TIME SEARCH Use this feature to...

Page 43: ...ttons 2 to move the image on the TV screen Press the ZOOM button 1 once more to cancel the zoom function This is not available on all discs 1 2 1 While in the Playback mode press the ANGLE button the...

Page 44: ...TV screen Press the NAVIGATION buttons to select the desired folder file 3 Press the OK button 1 to confirm If there are no folders on the disc playback will begin immediately If there are folders the...

Page 45: ...t makes a usually large music file into a smaller one which is more convenient to download and share Can I record my own MP3 CDs Yes but you need a CD recorder which is available from your local compu...

Page 46: ...ess the Stop X button 1 Press the PLAY PAUSE p button 2 to resume playback When playing a CD the unit will resume playback at the beginning of the track 2 1 4 PLAYBACK OF A CD VCD Press the Number but...

Page 47: ...time ALL will appear on the TV screen and the unit will repeat the CD continuously until the STOP X button 2 is pressed To cancel Repeat play press the REPEAT button 1 OFF will appear on the TV scree...

Page 48: ...he NEXT n button 2 to go to the Track Selection Menu Some VCDs may not have this menu Press the Number buttons 3 to select the desired track to play Follow the instructions supplied with the disc as t...

Page 49: ...After loading playback will start automatically Press the NEXT n 2 or PREVIOUS o button 3 to skip through the pictures The unit will playback all the pictures on the disc then the menu will appear on...

Page 50: ...t Clean the disc This is normal on some discs Select the correct TV type PS LB WIDE which matches the TV you are using Install fresh batteries Install batteries according to the diagram Aim the remote...

Page 51: ...ws a different camera angle Try another VCD Slide the PROGRESSIVE SCAN switch to the OFF position if your set is not compatible the picture should reappear POSSIBLE CAUSE DVD not inserted or inserted...

Page 52: ...f after Turn the unit off after programming programming INDEX mark was not INDEX mark was recorded at Let the tape run for a couple of registered the beginning of the video cassette seconds before you...

Page 53: ...to the outer edge of the disc Never wipe in circular motions Discs should be stored in their cases after each use to avoid damage Do not expose discs to direct sunlight high humidity high temperature...

Page 54: ...easily be determined if during playback of a known good tape there is good sound but no picture picture is extremely snowy If this is the case have the video cassette recorder checked by qualified se...

Page 55: ...8cm double sided single layer COMPACT DISC VIDEO CD 12cm disc 8cm disc Video Output Level 1Vp p Audio Output Level 2Vrms 1KHz 0dB Audio Signal Output Characteristics Frequency Responses DVD Linear Au...

Page 56: ...Memcorp Inc Weston FL Printed in Hong Kong Visit our website at www memorexelectronics com...

Reviews: