background image

20

SETTING THE MESSAGE WAITING

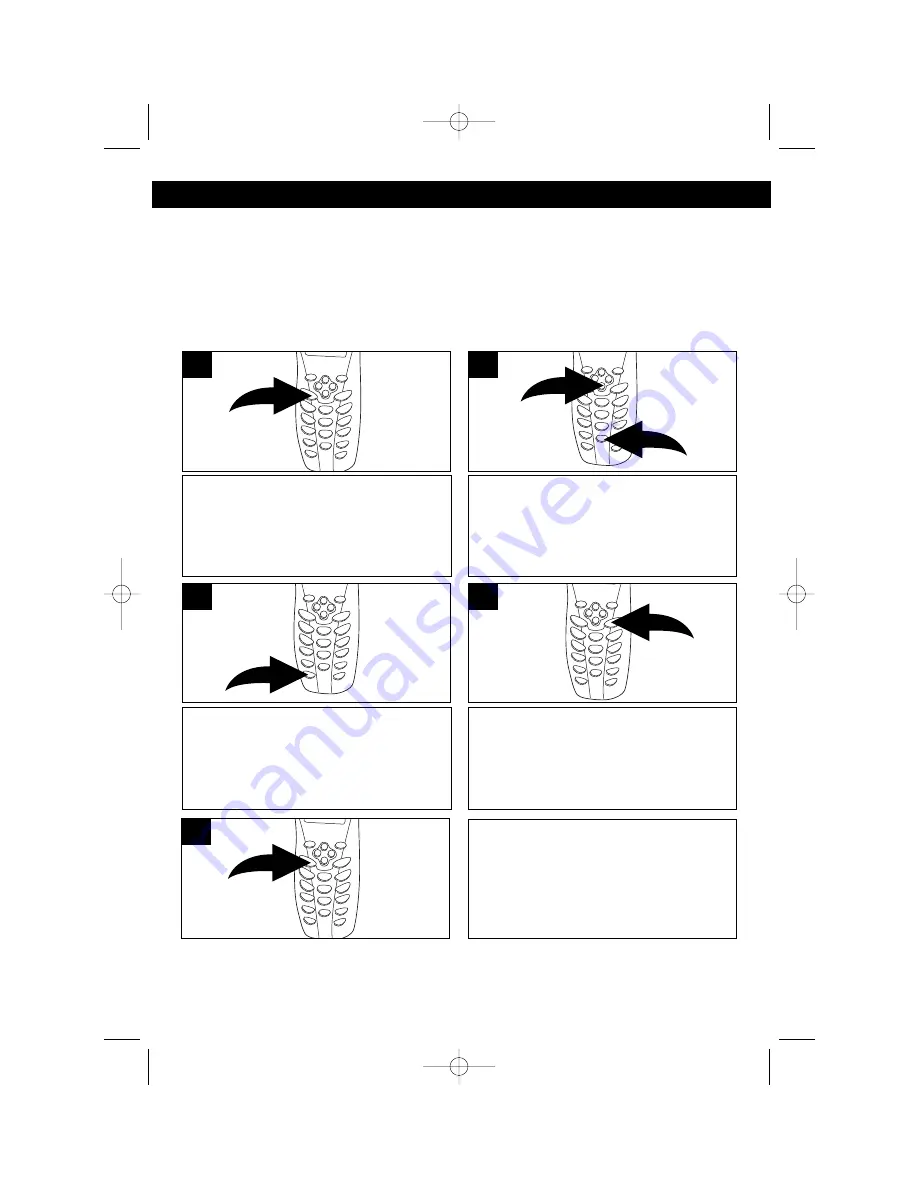
The unit’s Message Waiting setting is set to OFF by default. Message Waiting will
turn on automatically only when your local phone company sends the signal
provided that this optional service is available in your area. When all messages
have been received, the local telephone company will send a signal to turn the
Message Waiting off. In the unlikely event the Message Waiting On signal fails to
turn off due to a data capturing error, simply turn it off as follows:

Press and hold the VOICE MAIL/
MENU button for more than two
seconds; the Ringer Volume setting
will appear in the display.

1

Press the Scroll Down button 

❶ 

nine

times or the 0 key button 

; the

Message Waiting setting will appear.

2

1

2

Press the EDIT/FLASH button to reset
the Message Waiting indication; “DEL”
will appear.

3

Press and hold the SAVE/RE/PA
button for more than two seconds; a
long beep will be heard to confirm the
setting has been saved.

4

You can continue with programming or
press the VOICE MAIL/MENU button
to return to the Standby mode.

5

SET-UP INSTRUCTIONS (CONTINUED)

MPH2430.O/M.QXD  1/29/03  9:12 AM  Page 20

Summary of Contents for MPH2430

Page 1: ...MODEL MPH2430 BEFORE OPERATING THIS PRODUCT PLEASE READ THESE INSTRUCTIONS COMPLETELY CORDLESS TELEPHONE WITH DIGITAL ANSWERING MACHINE OPERATING INSTRUCTIONS MPH2430 O M QXD 1 29 03 9 12 AM Page 50 ...

Page 2: ...ed to try to correct the inter ference by one or more of the following measures Reorient or relocate the receiving antenna Increase the separation between the equipment and receiver Connect the equipment into an outlet on a circuit different from that to which the receiver is connected Consult the dealer or an experienced radio TV technician for help IMPORTANT PLEASE KEEP ALL PACKAGING MATERIAL FO...

Page 3: ...emble this product but take it to a qualified service personnel under the following conditions A If liquid has been spilled into the product B If the product has been exposed to rain or water C If the product does not operate normally by following the operating instructions Adjust only those controls that are covered by the operating instructions as an adjustment of other controls may result in da...

Page 4: ... line as determined by the total REN s contact the telephone company to determine the maximum REN for the calling area Should your equipment cause trouble on your line which may harm the telephone network the telephone company shall where practical notify you that temporary discontinuance of service may be required Where prior notice is not practicable and the circumstances warrant such action the...

Page 5: ... s from the Caller ID Log 28 Dialing a Number in the Caller ID Display 28 Storing Names Telephone Numbers in the Phonebook 29 Character Map Chart 30 Viewing the Phonebook 30 Saving Caller ID Information to the Phonebook 31 Dialing a Number from the Phonebook 31 Editing Telephone Number s Name s 32 Deleting a Number from the Phonebook 33 Preferred Calls 33 Blocked Calls 33 Answering Machine Operati...

Page 6: ...on 14 Receiver Volume Switch Side of Handset 15 Option Button 16 DEL Delete CHAN Channel Button 17 MEMO Button 18 PLAY Button 19 OGM Outgoing Message Button 20 Message Display 21 PAGE Button 22 Mailbox 1 Button Indicator 23 Charging Contacts 24 Mailbox 3 Button Indicator 25 ANS Answer ON OFF Indicator 26 SET Button 27 IN USE Indicator 28 CODE Button 29 CHARGE Indicator 30 ERS Erase Button 31 Anten...

Page 7: ...8 49 50 BASE SIDE 43 RESET Button 44 DC 9V Jack 45 Telephone LINE jack 46 RING SELECT Switch 47 RINGER ON OFF Switch 48 MSSG Message ALERT Switch 49 TONE PULSE Switch 50 ANNC Announce Only ICM Incoming Message Switch BASE REAR MPH2430 O M QXD 1 29 03 9 11 AM Page 6 ...

Page 8: ...the base unit and the other end into a modular telephone jack 6 Insert the small plug at the end of the AC adapter into the DC 9V jack located at the rear of the base unit NOTE Use only the center positive 9V AC adapter provided with your unit 7 Plug the AC adapter into a standard 120V AC wall outlet 8 If desired install the belt clip by inserting the belt clip hook into the matching slots at the ...

Page 9: ...ner slots of the base unit as shown in Figure 4 4 Press the middle locking hooks of the mounting bracket while pushing the back of the mounting bracket until it snaps to lock as shown in Figure 5 NOTE Ensure that the lock guide stays in place on the hole provided on the base unit as shown in Figure 6 5 Plug the free end of the short line cord into the modular wall jack 6 Align the upper keyhole on...

Page 10: ...unit pull it back as shown in Figure 9 HEADSET CONNECTION One of the special features of your phone is that your handset could utilize a headset not included for hands free communication Insert the small plug at the end of your headset cord to the headset jack at the side of the handset Follow the procedures discussed in Placing a Call and Receiving a Call to place and receive a call NOTE The head...

Page 11: ...al use The handset s rechargeable battery will be charged when it s on the base s charge contacts the CHARGE indicator will light when it is placed in the base NOTES The Low battery indicator will appear in the display when the battery power is low and needs recharging If the battery becomes weak while you are on a call the LCD display will blink and a beep will be heard every 12 seconds In this c...

Page 12: ...g will blink 2 Press the Scroll Up or Down button to select a desired ringer volume HI LOW or OFF 2 1 3 When the desired Ringer Volume setting appears press and hold the SAVE RE PA button for more than two seconds a long beep will be heard to confirm the setting has been saved 4 You can continue with programming or press the VOICE MAIL MENU button to return to the Standby mode 5 NOTE A button must...

Page 13: ...ill appear 2 1 2 Press the EDIT FLASH button to change the setting the Language setting will blink 3 Press the Scroll Up or Down button to select the desired language ENGLISH SPANISH or FRENCH 2 1 4 When the desired Language setting appears press and hold the SAVE RE PA button for more than two seconds a long beep will be heard to confirm the setting has been saved 5 You can continue with programm...

Page 14: ...splay 1 Press the Scroll Down button twice or the 3 key button the First Ring will appear 2 1 2 Press the EDIT FLASH button to change the setting the First Ring setting will blink 3 Press the Scroll Up or Down button to turn the First Ring On or Off 2 1 4 When the desired First Ring setting appears press and hold the SAVE RE PA button for more than two seconds a long beep will be heard to confirm ...

Page 15: ... change the setting the month setting will blink 3 Set the month using the Key buttons 0 9 Repeat this step to set the date hour and minutes the AM PM indicator will then be blinking 4 Press the 1 Key button to choose AM or the 2 Key button to choose PM 2 1 5 When finished press and hold the SAVE RE PA button for more than two seconds a long beep will be heard to confirm the setting has been saved...

Page 16: ... button the Contrast setting will appear 2 1 2 Press the EDIT FLASH button to change the setting the Contrast setting will blink 3 Press the Scroll Up or Down button to adjust the Contrast level 2 1 4 When the desired Contrast setting appears press and hold the SAVE RE PA button for more than two seconds a long beep will be heard to confirm the setting has been saved 5 You can continue with progra...

Page 17: ...n button five times or the 6 key button once the PBX Number setting will appear 2 1 2 Press the EDIT FLASH button to change the setting the PBX Number setting will blink 3 Press the Scroll Up or Down button to select a PBX Number or Off to turn the PBX setting Off 2 1 4 When the desired PBX Number setting appears press and hold the SAVE RE PA button for more than two seconds a long beep will be he...

Page 18: ...ress the Scroll Down button six times or the 7 key button the Flash Time setting will appear 2 1 2 Press the EDIT FLASH button to change the setting the Flash Time setting will blink 3 Press the Scroll Up or Down button to select a desired Flash Time in milli seconds 2 1 4 When the desired Flash Time setting appears press and hold the SAVE RE PA button for more than two seconds a long beep will be...

Page 19: ...imes or the 8 key button the Pause Time setting will appear 2 1 2 Press the EDIT FLASH button to change the setting the Pause Time setting will blink 3 Press the Scroll Up or Down button to select the desired Pause Time 2 1 4 When the desired Pause Time setting appears press and hold the SAVE RE PA button for more than two seconds a long beep will be heard to confirm the setting has been saved 5 Y...

Page 20: ... the 9 key button the Voice Mail setting will appear 2 1 2 Press the EDIT FLASH button to change the setting the Voice Mail setting will blink 3 Use the Key buttons 0 9 to enter the phone number used to access your voice mail messages up to 15 digits 4 When the desired Voice Mail number has been set press and hold the SAVE RE PA button for more than two seconds a long beep will be heard to confirm...

Page 21: ...ing error simply turn it off as follows Press and hold the VOICE MAIL MENU button for more than two seconds the Ringer Volume setting will appear in the display 1 Press the Scroll Down button nine times or the 0 key button the Message Waiting setting will appear 2 1 2 Press the EDIT FLASH button to reset the Message Waiting indication DEL will appear 3 Press and hold the SAVE RE PA button for more...

Page 22: ... the Scroll Down button ten times or the Temporary Tone button the Area Code setting will appear 2 1 2 Press the EDIT FLASH button to change the setting the Area Code setting will blink 3 Use the Key buttons 0 9 to enter the three digit area code for your phone number 4 When the desired Area Code has been set press and hold the SAVE RE PA button for more than two seconds a long beep will be heard ...

Page 23: ...the base to the ON position to turn the ringer on Slide the RINGER ON OFF switch to the OFF position to turn the ringer off 1 TONE PULSE SWITCH Slide the TONE PULSE switch on the side of the base to TONE or PULSE to match the service provided on your telephone line If you are not sure of your service please contact your telephone company 1 NOTES You can also dial the number first then press the TA...

Page 24: ...e than 11 characters WHAT APPEARS IN THE CALLER ID DISPLAY When the incoming call has been assigned to your telephone number the display will show C F Forwarded Call When the incoming call is a long distance call and this service is provided by your local phone company the display will show L D C Long Distance Call If a call is received from an area which does not provide caller ID service the dis...

Page 25: ...switch to the HI MID or LOW position 1 CHANNEL SELECTION The base unit will automatically search for the clearest channel in the Standby mode However should you hear static or noise during the course of a conversation which makes it difficult to hear the caller the DEL CHAN button on the handset allows you to choose between 50 preset frequencies NOTE The unit will beep to indicate the unit is chan...

Page 26: ... take advantage of touch tone services after dialing to respond to touch tone prompts To do this press the Temporary Tone Button to temporarily change the dialing mode from Pulse to Tone after dialing in the Pulse mode This will enable Pulse users to access touch tone services It will revert back to Pulse after hanging up 1 CALL WAITING If you subscribe to Call Waiting through your local phone com...

Page 27: ...area DIGITAL SECURITY SYSTEM The security code prevents your cordless telephone conversation from being accessed by a phone on a different line Once the handset battery is fully charged the handset will automatically select the code from a total of over 65 000 combinations The code is changed every time the handset is placed in the cradle If you experience difficulty with placing or receiving call...

Page 28: ...n to cycle through the calls from the first call received to the last Press the DIR button to return to the Standby mode 2 1 3 1 NOTES The NEW CALL MSG WTG indicator will blink red until all new caller ID information has been reviewed Press the Scroll Right button to view caller ID information of more than 11 characters DELETING ONE NAME NUMBER FROM THE CALLER ID LOG Scroll through the calls to se...

Page 29: ...r a long distance call 2 Press the TALK button to dial the displayed number Press the TALK button again or return the handset to the base to end the call 3 Press the DIR button to cancel dialing and return to the standby mode 4 DELETING ALL NAME S NUMBER S FROM THE CALLER ID LOG Enter the caller ID display by pressing the Scroll Up or Down button 2 1 1 Press and hold the DEL CHAN button ERASE ALL ...

Page 30: ...n To delete a character or number inside the cursor press the DEL CHAN button Press the Scroll Down button and enter the telephone number using Key buttons 0 9 You can store up to 22 digits Briefly press the SAVE RE PA button to insert a pause 2 3 1 4 Press and hold the SAVE RE PA button to store the number into memory Press the DIR button to return to the Standby mode or if no buttons are pressed...

Page 31: ...BOOK Press the DIR button 1 Press the Key button that corresponds to the first letter of the saved name three beeps will sound if no entries are stored under those letters 2 Press the Scroll Up or Down button to locate the desired record 2 1 3 Press the Scroll Right button to view a name of more than 11 characters If the number has more than 11 digits the last 11 digits will be displayed first Pre...

Page 32: ...d dial a number from the phonebook follow the steps below Press the DIR button 1 Press the Scroll Up or Down button to locate the desired Phonebook entry OR Press the Key button that corresponds to the first letter of the saved name then press the Scroll Up or Down button to locate the desired number 3 1 2 2 Press the Option button to change the displayed number to 7 10 or 11 digits The first dial...

Page 33: ...n the entry will display a blinking prompt over the first character 3 To erase a character press the DEL CHAN button To add a letter or number use the Key buttons characters numbers will be inserted in front of the cursor 5 When the entry is edited as you desire press and hold the SAVE RE PA button to store the edited record 6 Move the cursor over the letter number you want to edit using the Scrol...

Page 34: ... To assign a preferred call simply insert at the beginning of the name by pressing the when storing 1 PREFERRED CALLS This function allows you to recognize an incoming caller from the ringing sound by assigning a priority ring to the designated number from the Phonebook as follows To assign a blocked call simply insert at the beginning of the name by pressing the when storing 1 BLOCKED CALLS This ...

Page 35: ...d and announced Repeatedly press the HOUR button until the desired hour is displayed and announced 3 Press the SET button to confirm the settings the system will announce the day and time 5 TO SET THE MINUTE Press and release the MIN button the corresponding minute will be displayed and announced Repeatedly press the MIN button until the desired minute is displayed and announced 4 NOTES The handse...

Page 36: ...an OGM in your primary mailbox instructing a caller to leave an ICM in one of the four mailboxes such as Hello please leave your message after the tone or if you are using a touchtone phone please dial 110 for Jenna 220 for Amanda 330 for Mike or 440 for Hannah 1 Release the OGM button when the OGM is completed and the unit will announce End of recording and your message will be played back for yo...

Page 37: ...nding mailbox indicator will blink 1 Press and hold the OGM button and begin recording by speaking clearly into the microphone after you hear please record your announcement after the beep 2 Release the OGM button when the OGM is completed and the unit will announce End of recording and your message will be played back for your approval 3 To check your OGM press the desired Mailbox button and then...

Page 38: ... the ANS ON OFF indicator will go off 2 SETTING THE ANNC ICM SWITCH SET TO ICM When this switch is in the ICM position and the answering system receives a call it will play the OGM and record a message 1 SET TO ANNC When this switch is in the ANNC position and the answering system receives a call it will play the announce ment and not record a message Ao will appear in the Message Display Record a...

Page 39: ... answering system will answer after the fifth ring You can then hang up after the fourth ring to avoid paying for the call 1 ANSWERING MACHINE OPERATION CONTINUED RECORDING A MEMO IN THE PRIMARY MAILBOX Press and hold the MEMO button and begin speaking after the unit announces Please record your message after the beep 1 Release the MEMO button when the memo is completed and the unit will announce ...

Page 40: ...he answering system will advance the message count after the actual memo is recorded 2 PLAYING ICMs MEMOS IN PRIMARY MAILBOX Press the PLAY button the system will play all NEW messages memos After playing all NEW messages memos press the PLAY button again to hear all saved messages 1 IN MAILBOXES 1 4 Press a Mailbox button the selected mailbox indicator will start blinking Press the PLAY button th...

Page 41: ...KIP button is pressed 1 While playing an ICM Memo press the PLAY button to pause PA will appear in the message display Press the PLAY button again to resume playback 1 ANSWERING MACHINE OPERATION CONTINUED SAVING ICMs MEMOS This answering system will save your ICMs Memos automatically After playing all ICMs Memos the answering system will announce End of messages and the total number of messages s...

Page 42: ... memo is playing press the ERS button the answering system will announce the erasure of the selected ICM Memo After the erasure is complete the numeric order of the remaining ICMs Memos will be rearranged 1 TO SET THE BASE SPEAKER S VOLUME Slide the VOLUME control to the right to increase or the the left to decrease the sound level 1 ANSWERING MACHINE OPERATION CONTINUED WHEN THE MEMORY IS FULL Wh...

Page 43: ...rd the conversation the corresponding mailbox indicator will blink Skip this step if you would like to record the two way conversation in the primary mailbox 1 Press and hold the MEMO button the message display will show 2r to indicate the recording mode Release the MEMO button to end the two way recording 2 NOTE Recording two way conversations may be subject to local or federal laws and regulatio...

Page 44: ...e the DAY button repeatedly until the desired first digit of the Access Code is displayed and mentioned 3 Repeatedly press the HOUR button to set the second digit and the MIN button to set the third digit Press the CODE button again the new Access Code will be announced 2 3 1 4 CHANGING THE ACCESS CODE All digits of the Access Code are a combination of numbers 5 6 7 8 9 0 Digits 1 2 3 and 4 cannot...

Page 45: ... 1 To skip message press 3 To stop message press 8 To playback announcement press 5 To turn answering machine ON or OFF press 6 To erase message press 9 To record memo or announcement press 0 To record a message press 2 to record announcement press 5 Press 1 for Mailbox 1 press 2 for Mailbox 2 press 3 for Mailbox 3 press 4 for Mailbox 4 and press 0 for Primary Mailbox Otherwise if you did not pres...

Page 46: ...Refer to the BLOCKED CALLS section of the manual No power on the Check for the Ni Cd battery pack connection inside the handset unit battery compartment on the handset The handset rechargeable Ni Cd battery pack may need charging Does not charge Make sure the charging contacts on both the base unit and the handset are in contact during charging The charging contacts may need cleaning with an alcoh...

Page 47: ...wo rings or more If it is a blocked call or an out of area call the caller s name and or phone number will not appear on the display If only the caller s phone number appears on the display it may be a Single Data Message Format SDMF call as opposed to a Multiple Data Message Format MDMF call Random characters On rare occasions the Caller ID information sent by the and or DATA ERROR telephone comp...

Page 48: ...e recording is limited to two minutes Callers cannot leave The telephone memory may be full Erase old messages messages to make room for new messages Check to see if the ANNC ICM switch is not set in the ANNC mode Announces Memory Full The 14 minute recording limit may have been reached Erase old messages to make room for new messages If there is no OGM recorded for the ANNC setting Memory Full is...

Page 49: ...one with a damp never wet cloth Solvent or detergent should never be used 2 Avoid operating your unit under direct sunlight or in hot humid or dusty places 3 Keep your unit away from heating appliances MPH2430 O M QXD 1 29 03 9 12 AM Page 48 ...

Page 50: ...Memcorp Inc Weston FL Printed in Hong Kong Visit our website at www memorexelectronics com MPH2430 O M QXD 1 29 03 9 12 AM Page 49 ...

Reviews: