background image

14

OPERATION (Continued)

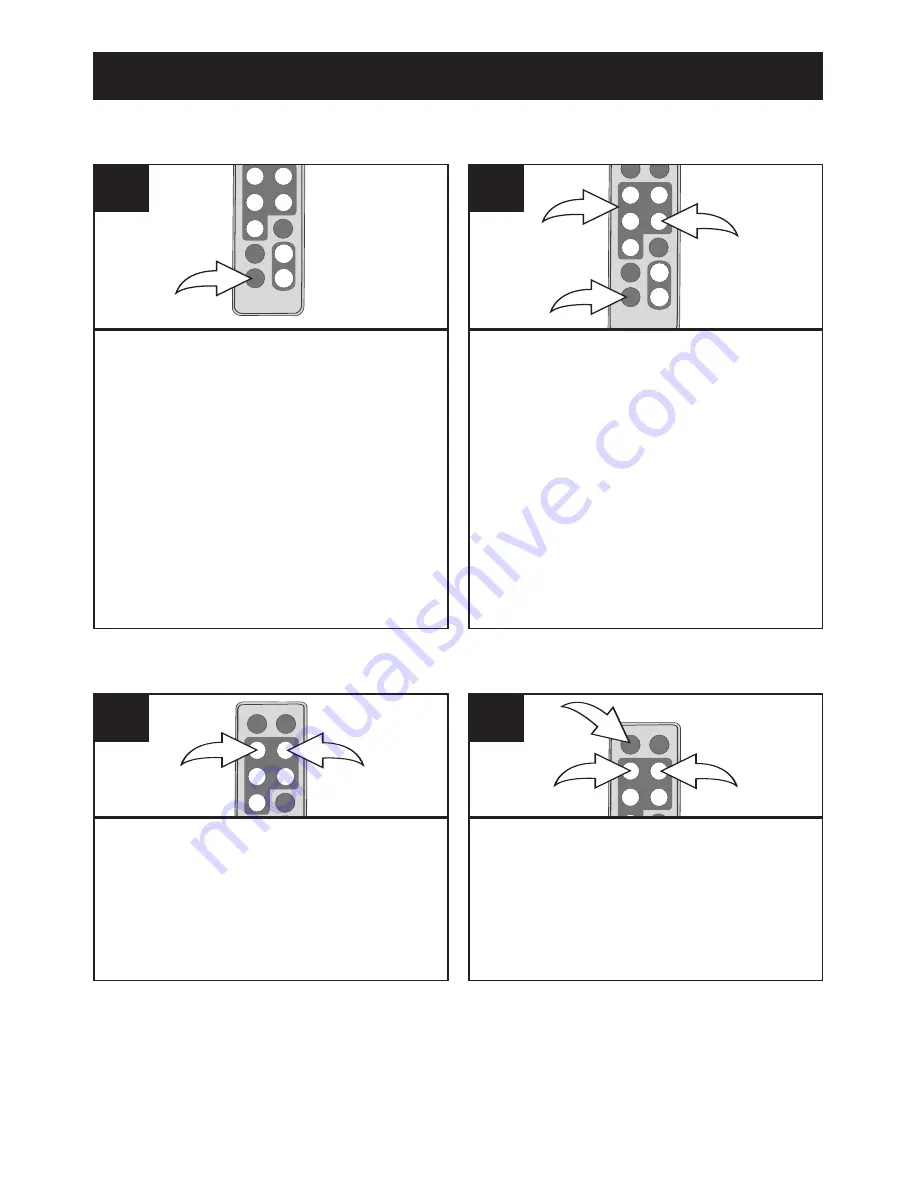
Slide the Power switch on the

rear of this unit to turn it on.

This unit will either show the Main

menu or automatically start

showing a photo Slideshow (if the

Auto Play option in the Setup

menu is set to ON).

If the unit is in Slideshow mode,

press the EXIT button twice to

exit and access the Main menu.

1

1

1

Select Music using the Navigation 

,

®

,

π

,

buttons 

1

; then press the

ENTER/PLAY button 

2

to enter the 

Music menu. Select the desired MP3

to listen to using the Navigation 

π

,

buttons 

1

; then press the

ENTER/PLAY button 

2

again to

confirm. Playback will begin with the

MP3 that you selected. To stop

playback and return to the Main

menu, press the EXIT button 

3

.

2

1

3

2

BASIC MUSIC PLAYBACK

(Supported format: MP3)

To adjust the main volume:

Press the Navigation 

/VOLUME

-

1

and/or Navigation 

®

/VOLUME

+

2

button to increase and/or

decrease the volume. 

2

1

1

To mute the main volume:

Press the MUTE button 

1

. Press

this button again, or either of the

Navigation 

/VOLUME - 

2

and/or

Navigation 

®

3

buttons to unmute.

3

2

1

2

ADJUSTING THE VOLUME

NOTES:

• See page 19 to select a Play Mode (i.e. Repeat All, etc.).

• You can pause playback at anytime by pressing the ENTER/PLAY button; the Pause

icon will appear on screen and the file will remain paused until the button is 

pressed again.

• You can use the Navigation 

π

,

buttons to skip to the previous or next MP3 file.

Summary of Contents for MDF8402-DWD

Page 1: ...s completely before operating this product Por favor lea toda las instruciones antes de tratar de usar este producto User Guide Gu a del usario MDF8402 LWD MDF8402 DWD 8 digital photo frame Environmen...

Page 2: ...ons ATTENTION The exclamation point within an equilateral triangle is intended to alert the user to the presence of important operating and maintenance servicing instructions in the literature accompa...

Page 3: ...rrect the interference by one or more of the following measures Reorient or relocate the receiving antenna Increase the separation between the equipment and receiver Connect the equipment into an outl...

Page 4: ...to do this now will help to prevent hearing damage or loss in the future After all we want you listening for a lifetime We Want You Listening For A Lifetime Used wisely your new sound equipment will...

Page 5: ...37 01000 E052 DARK WOOD DWD 337 01000 E050 3 Screen 4 Headphones Jack Under Cover 5 Remote Sensor 6 SD MMC MS xD Card Slot Under Cover 7 CF Card Slot Under Cover 8 Navigation Button 9 Navigation Butto...

Page 6: ...on 5 MENU Button 6 EXIT Button 7 Remote Transmitter Top of Unit 8 TIME Button 9 Navigation VOLUME Button 10 ENTER PLAY Button 11 ROTATE Button 12 ZOOM IN Button 13 ZOOM OUT Button 14 Battery Compartme...

Page 7: ...ced Replace only with the same or equivalent type 2 Use only the size and type of batteries specified 3 Be sure to follow the correct polarity when installing the batteries as indicated next to the ba...

Page 8: ...F UNIT If desired the digital frame can be mounted onto a wall Simply hang using the Wall Mount holes as you would hang an ordinary photo frame or painting STAND REAR OF UNIT To use the stand lift the...

Page 9: ...Simply insert the SD MMC MS or xD card into the top Card Slot located under the right cover of the unit with the card facing towards the rear of the unit as shown Insert the CF card in the same manne...

Page 10: ...SB cable to the USB jack located under the left cover of this unit and connect the other end to your computer as shown 3 On your computer double click My Computer This unit will appear as a removable...

Page 11: ...correct AM PM setting if you selected the 12 Hour mode in the Time Mode Setup option Press the Navigation button 2 to select the minutes Use the Navigation buttons 2 to set the current minutes Repeat...

Page 12: ...ect Photo using the Navigation buttons 1 then press the ENTER PLAY button 2 to enter the Photo Thumbnail view Select the desired photo or page of photos to view using the Navigation buttons 1 then pre...

Page 13: ...M OUT button 3 to zoom back out of the photo To exit Zoom mode and return to normal photo playback press the EXIT button 4 1 2 4 3 1 While viewing a photo see the previous page press the ROTATE button...

Page 14: ...Direction Then press the Navigation buttons 2 to select between Landscape and Portrait then press the ENTER PLAY button 1 again to confirm 1 2 3 Once you have chosen the viewing mode if desired selec...

Page 15: ...ith the MP3 that you selected To stop playback and return to the Main menu press the EXIT button 3 2 1 3 2 BASIC MUSIC PLAYBACK Supported format MP3 To adjust the main volume Press the Navigation VOLU...

Page 16: ...2 again to confirm Playback will begin with the video file that you selected Press ENTER PLAY button 2 to pause the video press again to resume playback To stop playback and return to the Movie menu...

Page 17: ...Folder menu Select the desired file to delete using the Navigation buttons 1 Then press the Navigation button 1 a pop up menu will appear Select No to NOT delete the file or Yes to delete the file us...

Page 18: ...to confirm To return to the Main menu press the EXIT button 3 2 1 3 2 COPYING A FILE NOTES While copying a file if more than one target media media to copy to is available select the target media whe...

Page 19: ...deshow mode press the EXIT button 1 twice to exit and access the Main menu 2 Select Setup using the Navigation buttons 2 then press the ENTER PLAY button 3 to enter the Setup menu NOTE You can also ac...

Page 20: ...a photo Slideshow after being turned on Choose to set Auto Play to ON or OFF Music Mode Use this Setup option to select a Play mode when listening to MP3s on this unit Choose from Repeat All will repe...

Page 21: ...ttery not inserted or Insert battery correctly inserted incorrectly as shown on page 6 No photos in frame No photos are present in Copy files onto the frame Internal Flash or external or insert extern...

Page 22: ...ect to change without notice FOR ADDITIONAL SET UP OR OPERATING ASSISTANCE PLEASE VISIT OUR WEBSITE AT WWW MEMOREXELECTRONICS COM OR CONTACT CUSTOMER SERVICE AT 1 800 919 3647 PLEASE KEEP ALL PACKAGIN...

Page 23: ...las personas ADVERTENCIA El signo de exclamaci n dentro de un tri ngulo est hecho para alertar al usuario de la existencia de instrucciones importantes tanto de servicio como de funcionamiento y mant...

Page 24: ...ientes medidas Reoriente o reubique la antena receptora Incremente la distancia entre el equipo y el receptor Conecte el equipo a un contacto el ctrico que est en un circuito distinto al que est conec...

Page 25: ...ol de volumen en dicho nivel Eso le tomar tan solo un minuto y le ayudar a prevenir la p rdida del o do en el futuro Nosotros deseamos que usted pueda o r durante toda su vida Si sabe usar su equipo s...

Page 26: ...culares Debajo de la Tapa 5 Sensor Remoto 6 Ranura para Tarjeta SD MMC MS xD Debajo de la Tapa 7 Ranura para Tarjeta CF Debajo de la Tapa 8 Bot n de Navegaci n 9 Bot n de Navegaci n 10 Bot n ENTRAR RE...

Page 27: ...8 Bot n de HORA TIME 9 Bot n de Navegaci n VOLUMEN VOLUME 10 Bot n de ENTRAR REPRODUCIR ENTER PLAY 11 Bot n de ROTAR ROTATE 12 Bot n de ACERCAR ZOOM IN 13 Bot n de ALEJAR ZOOM OUT 14 Compartimiento de...

Page 28: ...riesgo de explosi n si la pila se reemplaza de modo incorrecto Reempl cela s lo con una del mismo tipo o equivalente 2 Use nicamente el tama o de pila que indica el fabricante 3 Aseg rese de seguir l...

Page 29: ...A DE LA UNIDAD Si as lo desea puede montar el marco digital sobre la pared Simplemente cu lguelo utilizando los orificios para Montaje en Pared de la misma forma que colgar a un un marco para fotos co...

Page 30: ...rjeta SD MMC MS o xD en la ranura superior ubicada debajo de la tapa derecha de la unidad con la tarjeta mirando hacia la parte trasera de la unidad seg n se muestra en la ilustraci n Coloque la tarje...

Page 31: ...r al men n principal 2 Conecte el cable USB a la entrada USB ubicada debajo de la tapa izquierda de la unidad y conecte el otro extremo a su computadora seg n indica la ilustraci n 3 En su computadora...

Page 32: ...e ajustar la configuraci n AM PM en caso que haya seleccionado el modo de 12 Horas en la opci n de Configuraci n del Modo Hora Oprima el bot n de navegaci n 2 para seleccionar los minutos Utilice los...

Page 33: ...utilizando los botones de Navigaci n 1 luego presione ENTRAR REPRODUCIR ENTER PLAY 2 para iniciar la vista en miniatura de las fotograf as Seleccione la foto deseada o p gina de fotos Para visualizar...

Page 34: ...t n de ALEJAR ZOOM OUT 3 para alejar la imagen de la foto Para salir del Modo zoom y volver a la reproducci n normal de fotograf as oprima SALIR EXIT 4 1 Mientras visualiza una foto vea la p gina ante...

Page 35: ...l bot n de Navegaci n 2 para seleccionar entre Paisaje y Retrato Por ltimo presione ENTRAR REPRODUCIR ENTER PLAY 1 nuevamente para confirmar 3 Una vez que haya elegido el modo de visualizaci n si as l...

Page 36: ...firmar La reproducci n se iniciar con el MP3 seleccionado Para detener la reproducci n y volver al Men principal oprima SALIR EXIT 3 2 REPRODUCCI N B SICA DE M SICA Formato compatible MP3 Para ajustar...

Page 37: ...ma ENTRAR REPRODUCIR ENTER PLAY 2 nuevamente para confirmar La reproducci n se iniciar con el archivo de video seleccionado Presione ENTRAR REPRODUCIR ENTER PLAY 2 para pausar el video oprima nuevamen...

Page 38: ...2 para ingresar al Men de Carpetas Seleccione el archivo que desea borrar utilizando los botones de Navegaci n 1 luego oprima el bot n de Navegaci n 1 Aparecer autom ticamente la ventana de un men Sel...

Page 39: ...RODUCIR ENTER PLAY 2 nuevamente para confirmar Para volver al Men principal oprima SALIR EXIT 3 2 COPIAR UN ARCHIVO NOTAS Mientras est copiando un archivo si m s de un dispositivo de destino est dispo...

Page 40: ...de diapositivas oprima el bot n SALIR EXIT 1 dos veces para salir y acceder al Men principal 2 Seleccione Configurar con los botones de Navegaci n 2 luego oprima ENTRAR REPRODUCIR ENTER PLAY 3 para in...

Page 41: ...nfigurar entre Auto Reproducci n Auto Play ENCENDIDA ON o APAGADA OFF Modo M sica Music Mode Utilice esta opci n para seleccionar un Modo de reproducci n al escuchar archivos MP3 en esta unidad Elija...

Page 42: ...s Coloque las pilas enciende no est n bien colocadas correctamente vea p g 6 No hay fotos en el No hay fotos en Internal Copie los archivos en el marco digital Flash o en el soporte de marco digital i...

Page 43: ...ambios sin previo aviso PARA ASISTENCIA ADICIONAL SOBRE LA CONFIGURACI N O EL FUNCIONAMIENTO INGRESE EN WWW MEMOREXELECTRONICS COM O COMUN QUESE CON ATENCI N AL CLIENTE 1 800 919 3647 CONSERVE EL EMBA...

Page 44: ...www memorexelectronics com Memcorp Inc Weston FL Printed in China Memorex the Memorex logo and Is it live or is it Memorex are trademarks of the affiliates of Memorex Products Inc...

Page 45: ...ons ATTENTION The exclamation point within an equilateral triangle is intended to alert the user to the presence of important operating and maintenance servicing instructions in the literature accompa...

Page 46: ...rrect the interference by one or more of the following measures Reorient or relocate the receiving antenna Increase the separation between the equipment and receiver Connect the equipment into an outl...

Page 47: ...to do this now will help to prevent hearing damage or loss in the future After all we want you listening for a lifetime We Want You Listening For A Lifetime Used wisely your new sound equipment will...

Page 48: ...37 01000 E052 DARK WOOD DWD 337 01000 E050 3 Screen 4 Headphones Jack Under Cover 5 Remote Sensor 6 SD MMC MS xD Card Slot Under Cover 7 CF Card Slot Under Cover 8 Navigation Button 9 Navigation Butto...

Page 49: ...on 5 MENU Button 6 EXIT Button 7 Remote Transmitter Top of Unit 8 TIME Button 9 Navigation VOLUME Button 10 ENTER PLAY Button 11 ROTATE Button 12 ZOOM IN Button 13 ZOOM OUT Button 14 Battery Compartme...

Page 50: ...ced Replace only with the same or equivalent type 2 Use only the size and type of batteries specified 3 Be sure to follow the correct polarity when installing the batteries as indicated next to the ba...

Page 51: ...F UNIT If desired the digital frame can be mounted onto a wall Simply hang using the Wall Mount holes as you would hang an ordinary photo frame or painting STAND REAR OF UNIT To use the stand lift the...

Page 52: ...Simply insert the SD MMC MS or xD card into the top Card Slot located under the right cover of the unit with the card facing towards the rear of the unit as shown Insert the CF card in the same manne...

Page 53: ...SB cable to the USB jack located under the left cover of this unit and connect the other end to your computer as shown 3 On your computer double click My Computer This unit will appear as a removable...

Page 54: ...correct AM PM setting if you selected the 12 Hour mode in the Time Mode Setup option Press the Navigation button 2 to select the minutes Use the Navigation buttons 2 to set the current minutes Repeat...

Page 55: ...ect Photo using the Navigation buttons 1 then press the ENTER PLAY button 2 to enter the Photo Thumbnail view Select the desired photo or page of photos to view using the Navigation buttons 1 then pre...

Page 56: ...M OUT button 3 to zoom back out of the photo To exit Zoom mode and return to normal photo playback press the EXIT button 4 1 2 4 3 1 While viewing a photo see the previous page press the ROTATE button...

Page 57: ...Direction Then press the Navigation buttons 2 to select between Landscape and Portrait then press the ENTER PLAY button 1 again to confirm 1 2 3 Once you have chosen the viewing mode if desired selec...

Page 58: ...ith the MP3 that you selected To stop playback and return to the Main menu press the EXIT button 3 2 1 3 2 BASIC MUSIC PLAYBACK Supported format MP3 To adjust the main volume Press the Navigation VOLU...

Page 59: ...2 again to confirm Playback will begin with the video file that you selected Press ENTER PLAY button 2 to pause the video press again to resume playback To stop playback and return to the Movie menu...

Page 60: ...Folder menu Select the desired file to delete using the Navigation buttons 1 Then press the Navigation button 1 a pop up menu will appear Select No to NOT delete the file or Yes to delete the file us...

Page 61: ...to confirm To return to the Main menu press the EXIT button 3 2 1 3 2 COPYING A FILE NOTES While copying a file if more than one target media media to copy to is available select the target media whe...

Page 62: ...deshow mode press the EXIT button 1 twice to exit and access the Main menu 2 Select Setup using the Navigation buttons 2 then press the ENTER PLAY button 3 to enter the Setup menu NOTE You can also ac...

Page 63: ...a photo Slideshow after being turned on Choose to set Auto Play to ON or OFF Music Mode Use this Setup option to select a Play mode when listening to MP3s on this unit Choose from Repeat All will repe...

Page 64: ...ttery not inserted or Insert battery correctly inserted incorrectly as shown on page 6 No photos in frame No photos are present in Copy files onto the frame Internal Flash or external or insert extern...

Page 65: ...ect to change without notice FOR ADDITIONAL SET UP OR OPERATING ASSISTANCE PLEASE VISIT OUR WEBSITE AT WWW MEMOREXELECTRONICS COM OR CONTACT CUSTOMER SERVICE AT 1 800 919 3647 PLEASE KEEP ALL PACKAGIN...

Page 66: ...las personas ADVERTENCIA El signo de exclamaci n dentro de un tri ngulo est hecho para alertar al usuario de la existencia de instrucciones importantes tanto de servicio como de funcionamiento y mant...

Page 67: ...ientes medidas Reoriente o reubique la antena receptora Incremente la distancia entre el equipo y el receptor Conecte el equipo a un contacto el ctrico que est en un circuito distinto al que est conec...

Page 68: ...ol de volumen en dicho nivel Eso le tomar tan solo un minuto y le ayudar a prevenir la p rdida del o do en el futuro Nosotros deseamos que usted pueda o r durante toda su vida Si sabe usar su equipo s...

Page 69: ...culares Debajo de la Tapa 5 Sensor Remoto 6 Ranura para Tarjeta SD MMC MS xD Debajo de la Tapa 7 Ranura para Tarjeta CF Debajo de la Tapa 8 Bot n de Navegaci n 9 Bot n de Navegaci n 10 Bot n ENTRAR RE...

Page 70: ...8 Bot n de HORA TIME 9 Bot n de Navegaci n VOLUMEN VOLUME 10 Bot n de ENTRAR REPRODUCIR ENTER PLAY 11 Bot n de ROTAR ROTATE 12 Bot n de ACERCAR ZOOM IN 13 Bot n de ALEJAR ZOOM OUT 14 Compartimiento de...

Page 71: ...riesgo de explosi n si la pila se reemplaza de modo incorrecto Reempl cela s lo con una del mismo tipo o equivalente 2 Use nicamente el tama o de pila que indica el fabricante 3 Aseg rese de seguir l...

Page 72: ...A DE LA UNIDAD Si as lo desea puede montar el marco digital sobre la pared Simplemente cu lguelo utilizando los orificios para Montaje en Pared de la misma forma que colgar a un un marco para fotos co...

Page 73: ...rjeta SD MMC MS o xD en la ranura superior ubicada debajo de la tapa derecha de la unidad con la tarjeta mirando hacia la parte trasera de la unidad seg n se muestra en la ilustraci n Coloque la tarje...

Page 74: ...r al men n principal 2 Conecte el cable USB a la entrada USB ubicada debajo de la tapa izquierda de la unidad y conecte el otro extremo a su computadora seg n indica la ilustraci n 3 En su computadora...

Page 75: ...e ajustar la configuraci n AM PM en caso que haya seleccionado el modo de 12 Horas en la opci n de Configuraci n del Modo Hora Oprima el bot n de navegaci n 2 para seleccionar los minutos Utilice los...

Page 76: ...utilizando los botones de Navigaci n 1 luego presione ENTRAR REPRODUCIR ENTER PLAY 2 para iniciar la vista en miniatura de las fotograf as Seleccione la foto deseada o p gina de fotos Para visualizar...

Page 77: ...t n de ALEJAR ZOOM OUT 3 para alejar la imagen de la foto Para salir del Modo zoom y volver a la reproducci n normal de fotograf as oprima SALIR EXIT 4 1 Mientras visualiza una foto vea la p gina ante...

Page 78: ...l bot n de Navegaci n 2 para seleccionar entre Paisaje y Retrato Por ltimo presione ENTRAR REPRODUCIR ENTER PLAY 1 nuevamente para confirmar 3 Una vez que haya elegido el modo de visualizaci n si as l...

Page 79: ...firmar La reproducci n se iniciar con el MP3 seleccionado Para detener la reproducci n y volver al Men principal oprima SALIR EXIT 3 2 REPRODUCCI N B SICA DE M SICA Formato compatible MP3 Para ajustar...

Page 80: ...ma ENTRAR REPRODUCIR ENTER PLAY 2 nuevamente para confirmar La reproducci n se iniciar con el archivo de video seleccionado Presione ENTRAR REPRODUCIR ENTER PLAY 2 para pausar el video oprima nuevamen...

Page 81: ...2 para ingresar al Men de Carpetas Seleccione el archivo que desea borrar utilizando los botones de Navegaci n 1 luego oprima el bot n de Navegaci n 1 Aparecer autom ticamente la ventana de un men Sel...

Page 82: ...RODUCIR ENTER PLAY 2 nuevamente para confirmar Para volver al Men principal oprima SALIR EXIT 3 2 COPIAR UN ARCHIVO NOTAS Mientras est copiando un archivo si m s de un dispositivo de destino est dispo...

Page 83: ...de diapositivas oprima el bot n SALIR EXIT 1 dos veces para salir y acceder al Men principal 2 Seleccione Configurar con los botones de Navegaci n 2 luego oprima ENTRAR REPRODUCIR ENTER PLAY 3 para in...

Page 84: ...nfigurar entre Auto Reproducci n Auto Play ENCENDIDA ON o APAGADA OFF Modo M sica Music Mode Utilice esta opci n para seleccionar un Modo de reproducci n al escuchar archivos MP3 en esta unidad Elija...

Page 85: ...s Coloque las pilas enciende no est n bien colocadas correctamente vea p g 6 No hay fotos en el No hay fotos en Internal Copie los archivos en el marco digital Flash o en el soporte de marco digital i...

Page 86: ...ambios sin previo aviso PARA ASISTENCIA ADICIONAL SOBRE LA CONFIGURACI N O EL FUNCIONAMIENTO INGRESE EN WWW MEMOREXELECTRONICS COM O COMUN QUESE CON ATENCI N AL CLIENTE 1 800 919 3647 CONSERVE EL EMBA...

Page 87: ...www memorexelectronics com Memcorp Inc Weston FL Printed in China Memorex the Memorex logo and Is it live or is it Memorex are trademarks of the affiliates of Memorex Products Inc...

Reviews: