• Appliances are not inteded to be operated
by means of an external timer or separate
remote-control system.
PREPARING THE SANDWICH TOASTER
• Once the sandwich toaster has been unpack
-
ed, you must ensure that any packaging inside
the appliance itself is also removed.
• Wipe the sandwich toaster’s hotplates with a
damp cloth before using it for the first time (see
Cleaning). Then oil the hotplates with a small
amount of butter, margarine or cooking oil.
USE
• Place the sandwich toaster on a hard, flat
surface.
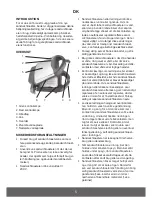
• Place the plug in the socket. The red indicator
light (2) and the green indicator light (1) light
up, and the hotplates (6, 7) begin to heat up.
• When the green indicator light (1) goes out,
the sandwich toaster has reached the correct
temperature and is ready for use. Now place
1-2 sandwiches on the bottom hotplate (7).
• Close the upper section (5) so that it rests on
top of the food. Lock the handle by clipping
the lock (4) on the top section to the bottom
section of the handle.
• If the sandwich is very thick, you must not try
to press the hotplates together completely so
they can be closed with the lock. Wait a mo-
ment until the sandwich has got a little thinner,
and now lock the handles together.
• Both hotplates (6, 7) on the sandwich toaster
are heated, which reduces the cooking time.
• During cooking, the green indicator light will
come on and go off several times. This merely
means that the thermostat is coming on and
going off from time to time.
• The sandwich is ready after approximately 3-4
minutes, depending on its thickness and filling.
If you want the bread to be more golden, you
should toast the sandwich a little longer.
• You can switch off the sandwich toaster at any
time by removing the cord from the socket.
• Once the sandwich is ready, you should open
the sandwich toaster carefully.
• Warning! The metal parts will get very hot du
-
ring use. Touch the handle only (2). Be careful
of spitting oil, fat or other liquids.
• Carefully release the sandwich using a heat-
resistant plastic spatula or similar. You must
not use metal utensils or utensils with a sharp
edge on the hotplates, as these have a special
non-stick coating. Instead use plastic, mela-
mine or wooden utensils.
• Always close and unplug the sandwich toaster
once the food is ready.
• Before cleaning and storing the sandwich
toaster, make sure it has cooled completely.
SERVING SUGGESTIONS
(for toasted sandwiches)
• Vesuvio Mustard (tomato, cheese, ham, mu
-
stard and raw onion, as required)
• Salami (salami, fried onion, cheese, olives)
• Carni (fried mince, raw onion, pickled gherkins,
tomato, cheese)
• Vegetario (stewed apple, banana slices,
sprinkle with cinnamon)
• Hawaii Chicken (chicken, pineapple, pepper,
curry)
• Capriciosa (mushrooms in white sauce,
cheese, tomatoes, oregano)
• Hot Tuna (tuna, sliced hard-boiled eggs,
tomato, mayonnaise)
CLEANING
• Always follow the safety measures.
• Remove the plug from the socket.
• Allow the sandwich toaster to cool completely
before cleaning it.
• Use a piece of kitchen roll or a damp cloth to
wipe the hotplates. If necessary, use a damp
sponge for cleaning.
• If any food residues remain on the hotplates,
these can be loosened using a small amount
of cooking oil. Leave the oil for 5 minutes, and
then wipe the hotplates with a piece of kitchen
roll.
• You must not use scouring powder or any
form of strong solvent or abrasive cleaning
agent.
• You must not use steel brushes or other metal
utensils.
Warning!
• The electrical parts must not come into con
-
tact with water.
• The sandwich toaster must not be submerged
in any form of liquid.
15


