29
sharp cutting edges are less likely to
bind and are easier to control.
g
Use the power tool, accessories
and tool bits etc. in accordance
with these instructions, taking into
account the working conditions and
the work to be performed.
Use of
the power tool for operations different
from those intended could result in a
hazardous situation.
5 Service
a
Have your power tool serviced by a
qualified repair person using only
identical replacement parts.
This
will ensure that the safety of the
power tool is maintained.
b To avoid hazards, damaged power
leads must be replaced by the
manufacturer or his customer service
representative.
6 – Safety instructions
relating specifically to
the equipment
Wear goggles and ear
defenders.
• Before drilling into walls make sure
that you are not breaking into an
electricity, gas or water supply line.
Use a detector.
• Always unplug drill before changing drill
or bit.
• The chuck key should always be
stored in the key holder.
• To avoid injuries, securely attach the
workpiece (e.g. with vice or clamp).
• When drilling or driving screws: Do not
allow the motor to stall under the load.
• To avoid hazards, damaged power leads
must be replaced by the manufacturer
or his customer service representative.
7 – Installation and setting
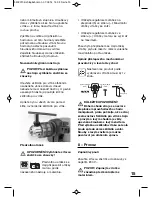
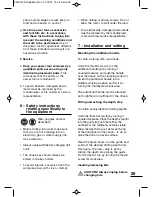
Mounting the additional handle
For safe working with two hands.
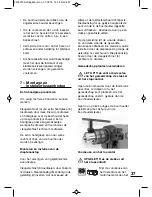
Undo the thumb screw (a) on the
additional handle (6) by turning it
counterclockwise and pushthe handle
over the chuck on the clamping collar (c).
Swivel the additional handle into a
suitable working position and fix it by
turning the thumbscrew clockwise.
The additional handle can be attached
both righthand or lefthand of the chuck.
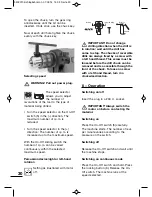
Fitting and setting the depth stop
To obtain evenly identical drilling depths.
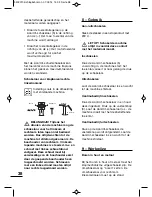
Undo the thumb screw (b) by turning it
counterclockwise. Place the depth stop (8)
into the guide (d) such that either the
numbers or the millimeter scale is visible.
Draw the depth stop out as far as the tip
of the drill placed in the chuck – to do so
place the drill on an even surface.
Read the figure shown on the guide and
subtract the desired drilling depth from
this figure. The new value is set by
sliding the depth stop along the guide.
Fix the depth stop by turning the thumb
screw (b) clockwise.
Inserting/removing bits
CAUTION! Always unplug before
changing bits.
5402070-Schlagbohr-man 07.03.14 14:03 Seite 29

