background image

ENGLISH

22

USE

Function

•  Do not use the tool with materials that are abrasive, corrosive or which contain petrol.
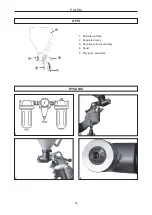
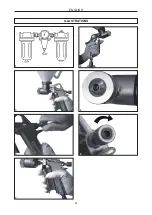
•  The tool is supplied with air via the air connection, which screws onto the pistol grip (fig. 2).
•  When air is connected to the tool, it will flow through the nozzle (fig.4)
•  Press the trigger in to open the paint nozzle (fig. 3).
•   The paint runs with natural pressure (gravity feeding) through the nozzle and is finely dispersed by the 

compressed air flow (fig. 4).

Compressor

•  The tool must only be powered with compressed air from a compressor.
•  Never attempt to power compressed air tools with oxygen, carbon dioxide or other bottled gas.

Starting

1.  Turn the adjuster knob for the nozzle to fully open position (fig. 5).
2.  Connect the tool to the compressed air supply (fig. 2).
3.  A small volume of air will now flow through the nozzle (fig. 4).
4.  Press in the trigger to release air and spray paint (fig. 7).

Adjusting the paint flow

The tool must be set for the actual type of paint and job.
1.  Turn the adjuster knob for the paint flow anticlockwise as far as it goes (fig. 6).
2.  Press the trigger to activate the tool.
3.  Check that the paint is evenly distributed.

IMPORTANT:

•  Do not use the tool with flammable solvents or other substances – explosion risk.
•   Clean the tool and accessories with solvent before using it the first time to remove any residual lubricant 

from the manufacturing.

NB!

The tool is not fitted with an internal air valve. If you do not want the air to flow continuously a valve must be 

connected to the tool. Never use a valve with a compressor that does not have a tank and an automatic start/

stop function.

Summary of Contents for 021-019

Page 1: ...kcja obs ugi w oryginale EN Operating instructions in original Jula AB 30 12 2011 Bruksanvisning f r texturf rgspruta Bruksanvisning for strukturmalerspr yte Instrukcja obs ugi pistoletu do farb tekst...

Page 2: ...tion 7 Kompressor 7 Start 7 Inst llning av f rgfl de 7 UNDERH LL 8 Avtappning av kondensvatten 8 NORSK 9 SIKKERHETSANVISNINGER 9 Ytterligere sikkerhetsanvisninger 10 TEKNISKE DATA 10 BESKRIVELSE 10 IL...

Page 3: ...17 Spr arka 17 Uruchamianie 17 Regulacja strumienia farby 18 KONSERWACJA 18 Spust kondensatu 18 ENGLISH 19 SAFETY INSTRUCTIONS 19 Additional safety instructions 20 TECHNICAL DATA 20 DESCRIPTION 20 IL...

Page 4: ...S tt fast arbetsstycket p l mpligt s tt Det r s krare n att h lla med handen och g r att du f r b da h nderna fria f r verktyget H ll verktyg rena och i gott skick H ll verktyg rena f r b ttre och s k...

Page 5: ...ng av verktyget innan du sl pper det H ll verktyget stadigt innan du startar det Rikta aldrig verktyget mot dig sj lv eller n gon annan R r inte vid verktyg eller tillbeh r omedelbart efter anv ndnin...

Page 6: ...SVENSKA 6 ILLUSTRATIONER 2 4 6 1 3 5 7...

Page 7: ...fig 5 2 Anslut verktyget till tryckluftsf rs rjning fig 2 3 Luft kommer nu att fl da i liten m ngd genom munstycket fig 4 4 Tryck in avtryckaren f r att luft och f rg skall sprutas ut fig 7 Inst llni...

Page 8: ...ellt ansamlat kondensvatten fig 1 genom att ppna avtappningskranarna VIKTIGT Anv nd inte l sningsmedel som inneh ller halogenerade kolv ten 1 1 1 trikloretan metylenklorid etc som kan reagera kemiskt...

Page 9: ...er tr tt Sett fast arbeidsemnet p egnet m te Det er sikrere enn holde med h nden og gj r at du har begge hendene frie til verkt yet Hold verkt yet rent og i god stand Hold verkt y rene for et sikrere...

Page 10: ...rter det Hvis du arbeider h yt oppe m du sjekke at ingen oppholder seg under deg f r du starter verkt yet H ndter alltid verkt yet med begge hender Hold hender og andre kroppsdeler borte fra verkt yet...

Page 11: ...NORSK 11 ILLUSTRASJONER 2 4 6 1 3 5 7...

Page 12: ...isjon fig 5 2 Koble verkt yet til trykklufttilf rsel fig 2 3 En liten mengde luft str mmer n gjennom munnstykket fig 4 4 Trykk inn avtrekkeren for spr yte luft og maling fig 7 Innstilling av malingsme...

Page 13: ...t kondensvann fig 1 ved pne avtappingskranene VIKTIG Ikke bruk l semidler som inneholder halogenerte hydrokarboner 1 1 1 trikloretan metylenklorid osv som kan reagere kjemisk med deler av aluminium el...

Page 14: ...ujno Przez ca y czas zachowuj ostro no Nie u ywaj urz dzenia gdy jeste zm czony Zamontuj obrabiany przedmiot w odpowiedni spos b Jest to bezpieczniejsze ni trzymanie przedmiotu w r ce i umo liwia trzy...

Page 15: ...prawd czy nie ma nikogo na dole Zawsze obs uguj narz dzie obiema r kami Trzymaj r ce i inne cz ci cia a w bezpiecznej odleg o ci od ruchomych cz ci Wy cz narz dzie przed puszczeniem go Przed uruchomie...

Page 16: ...POLSKI 16 OPIS 1 Zbiornik na farb 2 Regulator dyszy 3 Regulator strumienia farby 4 Spust 5 Przy cze powietrza RYSUNKI 2 4 1 3...

Page 17: ...sz farby rys 3 Farba sp ywa na skutek ci aru w asnego podawanie grawitacyjne przez dysz a strumie spr onego powietrza r wnomiernie j rozprowadza rys 4 Spr arka Narz dzie mo e by zasilane wy cznie spr...

Page 18: ...automatycznego systemu start stop KONSERWACJA WA NE Narz dzie jest wykonane w spos b zapewniaj cy d ugie dzia anie przy minimalnej potrzebie konserwacji Czy narz dzie regularnie aby zapewni prawid owe...

Page 19: ...ot use the tool when you are tired Secure the workpiece properly This is safer than using your hands and means you have both hands free to operate the tool Keep the tool clean and in good condition Ke...

Page 20: ...t If you are working high up check that no one is below you before starting the tool Always operate the tool with both hands Keep your hands and the rest of your body away from the moving parts Switch...

Page 21: ...ENGLISH 21 ILLUSTRATIONS 2 4 6 1 3 5 7...

Page 22: ...ion fig 5 2 Connect the tool to the compressed air supply fig 2 3 A small volume of air will now flow through the nozzle fig 4 4 Press in the trigger to release air and spray paint fig 7 Adjusting the...

Page 23: ...ty the air hoses of any condensate that has accumulated fig 1 by opening the drain cocks IMPORTANT Do not use solvents that contain halogenated hydrocarbons 1 1 1 trichloroethane methylene chloride et...

Page 24: ......

Reviews: