EN
11
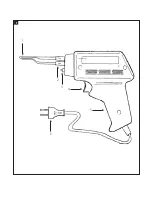
5. Handle
6. Plug
FIG. 1
USE
The product is intended to be supplied with
230 V ~ 50 Hz. Check that the mains voltage
corresponds to the rated voltage on the type
plate. Plug the plug into a suitable power
point. Hold the product by the handle.
Point the soldering tip at the junction and
press the trigger. The status and torch light
go on. After six–eight seconds the soldering
tip is heated to 230°C and the soldering can
be carried out. The solder temperature is
controlled with the trigger. The soldering tip
is supplied with power when the trigger is
pressed and its temperature increases.
For this reason do not press the trigger all
the time, release it now and then so that the
temperature drops a little. Release the trigger
when the soldering tip begins to get too hot,
but after no more than 12 seconds, and keep it
released for at least 48 seconds for it to cool.
Press the trigger again when temperature of
the soldering tip begins to get too low – the
temperature will then quickly increase.
The soldering temperature is kept within
suitable limits in this way, which ensures better
results, reduces oxidisation on the soldering tip
and increases the life span.
MAINTENANCE
REPLACING THE SOLDERING TIP
The soldering tip can after prolonged use
become oxidised and worn thin, and should
therefore be replaced.
Undo both retaining screws on the soldering
tip. Remove the old soldering tip, fit a new one
and tighten the screws. The product can now
be used again as usual.
REPLACING BULB
Contact the retailer if the bulb needs to be
replaced. Bulb data: 6 V, 3 W.
Summary of Contents for 018231
Page 3: ...1 1 2 3 6 4 5 ...


