background image

Re
ad

Pu
mp

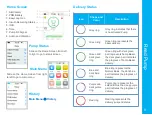
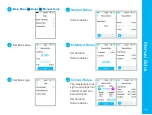
Home Screen

Delivery Status

8

9

1. Alert/Alarm

2. PDM Battery

3. EasyLoop Icon

4. Insulin Delivering Status

5. IOB

6. Time

7. Pump RF Signal

8. Audio and Vibration

Pump Status

Slide on the Home Screen from left 
to right to go to status screen

History

Main Menu 

History

Main Menu

Slide on the Home Screen from right
to left to go to main menu

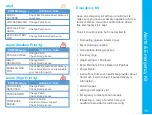
Icon

Shape and 

Color

Description

Grey ring

Grey ring indicates that there 
is no activated Pump.

Green ring

Green ring represents the 
basal delivery.

Green and 
dark green 
ring

Green ring with dark green 
part represents Temp Basal, 
the dark green part indicates 
the progress of Temp Basal 
delivery.

Blue and 
dark blue 
ring

Blue ring represents the 
Normal Bolus, the dark blue 
part indicates the progress of 
delivery.

Purple and 
dark purple 
ring

Purple ring represents the 
extend Bolus, the deep purple 
part indicates the progress of 
delivery.

Red ring

Red ring represents the 
delivery suspend status.

Summary of Contents for A6 TouchCare

Page 1: ...Simplifying Diabetes A6 TouchCare Insulin Pump color touchscreen Quick Start Guide mmol L...

Page 2: ...iew 1 PDM Settings 2 Basal Settings 4 Bolus Settings 5 Start a new Patch 6 Read Pump 9 Temp Basal 10 Manual Bolus 11 Food Bolus Calculator 12 Suspend Resume 13 Deactivate the Patch 14 Alerts Emergency...

Page 3: ...o 3 days The Pump Base stores delivery settings and sends data to the PDM via Bluetooth Low Energy The Patch Pump Base and Patch connected is waterproof at 8 feet 2 5 meters for 60 minutes IPX8 Store...

Page 4: ...2 seconds then slide to power off Or long press the power button for about 6 seconds 4 Set time and date 2 Wake the PDM When the screen goes black press the power button and then slide to unlock 5 Bo...

Page 5: ...n Menu Settings General Display It is recommended for new users to set backlight time as 2 minutes 5 Set audio options Main Menu Settings General Audio Options If you set the audio option to Audio off...

Page 6: ...asal Rate with an increment of 0 05 U H 3 Add Time Segment Tap Add Time Segment to add a new segment You can set up to 48 segments for each day 4 Delete Time Segment Slide to left on each segment tap...

Page 7: ...Set up the Bolus Calculator Turn on off the Bolus Calculator Set IC ratios Set Insulin Sensitivity Set BG target Set IOB Time Active Insulin Time 3 Normal Extended and Combo Bolus Bolus Settings 5 Ma...

Page 8: ...ly the Patch horizontally If you choose an infusion site on your upper arm or thigh apply the Patch vertically Prepare the infusion site Wash your hands with soap and water Clean the infusion site wit...

Page 9: ...insulin 1 Push air into the vial Remove air 3 Keep the syringe vertical to the Patch Pump and the needle inside the fill port Retract the plunger to remove air bubbles 4 Push the plunger until you se...

Page 10: ...tch 7 Start Insulin Delivery 8 4 Press the needle button with one quick motion to completely insert the needle 1 Remove the button cover 2 Peel off the adhesive liners 3 Press the Pump against the ski...

Page 11: ...scription Grey ring Grey ring indicates that there is no activated Pump Green ring Green ring represents the basal delivery Green and dark green ring Green ring with dark green part represents Temp Ba...

Page 12: ...adjust your Basal rate for a short time Select a Basal type rate or percent and duration Set Preset Temp Basal Main Menu Settings Insulin Pump Basal Setup Preset Temp Setup Activate a Preset Temp Basa...

Page 13: ...s Slide to deliver Set duration Slide to deliver Set Bolus dose Tap blue purple plus sign to set proportion of Normal part and Extended part Set duration Slide to deliver 1 2 3 Normal Bolus Extended B...

Page 14: ...e to deliver Enter BG or Carb or both Set duration Slide to deliver Set Bolus dose and Bolus type 1 2 3 4 1 4 3 4 2 Normal Bolus Extended Bolus Combo Bolus Tap blue purple plus sign to set proportion...

Page 15: ...Suspend Resume Suspend Main Menu Suspend 13 Resume Main Menu Resume No Bolus is being delivered Bolus All A Bolus is being delivered...

Page 16: ...ical adhesive remover or baby oil if necessary Bend the adhesive pad and peel off the double sided tape Press and hold the two release buttons on opposite sides of the Pump Base and pull the Pump Base...

Page 17: ...S MAX TDD Check BG Resume basal delivery Check bolus history and reevaluate your need for insulin Alarm High Priority Keep an emergency kit with you at all times to make sure you have necessary suppli...

Page 18: ...U H Start Time Rate U H Max Basal Rate ________________ U H Basal Pattern Name ___________________ Start Time Rate U H Start Time Rate U H Name Rate Duration Heavy Exercise or U H Medium Exercise or...

Page 19: ...1 U g 1 U g 1 U g 1 U g 1 U g Insulin Sensitivity Start Time ISF mmol L 1 U mmol L 1 U mmol L 1 U mmol L 1 U mmol L 1 U mmol L 1 U mmol L 1 U mmol L 1 U mmol L BG Target mmol L Start Time Low Limit H...

Page 20: ...201203 China Tel 86 21 50274781 Fax 86 21 50274779 www medtrum com 0197 This product complies with Directive 93 42 EEC MDD and Directive 2014 53 EU RED MD SY 011C IM882111WW 002 348367 Version 1 4 Med...

Reviews: