background image


and practice the test. Carry out all the quality control checks as directed. 

7.


Keep the device and testing equipment away from young children. Small items 
such as the battery cover, batteries, test strips, lancets and vial caps are choking 
hazards. 

8.


Use of this instrument in a dry environment, especially if synthetic materials are 
present (synthetic clothing, carpets etc.) may cause damaging static discharges 
that may cause erroneous results. 

9.


Do 

NOT 

use this instrument in close proximity to sources of strong 

electromagnetic radiation, as these may interfere with accurate operation. 

10.


Proper maintenance and periodic control solution testing are essential to the 
longevity of your device. If you are concerned about your accuracy of 
measurement, please contact the local customer service or place of purchase for 
help. 


KEEP THESE INSTRUCTIONS IN A SAFE PLACE 


SCAN THIS QR CODE FOR ONLINE SUPPORT 

Summary of Contents for DGEMP01M

Page 1: ...Blood Glucose Monitoring System DGEMP01M Owner s Manual Owner s Manual ...

Page 2: ......

Page 3: ...nitor your blood glucose levels by yourself anywhere any time If you have other questions regarding this product please contact the local customer service or place of purchase Intended Use This MediSure Empower Blood Glucose Monitoring System DGEMP01M is intended for use outside the body in vitro diagnostic use by people with diabetes at home as an aid to monitoring the effectiveness of diabetes c...

Page 4: ...14 http www fda gov MedicalDevices Safety AlertsandNotices ucm224025 htm CDC Clinical Reminder Use of Fingerstick Devices on More than One Person Poses Risk for Transmitting Bloodborne Pathogens 2010 http www cdc gov injectionsafety Fingerstick DevicesBGM html 1 Use this device ONLY for the intended use described in this manual 2 Do NOT use accessories not specified by the manufacturer 3 Do NOT us...

Page 5: ... clothing carpets etc may cause damaging static discharges that may cause erroneous results 9 Do NOT use this instrument in close proximity to sources of strong electromagnetic radiation as these may interfere with accurate operation 10 Proper maintenance and periodic control solution testing are essential to the longevity of your device If you are concerned about your accuracy of measurement plea...

Page 6: ... WITH BLOOD SAMPLE 10 Preparing the Lancing Device for Blood Testing 10 Preparing the Puncture Site 10 Performing a Blood Glucose Test 12 Alternative Site Testing 14 METER MEMORY 15 Reviewing Test Results 15 Reviewing Blood Glucose Day Average Results 15 DOWNLOADING RESULTS ONTO A COMPUTER 16 MAINTENANCE 18 Battery 18 Replacing the Battery 18 Cleaning and Disinfection 19 Disinfecting Procedures 20...

Page 7: ...Result Readings 25 Troubleshooting 27 DETAILED INFORMATION 28 Comparing Meter and Laboratory Results 28 SYMBOL INFORMATION 29 SPECIFICATIONS 30 ...

Page 8: ......

Page 9: ......

Page 10: ......

Page 11: ......

Page 12: ...les to test your blood glucose Using other substances will lead to inaccurate results If you are experiencing symptoms that are inconsistent you re your blood glucose test results and you have followed all the instructions given in this owner s manual contact your healthcare professional The device should not be used on severely hypotensive individuals or patients in shock Readings which are lower...

Page 13: ...tor DGEMP01M 1 2 Owner s Manual 1 3 Protective Wallet 1 4 Lancing Device DGEMP001L 1 5 Sterile Lancets DGEMP030N 10 6 Log Book and Warranty Card x 1 7 Quick Start Guide 1 Glucose Control Solution DGEMP01C Low W2 High B3 1 MediSure Empower Blood Glucose Test Strips c glucose control solutions d lancing device e or sterile lancets f may not be included in the kit They can be purchased separately Ple...

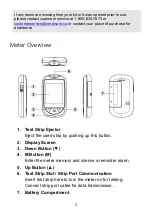
Page 14: ...rchase for assistance Meter Overview 1 Test Strip Ejector Eject the used strip by pushing up this button 2 Display Screen 3 Down Button 4 M Button M Enter the meter memory and silence a reminder alarm 5 Up Button 6 Test Strip Slot Strip Port Communication Insert test strip here to turn the meter on for testing Connect strip port cable for data transmission 7 Battery Compartment ...

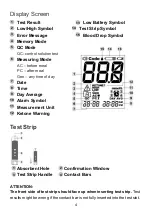
Page 15: ... PC after meal Gen any time of day Date Time Day Average Alarm Symbol Measurement Unit Ketone Warning Test Strip Absorbent Hole Confirmation Window Test Strip Handle Contact Bars ATTENTION The front side of test strip should face up when inserting test strip Test results might be wrong if the contact bar is not fully inserted into the test slot 1 2 3 4 12 14 15 1 2 3 4 5 8 10 11 9 7 6 13 ...

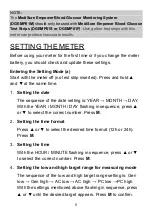
Page 16: ...ld and at the same time 1 Setting the date The sequence of the date setting is YEAR MONTH DAY With the YEAR MONTH DAY flashing in sequence press or to select the correct number Press M 2 Setting the time format Press or to select the desired time format 12h or 24h Press M 3 Setting the time With the HOUR MINUTE flashing in sequence press or to select the correct number Press M 4 Setting the low an...

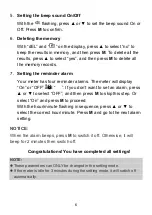
Page 17: ...meter will display On or OFF and If you don t want to set an alarm press or to select OFF and then press M to skip this step Or select On and press M to proceed With the hour minute flashing in sequence press or to select the correct hour minute Press M and go to the next alarm setting NOTICE When the alarm beeps press M to switch it off Otherwise it will beep for 2 minutes then switch off Congrat...

Page 18: ...receive the meter At least once a week to routinely check the meter and test strips You begin using a new vial of test strips You suspect the meter or test strips are not working properly Your blood glucose test results are not consistent with how you feel or if you think the results are not accurate Practicing the testing process or You have dropped or think you may have damaged the meter Perform...

Page 19: ...Shake the control solution vial thoroughly before use Squeeze out the first drop and wipe it off then squeeze out another drop and place it on the tip of the vial cap Hold the meter to move the absorbent hole of the test strip to touch the drop Once the confirmation window fills completely the meter will begin counting down NOTE To avoid contaminating the control solution do not directly apply con...

Page 20: ...g properly Do NOT test your blood Go to www medisure ca support or call customer service at 1 855 MDI SURE for help NOTE The control solution range printed on the test strip vial is for control solution use only It is not a recommended range for your blood glucose level See the MAINTENANCE section for important information about your control solutions ...

Page 21: ... section If the meter is being operated by a second person who is providing testing assistance to the user the meter and lancing device should be decontaminated prior to use by the second person Sharing the lancing device and lancets may increase the risk of contracting infectious diseases Lancing device must not be used for more than one person Preparing the Lancing Device for Blood Testing Pleas...

Page 22: ...ce s tip firmly against the lower side of your fingertip Press the release button to prick your finger then a click indicates that the puncture is complete Blood from sites other than the fingertip i Replace the lancing device cap with the clear cap for AST Pull the cocking control back until it clicks When lancing the forearm upper arm or hand avoid lancing the areas with obvious veins because of...

Page 23: ...of blood to the absorbent hole of the test strip at a tilted angle Confirmation window should be completely filled if enough blood sample has been applied Do NOT remove your finger until you hear a beep sound NOTE Do not press the punctured site against the test strip or try to smear the blood If you do not apply a blood sample to the test strip within 3 minutes the meter will automatically turn o...

Page 24: ...dispose of used test strips The meter will switch itself off automatically Always follow the instructions in the lancing device insert when removing the lancet WARNING The used lancet and test strip may be biohazardous Please discard them carefully according to your local regulations Wash your hands thoroughly with soap and water after handling the meter lancing device and test strips to avoid con...

Page 25: ...ood at other sites Thus when testing blood glucose during or immediately after a meal physical exercise or any other event take a blood sample from your finger only We strongly recommend that you perform AST ONLY at the following times In a pre meal or fasting state more than 2 hours since the last meal Two hours or more after taking insulin Two hours or more after exercise Do NOT use AST if You t...

Page 26: ...e meter Reviewing Blood Glucose Day Average Results 1 Press and release to enter memory mode for average results with and displayed on the screen Release M and then your 7 day average result measured in general mode will appear on the display 2 Press to review 14 21 28 60 and 90 day average results stored in each measuring mode in the order of Gen AC then PC 3 Exit the meter memory Keep pressing t...

Page 27: ...h Dongle and installing the software To download the Health Care Software System please visit the MediSure website www medisure ca support 2 Connecting to a personal computer a For Computer connect the strip port cable to a cable port on your computer With the meter switched off insert the other end of the strip port cable to the meter data port PC will appear on the meter display indicating that ...

Page 28: ...17 WARNING While the meter is connecting to the PC it will be unable to perform a blood glucose test ...

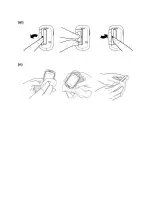
Page 29: ...e sure the meter is turned off 1 Press the edge of the battery cover and lift it up to remove 2 Remove the old battery and replace with one 1 5V AAA size alkaline battery 3 Close the battery cover If the battery is inserted correctly you will hear a beep afterwards NOTE Replacing the battery does not affect the test results stored in the memory As with all small batteries these batteries should be...

Page 30: ... at least once a week to prevent infection How to clean and disinfect the meter The meter must be cleaned prior to the disinfection Use one disinfecting wipe to clean exposed surfaces of the meter thoroughly and remove any visible dirt blood or any other body fluid with the wipe Use a second wipe to disinfect the meter by following the disinfecting procedure below Do NOT use organic solvents to cl...

Page 31: ... slot but be careful not to allow excess liquid to get inside Keep meter moist with disinfection solution for a minimum of 1 minute for the wipes Follow the instructions on the package label of disinfecting wipe Use two or more wipes if necessary n 3 Allow the meter surface to dry completely 4 Discard the used wipes and never reuse them Improper system cleaning and disinfection may result in meter...

Page 32: ...and disinfect the meter while performing tests If the meter is being operated by a second person the meter and lancing device should be decontaminated prior to use by the second person Do NOT allow cleaning and disinfecting solution to get in the test slot battery compartment or strip ejection button If you do get moisture in the test strip slot wipe it away with a corner of tissue Always dry the ...

Page 33: ... for assistance This device has been validated to withstand 260 cycles 10 950 cleans of cleaning and disinfection using the recommended disinfecting wipe to simulate one cleaning and disinfection cycle per week over 5 years of use The lancing device has been validated to withstand 110 cycles of cleaning and disinfection using the recommended disinfecting wipe to simulate one cleaning and disinfect...

Page 34: ...ions 2o C to 30o C 35 6o F to 86 0o F 10 to 85 relative humidity Do NOT freeze Store your test strips in their original vial only Do not transfer to another container Store test strip packages in a cool dry place Keep away from direct sunlight and heat After removing a test strip from the vial immediately close the vial cap tightly Touch the test strip with clean and dry hands Use each test strip ...

Page 35: ...scard the remaining solution after 3 months It is recommended that the control solution test be done at room temperature 20 C to 25 C 68 F to 77 F Make sure your control solution meter and test strips are at this specified temperature range before testing Shake the vial before use discard the first drop of control solution and wipe off the dispenser tip to ensure a pure sample and an accurate resu...

Page 36: ...he meter under any circumstances Result Readings MESSAGE WHAT IT MEANS Lo 1 1 mmol L LOW 1 1 to 3 8 mmol L 5 5 mmol L AC PC Gen 3 8 7 1 mmol L 3 8 9 9 mmol L 3 8 6 6 mmol L HIGH AC PC Gen 7 2 13 2 mmol L 10 13 2 mmol L 6 6 13 2 mmol L KETONE 13 3 mmol L KETONE is shown when your blood glucose result is equal to or higher than 13 3 mmol L What to Do Check blood ketone if checking ketones is part of...

Page 37: ...range is 8 C to 45 C 46 4 F to 113 F Repeat the test after the meter and test strip are in the above temperature range E 0 E A E E Problem with the meter Repeat the test with a new test strip If the meter still does not work please contact the customer service for assistance E F Appears when test strip is removed while counting down or insufficient blood volume Review the instructions and repeat t...

Page 38: ...ction Repeat the test with a new test strip Apply sample only when flashing appears on the display Defective meter Please contact customer services 3 If the control solution testing result is out of range POSSIBLE CAUSE WHAT TO DO Error in performing the test Read instructions thoroughly and repeat the test again Control solution vial was poorly shaken Shake the control solution vigorously and rep...

Page 39: ...ds of medical care in diabetes 2016 39 supp 1 Diabetes Care S16 Please consult your health care provider to determine a target range that works best for you Comparing Meter and Laboratory Results The meter provides you with whole blood equivalent results The result you obtain from your meter may differ somewhat from your laboratory result due to normal variation Meter results may be affected by fa...

Page 40: ...3 9 mmol L higher than blood drawn from a vein venous sample used for a lab test 3 Therefore it is best to fast for eight hours before doing comparison tests Factors such as the amount of red blood cells in the blood a high or low hematocrit or the loss of body fluid dehydration may also cause a meter result to be different from a laboratory result 2 Surwit R S and Feinglos M N Diabetes Forecast 1...

Page 41: ... off after 3 minutes without action Temperature Warning Operating Condition 10 C to 40 C 50 F to 104 F 10 to 85 R H non condensing Meter Storage Transportation Conditions 20 C to 60 C 4 F to 140 F below 93 R H Test Strip Storage Transportation Conditions 2o C to 30o C 35 6o F to 86o F 10 to 85 R H Measurement Units Fixed mmol L Measurement Range 1 1 to 36 1 mmol L Expected Service Life 5 years Thi...

Page 42: ......

Page 43: ......

Page 44: ...nit 23 Ajax ON L1S 7G1 CANADA www medisure ca Toll Free 1 855 634 7873 8 30 am 5 00 pm EST Monday Friday For assistance outside of these hours please contact your healthcare professional 8 30 am 5 00 pm EST lundi vendredi Pour obtenir de l aide en dehors de ces heures contactez votre professionnel de la santé ...

Reviews: