background image


P

P

R

R

I

I

N

N

T

T


Y

Y

O

O

U

U

R

R


P

P

H

H

O

O

T

T

O

O

G

G

R

R

A

A

P

P

H

H

S

S


23 

Deuts

ch 

English 

Ned

erla

n

ds


Français 

Españo

l


Slovenš

č

in

C

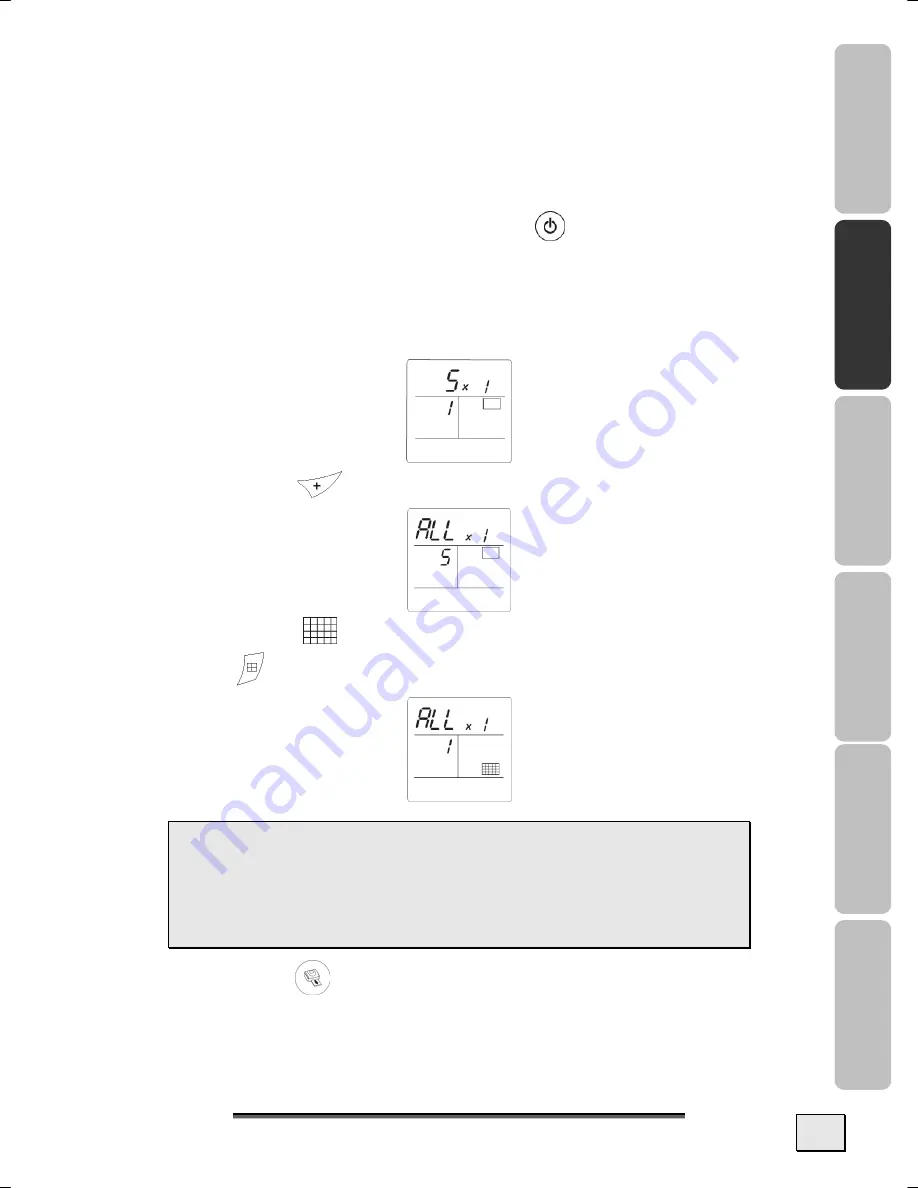
REATE A CONTACT SHEET 

(

INDEX

The contact plate is a simple way of displaying all the photographs 
on your memory card; choose those to be printed using the num-

ber assigned to each of them. 
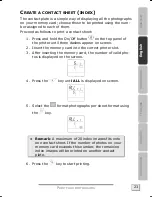
Proceed as follows to print a contact sheet: 

1.


Press and hold the On/Off button 

 on the top panel of 

the printer until three dashes appear on screen. 

2.


Insert the memory card into the correct printer slot.  

3.


After inserting the memory card, the number of valid pho-
tos is displayed on the screen. 


4.


Press the 

 key until 

ALL

 is displayed on screen.  


5.


Select the 

 format photographs per sheet format using 

the 

 key.  


Â


Remark

: A maximum of 20 index images fits onto 

one contact sheet. If the number of photos on your 
memory card exceeds this number, the remaining 

index images will be printed on another contact 
plate. 

6.


Press the 

 key to start printing. 

Summary of Contents for Printer

Page 1: ...d disposal 4 INTRODUCTION 5 Notes on these instructions 5 Quality 5 Service 5 Our target group 5 Included in the box 6 System requirements 6 Technical Data 7 SETUP 8 1 Connecting to the power supply 8 2 Ribbon installation 9 To change the ribbon 10 3 Loading paper 12 TRANSFERRING IMAGES 13 Transferring Images from Memory Cards 13 Infrared transfer 15 Transferring Images via USB 16 1 Install the so...

Page 2: ... First aid for malfunctions 29 Problems 29 Error messages 30 Paper jam 31 Technical support 32 Do you need additional help 32 Guarantee 33 Liability limitations 34 Copying this manual 34 Device At the end of its life the appliance must not be disposed of in household rubbish Enquire about the options for environmentally friendly disposal Copyright 2005 All rights reserved This manual is protected ...

Page 3: ... could lead to an electrical short circuit dam age to your printer or fire Slots and openings in the printer serve for ventilation and prevent overheating Do not cover these openings Never insert any objects through the slots and openings into the inside of the printer Doing so could lead to an electrical short cir cuit or damage to your printer Do not allow children to play unattended with any el...

Page 4: ...rom 15 C 59 F to 35 C 95 F at a relative humidity of 30 to 75 not condensing After transporting your printer wait until it has reached the ambient temperature before putting it into operation In the event of major variations in the temperature or humidity Condensation can form on the inside of the printer which can cause an electrical short circuit ELECTRO MAGNETIC COMPATIBILITY When connecting th...

Page 5: ... Always hold the power unit firmly when removing the power cord Never pull the power cord Only use the power adaptor provided with this printer HDAD15W101 124 operating at AC 200 240V 50 Hz If using an extension cord make certain that it meets your local safety requirements If in doubt consult a qualified elec trician To provide additional protection against electric shock power surges lightning s...

Page 6: ...n an external storage medium i e CDR disc We cannot assume a liability for data loss or associated subsequent damage RECYCLING AND DISPOSAL This printer and its packaging was produced mostly from materi als which can be disposed of in an environmentally friendly man ner and be professionally recycled After its use this device will be taken back and recycled or use will be made of its useful materi...

Page 7: ...anced hardware and software design offers you an advanced printer design which will provide you a great deal of functionality for business or entertainment purposes SERVICE Service and support is available any time you use your printer Contact us we will be glad to help you This manual contains a separate chapter on the subject of service beginning on page 29 OUR TARGET GROUP Thank your for purcha...

Page 8: ...pter model KSAFJ2400333T1M2 Paper tray Ink ribbon Photo paper Installation and application software User s manual Guarantee documentation SYSTEM REQUIREMENTS Computer PC AT compatible computer Processor type Pentium III class 500 MHz or higher Operating system Windows 98SE ME 2000 XP Memory 128 MB or more Hard disc capacity min 150 MB free storage capacity Installation CD ROM drive Connections USB...

Page 9: ...speed Less than 60 seconds per photo excluding image processing Interface CF cards Type I II SM MS MD MMC SD xD cards USB 2 0 compatible port Paper tray By automatic loader capacity 20 sheets Main supply 230V AC 50 60 Hz Operating temperature 15 to 35 C 30 to 75 humidity Dimensions in mm 201 x 174 x 94 excluding paper tray Weight in Kg 1 5 except power supply unit Power consumption in standby 10 W...

Page 10: ...ement of the sheet of paper being printed is not obstructed 1 Observe the notes in chapter Safety refer to page 1 2 Insert one end of the mains lead into the corresponding socket of the power supply 3 Connect the power supply to the rear of the printer 4 Plug the other end of the power supply mains lead into a wall socket 5 Press and hold the On Off button on the top panel of the printer until thr...

Page 11: ...m 3 Take the new ribbon out of its pack aging and make sure that the film is stretched after removing the card A 4 Pay attention to the position of the inked ribbon in accordance with the illustration on the right 5 Lift the green catch lever and push the inked ribbon into the compart ment until it engages audibly 6 Close the external flap  Warning Never touch the film cartridge with your fingers...

Page 12: ...er Wait 10 seconds for the printhead to lift then 1 Take the smart card supplied with the ribbon and photo paper and insert it in the reader on the printer s left hand side The smart card is recog nised and read by the printer and once the procedure is complete the wording 40 End or 120 End ap pears on screen 2 Remove the SIM card 3 Take the new ribbon out of its pack aging and make sure that the ...

Page 13: ...the inked ribbon in accordance with the illustration on the right 7 Lift the locking lever and push in the film cartridge until it touches the back of the compartment the locking lever must be locked after insertion 8 Close the external flap  Remark If the ribbon is replaced during a print job you can resume printing where you left off by pressing the print button ...

Page 14: ...ne up the tray with its com partment and push it in slowly until the locking system clicks  Warning Handle paper sheets by their pre cut edges never allow your fingers to come into contact with the shiny surface before printing There will be the risk of a reduced print quality  Warning Make sure that a previously printed pho tograph has not been slipped inadvertently into a packet of blank pages...

Page 15: ...ing your images from a memory card Such a connection will only be necessary if your memory card is not compatible with the printer Take the information whether your card format is supported from the technical data or from the illustration below  Warning Images smaller than 80 000 pixels can not be printed from memory cards e g a 320 x 240 image equivalent to 76 800 pixels However these photos can...

Page 16: ...ing the memory card Incorrect insertion of the memory card could lead to damage to the insertion slot and or the memory card Card format Contacts CompactFlash CF Pointing forwards Memory Stick MS Pointing upwards Microdrive MD Pointing forwards MultiMediaCard MMC Pointing upwards Secure Digital SD Pointing upwards SmartMedia SM Pointing upwards xD card Pointing upwards ...

Page 17: ...wer resolution You will achieve good quality if you print 2 4 or 8 images per sheet 1 Press and hold the On Off button on the top panel of the printer until three dashes appear on screen 2 Place the infrared window of your device face to face with the corresponding window of the photo printer at a dis tance not exceeding 30 centimetres 3 Select a photo on your device and launch its transfer via th...

Page 18: ...hen con nect the printer 1 Insert the CDROM supplied to automatically start the installation Remark If installation does not start automatically probably the so called Autorun feature is deactivated Manual installation without Autorun feature 1 Open the Start menu and select Run 2 Then enter the letter for the CD ROM drive fol lowed by a colon and the name of the program setup exe 3 Confirm by cli...

Page 19: ...ich will have been switched on and the other end to Connection B of your printer The USB cable is not in the scope of delivery 2 Press and hold the On Off button on the top panel of the printer until three dashes appear on screen 3 The printer will be recognized and the installation process will be concluded by the operating system  Remark If your operating system is configured so that the instal...

Page 20: ...ERFACE DISPLAY User interface 1 On Off button press and hold 2 Last photo selection button 3 Next photo selection button 4 Number of copies to print button 1 20 5 Photo format button 10x15 full page no border 10x15 with a white border 10x13 2 photographs per page 4 photographs per page 8 photographs per page 20 photographs per page index ...

Page 21: ...ements all the settings and cor rections required with respect to the sharpness of the image as well as the colour and contrast management in order to achieve the best possible print quality What is more exposure defects will also be corrected e g under exposed photos are made brighter or parts of a photo presenting strong contrasts will be compensated The red eye correction function corrects the ...

Page 22: ...n the print basket 4 Number of copies to be printed 1 20 5 Crystal Image function icon 6 Print format 7 Red eye correction function icon 8 Ribbon error refer to page 30 9 Paper error refer to page 30 10 Consumable card icon refer to page 30 11 Timer icon that flashes during printer activity 12 Print basket function 13 Number of the sheet to be printed ...

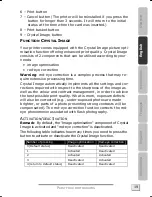
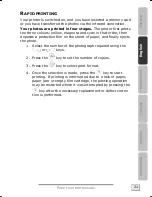
Page 23: ...genta and cyan in that order then deposits a protective film on the sheet of paper and finally ejects the photo 1 Select the number of the photograph required using the or keys 2 Press the key to set the number of copies 3 Press the key to select print format 4 Once the selection is made press the key to start printing If printing is interrupted due to a lack of paper paper jam or empty film cartr...

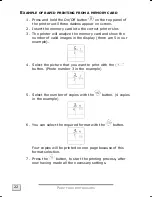
Page 24: ...l analyze the memory card and show the number of valid images in the display there are 5 in our example 4 Select the picture that you want to print with the button Photo number 3 in the example 5 Select the number of copies with the button 4 copies in the example 6 You can select the required format with the button Four copies will be printed on one page because of this format selection 7 Press th...

Page 25: ...he On Off button on the top panel of the printer until three dashes appear on screen 2 Insert the memory card into the correct printer slot 3 After inserting the memory card the number of valid pho tos is displayed on the screen 4 Press the key until ALL is displayed on screen 5 Select the format photographs per sheet format using the key  Remark A maximum of 20 index images fits onto one contact...

Page 26: ...es printing 1 Press and hold the On Off button on the top panel of the printer until three dashes appear on screen 2 Insert the memory card into the correct printer slot 3 After inserting the memory card the number of valid pho tos is displayed on the screen 4 Select photograph 3 using the key press the key until the figure 4 corresponding to the quantity de sired is displayed 5 Press the key to a...

Page 27: ...responding to the desired number of copies is displayed 9 Press the key to add the photograph to the shopping trolley the series 10 The required number of sheets is displayed to the right of the print basket icon 11 Press the key to start printing DELETING PHOTOS FROM THE PRINT BASKET If you notice that you have made an error after having validated the selection with the key press the key again to...

Page 28: ...s will be started automatically In the DPOF mode you will already define with your camera which pictures should be printed how often This information will be stored on the memory card and passed to the printer when the card is inserted into it DPOF and the number of the printouts which you will have defined previously will appear in the display 15 in this example Press the key to start printing Pr...

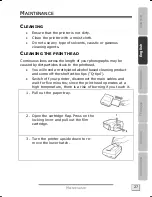
Page 29: ...the length of your photographs may be caused by dirt particles stuck to the printhead You will need a methylated alcohol based cleaning product and some off the shelf cotton tips Q tips Switch off your printer disconnect the main cables and wait for five minutes since the print head operates at a high temperature there is a risk of burning if you touch it 1 Pull out the paper tray 2 Open the cartr...

Page 30: ...ith your fingers or any object that might scratch it 5 Replace the lower hatch turn the printer right side up connect the mains cable and switch on the printer 6 Replace the film cartridge Take care that the film is taut before inserting the cartridge into its compartment Also absolutely pay attention to the notes on page 9 7 Close the flap 8 Push the paper tray back into place until the locking s...

Page 31: ...mperature drops back to normal No mains supply Check that the power supply block is correctly plugged into the mains Check that the power supply connector is correctly plugged into the printer Check that the mains socket is live The printer was unplugged during a print job Reconnect the power cable Switch the printer on again and wait to the end of the ini tialization Remove any paper jam refer to...

Page 32: ...ridge missing or incorrectly inserted Check that the cartridge is correctly inserted and that the locking lever is locked Err 21 Memory card File damaged or incorrect File illegible Try to print others If error persists check the file source or try with a different source Err 22 Memory card JPEG decom pression error The file cannot be read Try printing the others If the error persists check the so...

Page 33: ... transfer error Remove the inserted card and insert a valid SIM card Err 90 SIM card and rib bon Authorised print quantity reached The selected number of photos is greater than the remaining ribbon capacity to print all photos Other error number Other System error Switch off printer wait 30 seconds and restart If error persists contact your re tailer PAPER JAM Follow this procedure if a sheet beco...

Page 34: ...rent driver updates are available at the following URL address on the Internet Internet http www medion com DO YOU NEED ADDITIONAL HELP Should our suggestions in this manual not solve your specific problem please contact our helpline We will try and help you over the telephone However before you contact us it would be helpful to have the following information available What additional peripheral d...

Page 35: ...ms data and removable storage me dia Products which are sent with accessories will be replaced without accessories The warranty obligation does not apply in the case of the problem being caused by an accident a catastrophe vandalism misuse incorrect use ignoring the safety and maintenance regulations changes by software viruses or another piece of equipment or accessory or by other modifications n...

Page 36: ...ties based on loss or damage 2 Loss or damage to your media recordings or data 3 Economic follow on damage including lost profit or savings or asso ciated damage even in the case that we have been informed of the possibilities of this type of damage In some countries the exclusion or limitation of accompanying or follow on damage is not legally accepted so the above limitations do not come into fo...

Reviews: