background image

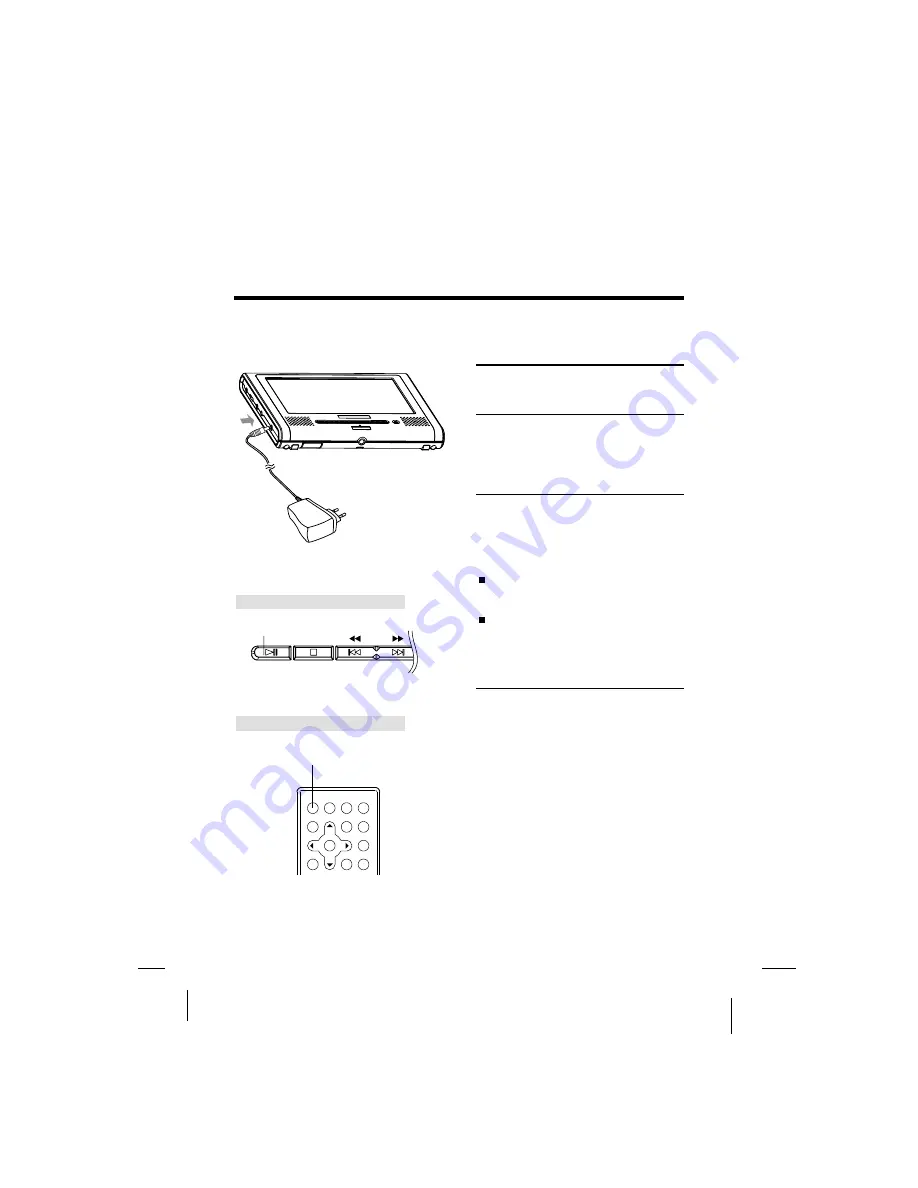
Turning On the Power

Main unit (front panel)

1

2

Connect the DC output plug of the

adapter to the DC input jack on the

main unit.

3

Connect the AC adapter to a power

outlet.

The power LED is lit blue.

The player can be used now.

At standby mode (when the power

LED is lit red), the power can also

be turned on by pressing the

standby button on the remote

control unit.

Keep pressing the ON button
on the main unit for about 1.5
seconds.

Remote control unit

4

Hint:

The included AC adapter is
compatible with voltage from 100
to 240 V, you can use it on trips
overseas.

Note that you need a converter plug
(available in stores) suited for the
region in which you are travelling.

-30-

3

1

2

3

ON

OFF

Summary of Contents for PORTABLE DVD PLAYER

Page 1: ...PORTABLE DVD PLAYER PORTABLE DVD PLAYER Operating Instructions ...

Page 2: ...exit from the apparatus 11 Only use attachments accessories specified by the manufacturer 12 Use only with the cart stand tripod bracket or table specified by the manufacturer or sold with the apparatus When a cart is used use caution when moving the cart apparatus combination to avoid injury from tip over 13 Unplug this apparatus during lightning storms or when unused for long periods of time 14 ...

Page 3: ...ATCH WIDE BLADE OF PLUG TO WIDE SLOT FULLY INSERT LASER Use of controls adjustments or the performance of procedures other than those specified may result in hazardous radiation exposure To prevent direct exposure to laser beam do not try to open the enclosure Visible and invisible laser radiation when open and interlocks defeated DO NOT STARE INTO BEAM LASER Type Wave length Output Power Beam div...

Page 4: ...e personnel The lightning flash with arrowhead symbol with in an equilateral triangle is intended to alert user to the presence of uninsulated dangerous voltage within the product enclosure that may be of sufficient magnitude to constitute a risk of electric shock to persons The exclamation point within an equilateral triangle is intended to alert the user to the presence of important operating an...

Page 5: ...ise authorized by Macrovision Reverse engineering or disassembly is prohibited FCC NOTICE This device complies with part 15 of the FCC Rules Operation is subject of the following two conditions 1 this device may not cause harmful interference and 2 this device must accept any interference received including interference that may cause und sired operation e Manufactured under license from Dolby Lab...

Page 6: ... unit rear side 18 How to stand Main unit bottom side Remote control unit frequently used buttons Remote control unit other buttons Names of battery parts and their functions Connecting to a TV Connecting to a Dolby Digital DTS MPEG decoder or an amplifier with built in decoder 23 Connecting to a digital amplifier that is not Dolby Digital DTS MPEG compatible Connecting to active speaker systems C...

Page 7: ...G 49 31 32 32 33 33 34 BASIC OPERATIONS ADVANCED OPERATCONS Viewing in slow motion DVDs and video CDs Repeating DVDs video CDs and CDs Selecting angle multi angle Changing from AV OUT to AV IN Searching for a specific scene SYSTEM SETUP TV SYSTEM SCREEN SAVER TV TYPE PASSWORD RATING DEFAULT LANGUAGE SETUP OSD LANGUAGE AUDIO LANGUAGE SUBTITLE LANGUAGE MENU LANGUAGE AUDIO SETUP AUDIO OUT VIDEO SETUP...

Page 8: ...er Turn off the power when not using the player Special note regarding use of player in vehicles We strongly advise against using the player while driving Most countries and states have laws which prohibit or severely restrict the use of the player in vehicles while driving Do not leave the player or the battery pack in places where the temperature is extremely low about 10 or lower or extremely h...

Page 9: ...d leaving rubber or plastic products in contact with the player for long periods of time as this may damage the cabinet When using chemically treated cloths read the cloth s instructions carefully Always unplug the power cord from the power outlet before cleaning the player To clean dirt off the liquid crystal display wipe the display gently with a soft dry cloth such as an eyeglass cleaning cloth...

Page 10: ...e portable DVD player is switched on while the battery pack is not fully charged the operation may sometimes be unstable Be sure to charge the battery pack fully before use The battery pack should be stored under an surrounding temperature between 15 and 25 Avoid storing it under extremely low temperatures in a place with high temperature and high humidity or in a place subject to Storage soot etc...

Page 11: ...wn on the table below are indicated on the disc s label package or jacket Marks indicated on DVDs DVD discs or packages include the marks shown below These marks indicate the type of video or audio signals recorded on the disc and the functions that can be used Indicates the number of audio tracks Indicates the number of angles Indicates the selectable picture aspect ratio Indicates the playable r...

Page 12: ... to one title On karaoke discs one song corresponds to one title Some discs are not divided in this way however so be careful when using the search and programming functions DVDS Chapter 1 Chapter 2 Chapter 1 Chapter 2 Title 1 Title 2 CDS Track1 Track2 Track3 Track4 Track5 Disc structure CDs are divided in units called tracks Generally one track corresponds to one song Tracks are sometimes further...

Page 13: ... TV or AV amplifier the setup screen should be displayed Choose the various corresponding settings according to the connected equipment With DVDs it is possible to use setup to change the subtitle and audio languages and select the desired sound mode from among multiple sound tracks In order to take full advantage of the many functions of this player be sure to store this OPERATING INSTRUCTIONS in...

Page 14: ...e accessories listed below are included 12 Accessories bag AV cable Operating instructions this manual O P E R A T I O N I N S T R U C T I O N S Battery pack AC DC adapter Card type remote control unit Soft carrying bag Short car bag Car power cable Ear phone ...

Page 15: ...ied operating range Replacing the battery 1 2 3 Fit the battery holder back to its place Lithium battery CR2025 CR2025 Insert your finger nails into A and B on the diagram below press A according to the direction then pull out the battery holder Remove the old battery then insert the new battery into the battery holder with the side facing upwards Note To prevent leakage of fluid from the lithium ...

Page 16: ...ontrol unit can operate within a distance of approximately 5 meters Note Most of the player s operations can be done by using the remote control unit Some operations however can only be done by using the main unit buttons Remote Control Unit and Main Unit Preparations 14 ...

Page 17: ...on Remote sensor 1 2 3 4 1 2 3 4 5 Power indicator 5 The remote control signals are received here Control buttons Off No power connection Main unit control section 15 1 2 3 4 5 1 2 3 4 5 Red The player is set to standby mode Blue The player is on Turn on the power using ON button on the main unit or the STANDBY button on the remote control unit 6 ON OFF ...

Page 18: ...previous next tracks or chapters Keep pressing it for about 1 5 seconds during playback to switch playing speed of backward forward through X2 X4 X8 X20 X2 Press it to adjust display mode Press it to slide the tray out Main unit left side 16 1 2 3 4 5 OPEN button 6 Use key to adjust after entering one mode BRIGHTNESS Level 0 to 8 COLOR Level 0 to 8 TFT MODE switch screen between 16 9 and 4 3 VIEW ...

Page 19: ... value The included AV cable is connected here Connect the included AC adapter here Main unit right panel 1 2 3 Loader status indicator LED Tray Open hole 1 2 3 Indicate loader status When you insert the open stick into this hole the tray will slide out Please turn off the unit before this operation 1 2 3 17 1 2 Input or output audio signals to connected device by setting AV IN OUT mode value Outp...

Page 20: ...om side 1 2 Hole for Battery Pack Nut for Battery Pack Battery connector 3 1 2 3 How to stand 1 2 3 Pull out the support Draw out the support to a proper position Pull down the button to lock it 1 2 3 18 1 2 2 1 1 3 2 1 1 2 3 LOCK UNLOCK LOCK UNLOCK Note Remember to insert back the rubber cover to 3 BATTERY CONNECTOR after using the battery pack ...

Page 21: ...o play or pause playback 4 PLAY PAUSE button 4 PLAY PAUSE button Forward direction Backward direction Press this button to display the DVD s menu screen 5 MENU button 5 6 STOP button 6 Press this button to stop playback 7 STEP SLOW buttons 7 Press this button to slow playback at 1 2 1 4 1 6 1 7 speed If at pause status press this button to playback step by step Press this button to display the DVD...

Page 22: ...utton 8 For DVDs use this button to play titles or chapters repeatedly For CDs use this button to play tracks or the entire disc repeatedly SHIFT button 10 Press the shift button to switch number function Defaut function OPEN 11 Open the tray and replace take disk SUBTITLE button 12 Press it to switch the DVD s subtitle language 13 OSD button 13 Press this button to display the disc information 14...

Page 23: ...ayer terminals 1 2 3 1 2 3 Twist to tighten detach the battery pack Connect the power adapter to recharge Supply power to the player Do not short circuit the terminals CAUTION 21 When the battery is discharging LED is off When recharging the battery LED is red When the LED becomes green means finishing recharge 1 2 3 4 ...

Page 24: ... input jack yellow T o audio input jack white T o audio input jack red Signal flow Connecting the Player to Other Devices Before connecting Turn off the power of the player and the devices to be connected Connecting to a TV 22 Video audio cable ...

Page 25: ...utput the digital signals from the player s digital output to a decoder or amplifier with built in decoder Hint For a compatible decoder or amplifier 5 speakers front left right center and surround left right and a subwoofer are required to enjoy Dolby Digital DTS 5 1 channel sound Hint For a compatible decoder or amplifier 5 speakers front left right center and surround left right and a subwoofer...

Page 26: ...fore connecting the player to an amplifier equipped with a digital audio input jack which is not Dolby Digital DTS MPEG compatible Do not play DVDs when the audio settings are not correct Or may cause strong noise and damage your speakers Notes 24 Connecting to a digital amplifier that is not Dolby Digital DTS MPEG compatible Output the digital signals from the player s digital output to a digital...

Page 27: ...DEO IN Video audio cable included T o video input jack T o audio input jacks TV Active speaker systems Signal flow Main unit left side Connecting the Player to Other Devices 25 Connecting to active speaker systems ...

Page 28: ...minimum level then adjust the volume to comfortable level Be careful not to set the volume to too high level when using earphone It is not possible to hear the sound of DTS compatible DVDs over earphone Strong noise is produced when DTS discs are played so do not listen to such discs through earphone Note To PHONE jack Notes Earphone Insert the headphone plug securely No sound will be heard if the...

Page 29: ...s The battery pack can be used for about 300 cycles of recharging and operations though this is variable depending on the operating conditions Charge the battery pack fully before using it for the first time Place the battery pack and AC adapter on a flat surface for recharging Do not short circuit the terminals of the battery pack and AC adapter CAUTION The battery charger AC adapter is compatibl...

Page 30: ...tery pack may not be recharged fully if recharging at a hot place Do not recharge it under very hot environment it may cause explosion The surrounding temperature during recharging affects the recharge efficiency Recharge is the most efficient between 10 and 30 Recharging the battery pack at a place within this temperature range whenever possible 28 Attaching the battery pack to the player Attach ...

Page 31: ... This symbol indicates capability of the battery pack While the battery pack has lower capacity will be flashed to remind you Using the Battery AC power operation Turn off the power of the player Turning the battery knob anti clockwise to remove battery pack 1 2 1 2 Connect the DC output plug of the AC adapter to the DC IN jack on the player Connect the AC adapter to a power outlet Now the player ...

Page 32: ...when the power LED is lit red the power can also be turned on by pressing the standby button on the remote control unit Keep pressing the ON button on the main unit for about 1 5 seconds Remote control unit 4 Hint The included AC adapter is compatible with voltage from 100 to 240 V you can use it on trips overseas Note that you need a converter plug available in stores suited for the region in whi...

Page 33: ...lick is heard For CDs or one sided DVDs you do not have to worry about touching the label printed side of the disc with your fingers Since two sided DVDs however have signals recorded on both sides so be careful not to scratch them when removing them from the player Notes The player starts loading 4 Push the tray into the player 2 3 If no power supply the tray will not open you must insert the ope...

Page 34: ...eo CDs it is also possible to play a disc without displaying the menu screen For example press 1 number button while at STOP mode to play track 1 For CDs in order to save power the screen display will be closed automatically if no button is pressed for 1 minute during playing Press any button to wake it up For DVDs with menu screen or video CDs with playback control PBC a menu screen appears Use t...

Page 35: ...on Playback will be stopped Resume function DVDs and Video CDs exept VCD2 0 with PBC function on After the STOP button is pressed if the play button is pressed playback will start from the position at which it was stopped If the disc is removed or the STOP button is pressed again the resume function is cancelled Note Select by pressing the after pressing the button to switch to display NUMBER on s...

Page 36: ...hen removing them from the player Press the previous button during playback After pressing the previous button playback returns to the beginning of the previous chapter or track Removing the disc 1 2 3 Press the STOP button Press to open the tray Remove the disc Note 4 Push the tray into the player Moving to the next chapter or track DVDS video CDs and CDs Press the next button during playback Aft...

Page 37: ...put jack 2 3 2 3 35 CAUTION When connecting the player to an external TV monitor please make sure that for better audio and visual performance you switch adjust the TV system Marked to the corresponding one Example Change from NTSC default setting to PAL as the below SETUP MENU shows Please turning the player to the correct TV system before changing from AV OUTPUT to AV INPUT or you can only see t...

Page 38: ...itle Chapter or Track Repeat a section between point A and B Press the REPEAT button Select the title chapter or track you want to repeat During playback press A B button on the remote control unit at the starting point of the section you want to repeat point A Press A B button again at the ending point of the section you want to repeat Point B The repeating starts Press A B button again to cancel...

Page 39: ...TFT Monitor Default setting is AV OUT Press MODE button on main unit and switch LCD mode to AV IN OUT Press or button to switch between AV OUT and AV IN Avoid to input AV signals from AV JACK when the player is set to AV OUT or interference will be caused to affect current playback and lower down playing quality 1 2 Note AV cable included AV signals inputted from other device ...

Page 40: ...HUE SATURATION EXIT SETUP 3 Press the DOWN button to highlight the desired option Press ENTER or press Right to select the choices of that option appear VIDEO SETUP BRIGHTNESS CONTRAST HUE SATURATION EXIT SETUP 12 10 8 6 2 4 0 4 Press LEFT RIGHT UP DOWN buttons to highlight the EXIT SETUP option then press ENTER or SETUP again to exit SETUP MENU NOTE The pressing of the following buttons will turn...

Page 41: ...ected to a NTSC TV PAL Choose this setting if your DVD player is connected to a PAL TV The default setting is NTSC NOTE Setting with incorrect TV system will result in black and white picture on your TV screen SCREEN SAVER If the screen saver is on when your DVD player is at STOP or NO DISC status or there is a frame frozen for a little long time the screen saver will be displayed This feature can...

Page 42: ... movie might appear with black bars at the top and bottom of the screen 4 3 PS Pan Scan Choosing this setting if your DVD player is connected to a normal ratio TV You can fill the movie to the entire screen of your TV This might mean that parts of the picture the left and right edges won t be seen SYSTEM SETUP SCREEN SAVER TV TYPE PASSWORD RATING DEFAULT EXIT SETUP 4 3PS TV SYSTEM 4 3LB 16 9 NOTES...

Page 43: ...n SYSTEM SETUP SCREEN SAVER TV TYPE PASSWORD RATING DEFAULT EXIT SETUP TV SYSTEM RATING The Rating feature works with DVD discs that have been assigned a rating This helps you to control the types of DVDs that the player can be watched There are eight limited rating options KID SAFE G PG PG13 PGR R NC17 ADULT The default setting is ADULT SYSTEM SETUP SCREEN SAVER TV TYPE PASSWORD RATING DEFAULT EX...

Page 44: ...panish French and Italian Highlight the AUDIO LANG option and press LEFT RIGHT UP DOWN to choose audio language you prefer Press ENTER button to confirm If the disc you are playing has that language available it will output audio in that language There are 8 optional audio languages Chinese English Japanese French Spanish Portuguese Latin and German LANGUAGE SETUP AUDIO LANG MENU LANG EXIT SETUP O...

Page 45: ...ERMAN OFF Highlight the MENU LANG option and press LEFT RIGHT UP DOWN to choose menu language you prefer Press ENTER to confirm If the disc you are playing has that language available it will displays menu in that language There are 8 optional menu languages Chinese English Japanese French Spanish Portuguese German and Latin LANGUAGE SETUP AUDIO LANG MENU LANG EXIT SETUP OSD LANGUAGE SUBTITLE LANG...

Page 46: ... jack SPDIF RAW Choose this setting if your DVD player is connected to a power amplifier with a optical cable When playing a disc recorded with Dolby Digital DTS and MPEG audio formats the corresponding digital signals will be outputted from the Optical Output jack SPDIF PCM Choose this setting if your DVD player is connected to a 2 channel digital stereo amplifier When playing a disc recorded wit...

Page 47: ...TURATION EXIT SETUP BRIGHTNESS 12 10 8 6 2 4 0 BRIGHTNESS Use the UP and DOWN buttons to move the scroll and adjust the brightness VIDEO SETUP HUE SATURATION EXIT SETUP 12 10 8 6 2 4 0 CONTRAST BRIGHTNESS CONTRAST Use the UP and DOWN buttons to move the scroll and adjust the contrast 45 ...

Page 48: ...djust the hue VIDEO SETUP SATURATION EXIT SETUP 6 4 2 0 4 2 6 BRIGHTNESS HUE CONTRAST SATURATION Use the UP and DOWN buttons to move the scroll and adjust the saturation VIDEO SETUP EXIT SETUP BRIGHTNESS CONTRAST SATURATION HUE 12 10 8 6 2 4 0 Video Setup 46 ...

Page 49: ...NGE Choose this setting to adjust the line out compressing ratio and get different effect If adjusting to FULL the audio signal peak value will be compressed minimum while adjusting to OFF maximum DIGITAL SETUP EXIT SETUP DYNAMIC RANGE FULL 6 8 4 8 2 8 OFF DIGITAL SETUP 47 ...

Page 50: ...aces in which the temperature is extremely low Read any cautions included with the disc carefully Cleaning discs Fingerprints or dust on discs may reduce sound or picture quality Remove them by gently wiping the disc from the center toward the edges using a soft cloth Do not use benzene thinner or other volatile chemicals Do not use record spray or antistatic spray either We recommend using the se...

Page 51: ...kHz digital output of linear PCM audio signals is prohibited Disc is dirty Pause or slow play mode is set Main unit s volume is set to minimum Earphone is plugged in Picture is disturbed when playing a DVD recorded by a VCR TV or other device operates erroneously Player gets hot Notes The player may stop operation properly due to static electricity or other external influences In this case usually...

Page 52: ... SDV17AQ ENG NB A0 ...

Reviews: