background image

A

A

D

D

V

V

A

A

N

N

C

C

E

E

D

D


S

S

E

E

T

T

T

T

I

I

N

N

G

G

S

S


11 

A

A

D

D

V

V

A

A

N

N

C

C

E

E

D

D


S

S

E

E

T

T

T

T

I

I

N

N

G

G

S

S


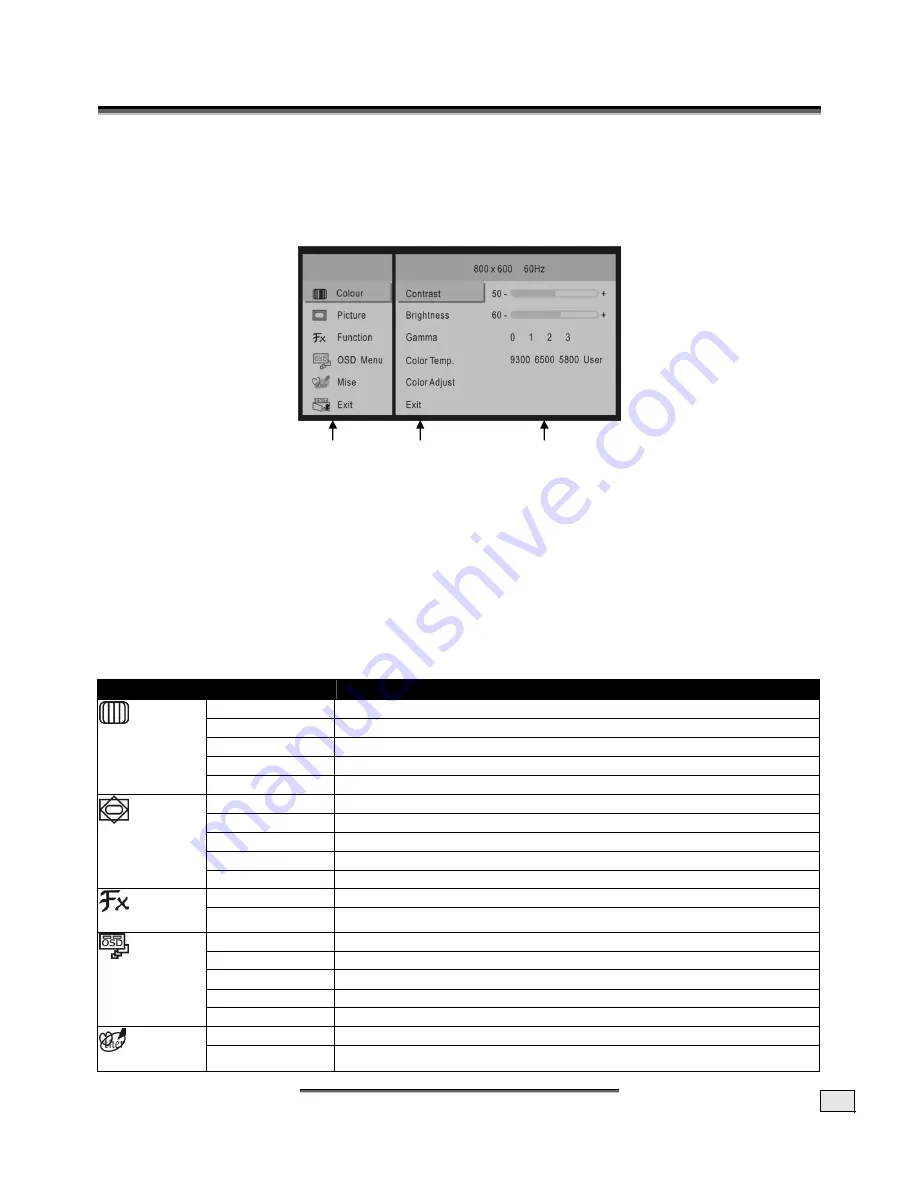
You can change advanced settings for your LCD monitor using the On Screen Display (OSD) menu. 
Before adjusting settings using the OSD, you should perform an auto adjustment by pressing the 

Auto

 button. 

OSD


M

ENU 


(actual screen image may differ slightly from examples) 


Press the

 menu button

 to activate the OSD. 

1.


Select the options from the main menu with the 

or

 -


buttons

2.


Press the

 menu button

 to activate the sub-menu. 

3.


Select the options from the sub-menu with the 

or

 -


buttons

4.


Press the

 menu button

 to select the item to adjust. 

5.


Set the desired value with the 

or

 -


buttons

6.


Press the 

menu button

 to confirm changes. 

7.


Select 

exit 

to close the OSD. 


Main menu  Sub Menu 

User settings 

Contrast 

Adjusts the contrast. 

Brightness 

Adjusts the level of brightness.  

Gamma 

Adjusts the color tone or brightness with one command. 

Color Temperature  Adjusts the way colors are displayed on the monitor 


Color 

Color Adjust 

Fine tunes color (You must choose “User” in ” Color Temp” option first) 

H. Position 

Moves the screen horizontally (left/right). 

V. Position 

Moves the screen vertically (up/down). 

Phase 

Adjusts the phase.  

Clock 

May be fine-tuned to correct flickering text or lines.  


Picture 

Sharpness 

Adjusts the sharpness. 

Auto Adjust 

Automatically adjust image Clock, Phase, H-Position, V-Position settings  


Function 

Auto Color 

Automatically adjust Color  

Language 

To choose the OSD language 

OSD H. Pos. 

Adjust OSD horizontally (left/right). 

OSD V. Pos. 

Adjust OSD vertically (up/down). 

OSD Timer 

Select On or Off  


OSD Menu 

Translucent 

Adjusts the level of transparency of the OSD menu.  

Mode Select 

Mode Select 


Misc. 

Reset 

Return the monitor to factory settings 

Main  menu 

User setting

Sub-menu

Summary of Contents for MD 41079

Page 1: ...his material including but not limited to the implied warranties of merchantability and fitness for a particular purpose Medion shall not be liable for errors contained herein or for incidental or consequential damages in connection with the furnishing perform ance or use of this material Medion assumes no responsibility for the use or reliability of its software on equipment that is not furnished...

Page 2: ...repare Your Computer 5 Supported Monitor Settings 5 Display Properties 5 Changing Basic PC Display Settings 6 Step 2 Attach the Monitor Base 7 Step 3 Connect the Monitor 7 n Connect the VGA Signal Cable 7 o Connect the Audio Cable optional 7 p Connect the Power Supply 7 Turn on the Power 7 Step 4 Set the Monitor Angle 8 Step 5 Perform an Auto Adjustment 8 Notes on Ergonomics 8 Your posture 8 CONTR...

Page 3: ... industry environment An injury hazard exists when the display breaks Wear protective gloves to pack the broken parts and send them into your service center for proper disposal Then wash your hands with soap be cause it is possible for chemicals to escape Never exert pressure on the display This could break the monitor Do not touch the display with your fingers or with sharp objects to avoid damag...

Page 4: ...f your LCD monitor and within reach of the power ca bles DO NOT stretch the power cables tightly to reach a power socket Carefully insert the VGA plug straight into the VGA socket of your computer with slight pres sure Please pay attention that plug and socket exactly match Due to the asymmetrical shape there is only one way to fit the plug into If the alignment fails don t use excessive force Exc...

Page 5: ...hich can be serviced or cleaned inside of the moni tor housing You can increase the service life of your LCD monitor by taking the following precautions Before cleaning always disconnect the power cable and all connection cables Do not use any solvents caustic or gaseous cleaning agents Clean the display with a soft lint free cloth Ensure that no water droplets remain on the screen Water can cause...

Page 6: ...s authority to operate the equipment Shielded interface cables if any must be used in order to comply with the emission limits DECLARATION OF CONFORMITY According to 47CFR Parts 2 and 15 for Class B Personal Computers We Medion Aktiengesellschaft____________ Name of the Responsible Party Located at Gänsemarkt 16 18_________________ D 45127 Essen_____________________ Germany________________________...

Page 7: ... 0 Hz 35 2 KHz 56 3 Hz 37 9 KHz 60 3 Hz 48 1 KHz 72 0 Hz SVGA 800 x 600 46 9 KHz 75 0 Hz 48 4 KHz 60 0 Hz 56 5 KHz 70 1 Hz XGA 1024 x 768 60 0 KHz 75 0 Hz 1280 x 1024 63 9 KHz 60 0 Hz VESA SXGA 1280 x 1024 79 9 KHz 75 0 Hz 640 x 480 35 0 KHz 66 7 Hz Macintosh VGA 832 x 624 49 7 KHz 74 6 Hz 640 x 350 31 5 KHz 70 1 Hz MS DOS 720 x 400 31 5 KHz 70 1 Hz recommended physical resolution DISPLAY PROPERTI...

Page 8: ... are displayed on your monitor We recommend setting this to 1280 x 1024 pixels This is the physical resolution of your monitor 5 To check or change the vertical frequency click the Advanced button A new window will ap pear The options on the new window will depend on the configuration of your computer The window shown below is an only an example and may differ from the one shown on your screen In ...

Page 9: ...tching VGA sockets on the computer If your PC has a DVI port you can use this to connect to your monitor instead of the VGA port You will need a DVI cable not included o CONNECT THE AUDIO CABLE OPTIONAL Plug the audio cable into the matching socket on the monitor Plug the other end of this cable into the speaker port on your PC This port is typically a light green p CONNECT THE POWER SUPPLY Connec...

Page 10: ...ce make sure your back is supported by the chair s backrest in an erect posi tion or angled slightly backwards Arms Your arms should be relaxed and loose elbows close to your sides with forearms and hands approxi mately parallel to the floor Wrists Your wrists should be as straight as possible while using the keyboard mouse or trackball They should not be bent sideways or more than 10 degrees up o...

Page 11: ...Hand support rest 2 4 Top line of screen should be at eye level or a little beneath Eye s distance to screen 20 28 Legroom vertical at least 26 Legroom horizontal at least 24 This illustration should give you a guide line for an ergonomic workplace ...

Page 12: ...s active use this button to move down decrease selection Increase volume Plus Press this button to increase the speaker volume When the OSD is active use this button to move up increase selection MENU OSD Press this button to open the On Screen Display OSD When the OSD is active use this button to confirm selections Power indicator Blue On Orange Stand by Unlit Off ON OFF switch Press this button ...

Page 13: ...ettings Contrast Adjusts the contrast Brightness Adjusts the level of brightness Gamma Adjusts the color tone or brightness with one command Color Temperature Adjusts the way colors are displayed on the monitor Color Color Adjust Fine tunes color You must choose User in Color Temp option first H Position Moves the screen horizontally left right V Position Moves the screen vertically up down Phase ...

Page 14: ...ate values for your LCD monitor see Prepare your computer page 5 Remove any equipment that may be causing interference portable telephones loudspeak ers lamps etc from the vicinity of your LCD monitor Avoid using monitor extension cables Colors not displayed cleanly Check the signal cable pins If pins are bent please contact Medion Customer Care Adjust the color using the OSD Avoid using monitor e...

Page 15: ...EDION has marketed this product The level of warranty service you receive may vary according to local standards MEDION will not alter form fit or function of the product to make it operate in a country for which it was never intended to function TO THE EXTENT ALLOWED UNDER APPLICABLE LAW THE REMEDIES IN THIS LIMITED WARRANTY STATEMENT ARE YOUR SOLE AND EXCLUSIVE REMEDIES EXCEPT AS INDICATED ABOVE ...

Reviews: