background image

26

6.8.2. Network 

configuration

WLAN
LAN
I do not have a network connction

Next

Please select your network connection type:

Select

Network Setup

Back


Select the desired network connection type 

WLAN

 or 

LAN

. Select 

I DO NOT 

HAVE A NETWORK CONNECTION

 if you want to skip the network configura-

tion.


After marking the selection with 

OK

, confirm the 

NEXT

 option by pressing the 

 button.

WLAN


All available networks are then displayed under the 

SCAN

 option. Select a net-

work using the 



 direction buttons and press 

OK

. Under the 

MANUAL

 op-

tion, the SSIDs can be entered using the virtual keyboard. Here you can also se-
lect a security mode (

NONE, WEP, WPA

 or 

WPA2

). Then select 

OK

 and press 

OK


to confirm. 

WPS WIFI PROTECTED SETUP

 appears under the option 

AUTO

If you then press the 

OK

 button, you have 100 seconds to press the WPS button 

on your router. Select the 

NEXT

 option with the 

 button when your network is 

found.


Then press 

OK

 to enter the password using the virtual keyboard (if necessary). 

Then select the Return button and confirm with 

OK

.


Then use the 



 buttons to select 

OK

 and press 

OK

 to confirm. The network 

connection will then be established.

LAN


Select 

MANUAL

 if you want to manually set the 

IP ADDRESS, SUBNET MASK, 

DEFAULT GATEWAY

 and 

PRIMARY/SECONDARY DNS

 options. Then select 

OK


and press the 

OK

 button to start the search.


Select 

AUTO

 to start an automatic search for cable networks.

Summary of Contents for LIFE S14900

Page 1: ...Operating instructions Ultra HD Smart TV MEDION LIFE S14900 MD 31580 S15501 MD 31581 ...

Page 2: ... Getting started 21 6 1 Unpacking 21 6 2 Mounting 22 6 3 Inserting the batteries in the remote control 23 6 4 Connecting the antenna 23 6 5 Common Interface 24 6 6 Connecting the power supply 24 6 7 Switching the Smart TV on and off 24 6 8 Channel search after switching on for the first time 25 6 9 Using the multimedia connections 33 7 Operation 35 7 1 Channel selection 35 7 2 Sound settings 35 7 3...

Page 3: ...nu for the media player 66 10 3 Displaying photos 67 10 4 Playing back music 68 10 5 Playing back videos 68 11 EPG Programme Guide 70 12 Data protection MEDION Smart TV 72 13 Troubleshooting 73 13 1 Do you need more help 74 13 2 Smart TV pixel faults 75 14 Cleaning 76 15 Storing the device when not in use 76 16 Disposal 77 17 Technical specifications 78 18 Product data sheet 80 19 Privacy statemen...

Page 4: ...u also pass on these operating instructions They are an essential component of the product 1 1 Key to symbols If a block of text is marked with one of the warning symbols listed below the hazard described in that text must be avoided to prevent the potential consequences de scribed there from occurring DANGER Warning risk of fatal injury WARNING Warning risk of possible fatal injury and or serious...

Page 5: ...laration of Conformity section Prod ucts that feature this symbol meet the requirements of the EC directives Protection class II Electrical devices in protection class II are devices that have double and or reinforced insulation throughout and do not have the option of connecting a protective earth The housing of an electrical device in protection class II with surrounding insulating material may ...

Page 6: ...mage Do not use the device in extreme environmental conditions This device is only suitable for use in dry interior rooms This device is not suitable for use as a data monitor for office workstations 1 3 Ultra HD Your Smart TV features Ultra HD technology This means that it can play back high resolution images with four times the resolution of Full HD An Ultra HDTV sig nal is required 1 3 1 HDR Hi...

Page 7: ...s are supplied with your product Ultra HD TV Remote control RC1840 including 2 batteries 1 5 V AAA AV adapter Mains cable HDMI cable Stand including screws Documentation DANGER Risk of choking and suffocation Packaging film can be swallowed or used improperly creating a risk of choking and suffocation Keep packaging material such as plastic film or plas tic bags away from children ...

Page 8: ...tood the dangers that result from it Children must not be allowed to play with the device Cleaning and user maintenance must not be carried out by children unless they are supervised DANGER Risk of choking and suffocation The packaging material is not a toy Packaging film can be swallowed or used improperly creating a risk of choking and suffocation Keep packaging material such as plastic film or ...

Page 9: ...D CAUTION Risk of injury Risk of injury due to broken display Do not touch the display with fingers or sharp ob jects to avoid damage Use protective gloves when wrapping up cracked parts Wash your hands with soap afterwards as the risk of chemicals escaping cannot be excluded Send the broken parts to your Service Centre for proper disposal Disconnect the device from the mains supply immediate ly a...

Page 10: ...ade over time We recommend you ventilate the room regularly to help dissipate this odour We have taken appro priate measures during the development of this product to ensure that levels are well below legal limits Keep your Smart TV and all connected devices away from moisture and avoid dust heat and direct sunlight Non compliance with these instructions can cause faults or damage to the Smart TV ...

Page 11: ...njury Only place the TV set on stable surfaces Falling televi sions may cause serious injuries and even death Many injuries particularly for children can be avoided by tak ing the following precautions Only operate the Smart TV and its components on a sturdy level and vibration free surface to prevent it from falling Only use the TV with the supplied feet and screws Only use furniture that ensures...

Page 12: ... magnetic interference televisions loud speakers mobile telephones etc to avoid malfunctions Remove the plug from the mains outlet and the antenna cable from the antenna socket during a thunderstorm or if the device is not going to be used for a long period ATTENTION Risk of damage Major changes in temperature or fluctuations in humid ity can cause moisture to build up within the Smart TV due to c...

Page 13: ...using It does not contain any parts for maintenance by the user Only operate the Smart TV from an earthed 100 to 240 V 50 60 Hz socket Contact your local energy supplier if you have any questions about the power supply at the installa tion location The socket must always be easily accessible so that the plug can be quickly removed from the socket in an emer gency To disconnect the power supply fro...

Page 14: ...r handling of the batteries to prevent damage to your device and your health Please follow the safety advice below closely Keep batteries away from children Consult a doctor immediately if batteries are swallowed Never charge batteries unless they are designed to be re charged Never discharge batteries by means of high power output Never short circuit the batteries Never expose the batteries to ex...

Page 15: ...device immediately There is an increased risk of leakage with flat batteries Remove the batteries from the remote control if it is not going to be used for a long period of time Replace all used batteries in the remote control at the same time with new batteries of the same type Cover the contacts of the batteries with sticky tape if you want to store or dispose of them If necessary clean the batt...

Page 16: ... of Radio Equipment Directive 2014 53 EU Ecodesign Directive 2009 125 EC RoHS Directive 2011 65 EU You can download the complete EU Declaration of Conformity at www medion com conformity 4 1 Information on WLAN WLAN Frequency range 2 4 GHz WLAN standard 802 11 b g n Encryption WPA2 Frequency range MHz Channel Transmitting power dBm 2400 2483 5 1 13 16 2 ...

Page 17: ...in this menu you can navigate with the CH CH and VOL VOL but tons and confirm your selection with the MENU button The available op tions are the same as those of the remote control buttons switch device to standby mode SOURCE select input source call up menu and go back one step in the menus 4 LCD screen 5 Infrared sensor Reception field for the infrared remote control signals 6 Operating light li...

Page 18: ... functions 4 LNB IN DC 13 V 18 V 400 mA Max For connecting the antenna satel lite 5 ANT Antenna connection DVB T DVB T2 HD DVB C analogue 6 SPDIF OUT OPTICAL Digital audio output optical 7 HDMI1 CEC HDMI connection for devices with HDMI output HDMI 1 can be used for CEC 8 HDMI2 CEC HDMI connection for devices with HDMI output HDMI 2 can be used for CEC 9 HDMI3 ARC CEC HDMI connection for devices w...

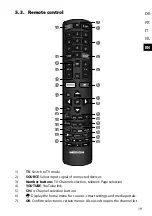
Page 19: ... 1 TV Switch to TV mode 2 SOURCE Select input signal of connected devices 3 Number buttons TV Channel selection teletext Page selection 4 YOUTUBE YouTube link 5 CH Channel selection buttons 6 Display the home menu for sources smart settings and media portals 7 OK Confirm selection in certain menus Also used to open the channel list ...

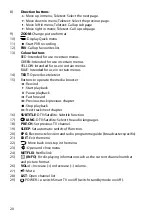
Page 20: ...ttons to operate the media browser Rewind Start playback Pause playback Fast forward Previous track previous chapter Stop playback Next track next chapter 16 SUBTITLE DTV Satellite Subtitle function 17 LANG DTV Satellite Select the audio languages 18 PRE CH Set previous TV channel 19 SLEEP Set automatic switch off function 20 EPG Electronic television and radio programme guide broadcaster specific...

Page 21: ...th a long blade to open the box Completely remove the packaging material The box contains a number of small items including batteries Keep these out of the reach of children as they represent a choking hazard Store the packaging material in a safe place Only use this box to transport the TV DANGER Risk of choking and suffocation Packaging film can be swallowed or used improperly creating a risk of...

Page 22: ...22 6 2 Mounting Attach the stand as shown in the illustration Carry out this step before connecting the Smart TV 4 x M4 x 25 4 x M5 x 13 ...

Page 23: ...llowing image signals to the television through the socket labelled ANT Via analogue cable an analogue house aerial Via a DVB T DVB T21 antenna or Via a DVB C2 connection Insert the antenna cable either from the house aerial analogue cable connec tion a DVB T antenna or the DVB C connection in the antenna socket on the Smart TV You also have the option of connecting a digital satellite system to t...

Page 24: ...television could be dam aged if you attempt to insert the CAM module by force 6 6 Connecting the power supply Connect the supplied mains cable to the AC IN socket Then connect the mains plug to an easily accessible mains socket 220 to 240 V 50 Hz 6 7 Switching the Smart TV on and off The device will be in standby mode as soon as you have connected the mains plug to the mains socket To switch on the...

Page 25: ...lease select your country Select Environment Back Select the desired country using The country setting will influence the or der in which the channels are stored In addition there are a number of options preset for the individual countries Confirm the option NEXT with the button 6 8 1 Privacy Settings information You will now be prompted to accept the Smart TV data protection information This is n...

Page 26: ... you can also se lect a security mode NONE WEP WPA or WPA2 Then select OK and press OK to confirm WPS WI FI PROTECTED SETUP appears under the option AUTO If you then press the OK button you have 100 seconds to press the WPS button on your router Select the NEXT option with the button when your network is found Then press OK to enter the password using the virtual keyboard if necessary Then select ...

Page 27: ... for TV channels You can also skip this option if you want Use the direction buttons to se lect the option I DON T WANT TO INSTALL CHANNELS and press OK Select CONTINUE and press OK to search for TV channels Aerial Digital Analogue Digital Analogue I don t want to scan Next Please select Antenna scan type Select Channel Installation Back Use to select the aerial search type DIGITAL ANALOGUE DIGITA...

Page 28: ...you set the search mode If you have selected ADVANCED only the frequencies that are enabled are searched for programmes In this case you can make settings for the following op tions If you have selected QUICK only the frequencies that are enabled are searched for programmes You cannot make any further settings here If you have selected FULL the entire frequency band is searched However this search...

Page 29: ...make more changes to the satellite settings press the red EDIT button The following setting options are available here LNB power LNB frequency MHz DiSEqC 1 0 DiSEqC 1 1 Tone 22KHz Signal strength Signal quality Select a satellite to edit the selected satellite or search for stations Channel Installation On Universal Disable Disable Auto OK OK Select OK 100 37 Menu option Setting LNB POWER Switch t...

Page 30: ... VERTICAL Once you have confirmed the settings with OK you will return to the satellite overview Select the option NEXT with the button Channels ServiceType Network Search Search type Please configure the search options Select Channel Installation Free Scrambled All Off Load Preset List Search OK OK Back Menu option Setting CHANNELS Decide which channels you want to search for FREE free channels or ...

Page 31: ...ed dur ing a blind scan The first search identifies the sat ellite s transponders The second search locates the TV stations The blind scan takes the longest LOAD PRESET LIST Select this to load the prein stalled channel list for the Astra 19 2E satellite This search mode takes the least time Then select SEARCH and confirm with OK If you have selected the AUTO SCAN or BLIND SCAN option under SEARCH...

Page 32: ...e buttons and number buttons to en ter the date This option appears only when AUTO SYNCHRO NIZATION has been deactivated TIME Use the buttons and number buttons to en ter the time This option appears only when AUTO SYNCHRO NIZATION has been deactivated Once you have confirmed the settings with OK an overview of the settings made appears Select FINISH and press OK The device then switches to TV mod...

Page 33: ... the socket in one position 6 9 1 AV The AV transmission composite works via three cinch connections of which one transmits the video signal yellow and two transmit the stereo audio signal red white Use a standard AV cable Connect the corresponding AV inputs and outputs of the devices used with an AV cable If any of the connected devices have AV connections to mini jack please use an ap propriate ...

Page 34: ... remote control e g standby or record functions Connect all devices via CEC enabled HDMI ports with HDMI cables Take care to ensure that the CEC functions are enabled for all ports and that all devices are connected accordingly 6 9 5 USB A USB port can be used to connect and read storage media such as USB sticks or ex ternal hard drives Use a suitable USB cable If a suitable USB cable is supplied ...

Page 35: ...to the lowest setting Start playback and increase the volume to a comfort able level 7 Operation 7 1 Channel selection To select a channel either press the CH buttons on the device or remote con trol or select the channel directly by pressing the appropriate number For a two or three figure number press the numbers one after another Press the PRE CH button to select the last channel played 7 2 Sou...

Page 36: ...undistorted picture dis play in 4 3 format 16 9 FORMAT For undistorted picture dis play in 16 9 format ZOOM 1 The picture is enlarged in all directions in level 1 ZOOM 2 The picture is enlarged fur ther in level 2 1 1 only for HDMI The picture is shown with pix el perfect reproduction You can also change the picture format in the PICTURE SCREEN MODE menu Please note that not all picture formats ar...

Page 37: ... LIST menu D 1 D 2 D 3 D 4 D 5 D 6 D 7 D 8 D 9 Channel list Free Select list Tuner mode Add to favorites T T Open the menu by pressing the button Under the menu option CHANNEL select the entry CHANNEL LIST and con firm with OK The channel list is then displayed If you press OK when the TV is in use you are directed straight to the channel list Use the direction buttons to select the desired channe...

Page 38: ...Press the SOURCE button on the remote control or on the device to call up the source selection list ATV Analogue TV operation analogue cable connection DTV Digital TV operation digital cable connection DVB T DVB T2 DVB S AV Audio video input on the side of the device via an adapter AV HDMI 1 HDMI input 1 HDMI 1 can be used for CEC HDMI 2 HDMI input 2 HDMI 2 can be used for CEC HDMI 3 HDMI input 3 ...

Page 39: ...INGS Afterwards the home page of the media portal appears where a shortlist of cer tain apps is displayed The and direction buttons can be used to scroll through the various apps and confirm your selection by pressing the OK button The following options can be selected here Yellow but ton SETTINGS You can specify which language areas the apps should be selected from LANGUAGE FILTER FOR APPS here I...

Page 40: ...8 2 Selecting a page Enter the number of the desired teletext page as a three digit number using the number buttons The selected page number is displayed in the top left corner of the screen The teletext counter searches as long as it takes to find the selected page number The direction buttons can be used to scroll forwards or backwards through the teletext pages 8 2 1 Colour buttons If coloured ...

Page 41: ...not every menu has a submenu option You can use the direction buttons to enter a value or make another se lection The or button takes you back to the previous menu at any time Close the menu with the EXIT button Please note that the menu will close automatically if no button is pressed You can select the following main menus PICTURE menu SOUND menu CHANNEL menu SMART TV menu NETWORK menu SETUP men...

Page 42: ...ss on a scale of 0 to 100 CONTRAST Increase or reduce contrast on a scale of 0 to 100 SATURATION Increase or reduce colour saturation on a scale of 0 to 100 TINT Hue settings are only available for NTSC reception on a scale of 0 to 100 SHARPNESS Increase or decrease the image sharpness on a scale of 0 to 100 COLOR TEMPERATURE Select colour temperature COOL NORMAL and WARM SCREEN MODE Set the pictu...

Page 43: ...RT PERSONAL 100HZ Increase or decrease the frequency range by 100 Hz on a scale of 0 to 100 500HZ Increase or decrease the frequency range by 500 Hz on a scale of 0 to 100 1 5KHZ Increase or decrease the frequency range by 1 5 kHz on a scale of 0 to 100 5KHZ Increase or decrease the frequency range by 5 kHz on a scale of 0 to 100 10KHZ Increase or decrease the frequency range by 10 kHz on a scale ...

Page 44: ...icture signal and audio signal you can try to compensate for the offset by de laying the audio signal 0 250 ms AUDIO DESCRIP TION Activate deactivate audio description and set the volume Only available in DTV mode Support for this function is de pendent on the programme AUTO VOLUME CONTROL This function compensates for the different volume levels be tween different programmes Set to OFF to return ...

Page 45: ...AN COUNTRY Select the country for the channel search TUNER MODE Select the connection type ANTENNA CABLE or SATELLITE AUTO MATIC SEARCHE antenna and cable only Use the direction buttons to select the reception type DIGITAL ANALOGUE search for analogue and digital TV channels ANALOGUE search for analogue TV channels DIGITAL search for digital TV channels ...

Page 46: ...ve if the ADVANCED option has been selected in search mode MODULA TION Set the modulation Standard stetting is AUTO Only active if the ADVANCED option has been selected in search mode SYMBOL RATE Set the baud rate Only active if the ADVANCED option has been selected in search mode NET WORK ID Standard stetting is AUTO This setting can be edited using the number but tons Only active if the ADVANCED...

Page 47: ...rs that have not been added to the tran sponders list Two searches are per formed during a blind scan The first search identifies the satellite s tran sponders The second search locates the channels The blind scan takes the longest LOAD PRESET LIST Select this to load the preinstalled channel list for the Astra 19 2E satellite This search mode takes the least time Select YES to load the channel li...

Page 48: ...he frequency of the cur rent channel SEARCH Press to start the search FINE TUNE Press to perform fine tuning SAVE Press OK to store the channel found by the search DTV MAN UAL SEARCH antenna only You can programme individual channels manually here if the input signal is received via the ANTEN NA DVB T CHANNEL NUMBER Select the channel number for which you want to carry out a search FREQUENCY Displ...

Page 49: ... TUNING satellite only If you have selected SATELLITE as tuner mode the following setting options are available SELECT SAT ELLITE Use to select the satellite for which you want to change the settings or carry out a search and then confirm with OK LNB POWER Set the LNB power here LNB FRE QUENCY Enter the oscillator frequency for your LNB type here The default setting is UNIVERSAL DISEQC 1 0 1 1 If ...

Page 50: ...only If you have selected SATELLITE as tuner mode the following setting options are available ANTENNEN TYP You can select antenna type UNI VERSAL or UNICABLE here The following options are for unicable settings and only appear if you have selected UNICABLE here TUNER Select the desired user band USER BAND 1 8 here BAND FRE QUENCY You can set the desired centre frequency here PIN You can set the sa...

Page 51: ...ode and press OK All channels of the selected operating type are then shown ADD TO FAVORITES Select the channel that you want to add to your favourites list and press the green button The selected channel is then displayed in your favourites list During TV mode the channel list can be called up in each tuner mode with the OK or LIST buttons You can use the FAV button to explicitly open the favouri...

Page 52: ...utton Yellow but ton SCHEDULE LIST All reminder and recording timers that you have programmed are listed here The selected timer can be deleted with the red button and pressing the yellow button takes you back to the programme guide Red button RECORD ER You can programme recordings here Press the ar row buttons to select a channel and then specify the START TIME and END TIME of the re cording HOUR...

Page 53: ...hile all channels between the old and new memory slot move down one position CHANNEL EDIT To rename a channel select this option and press OK Then you have the option to enter a new name using a virtual keyboard After you have changed the name select OK and press the OK button The new channel name is now applied CHANNEL DE LETE To delete a channel select this option and press OK To do this answer ...

Page 54: ...tream movies and series Netf lix contents on Internet connected televisions computers and other such devices Netflix com patible devices The Netflix service is provided to you by Netflix International B V a Netherlands limited liability company DEACTIVATE Press the OK button to deactivate Netflix The device will then be logged out and ac cess will be released again ESN Press the OK button to displ...

Page 55: ...ting to Wireless Display appears Then the TV will mirror the screen content of the playback device Wireless display can only be used if the mobile device supports this function The detection and connection processes differ depending on the programs you use Please re fer to the operating instructions of your playback device Android based mobile devices should have the software version 4 2 or higher...

Page 56: ...he MANUAL option the SSIDs can be entered using the virtual keyboard Here you can also select a security mode NONE WEP WPA or WPA2 Then select OK and press OK to confirm WPS WIFI PROTECTED SETUP appears under the option AUTO If you then press the OK button you have 100 seconds to press the WPS but ton on your router Select the NEXT option with the but ton when your network is found Then press OK t...

Page 57: ...ION All information about the current network connection is list ed together here BLUETOOTH Activate deactivate the Bluetooth function here ON OFF As soon as the function is activated the device automatically searches for nearby Bluetooth enabled devices Then you can start a new search at any time using the REFRESH button to add new Bluetooth devices 9 6 Setup menu Menu language Time Lock CEC HDMI...

Page 58: ...e in this menu TIME ZONE You can set the time zone here This option is only available in DTV mode CLOCK This menu contains the following op tions for the time settings AUTO SYN CHRONI ZATION Activate this option if the data and time are to be set automatically The fol lowing options DATE and TIME cannot be edited in this case DATE Manually set the desired date here TIME Manually set the desired ti...

Page 59: ...l should be locked PARENTAL RATING Here you can select the age that sets the parental control level This option is only available in DTV mode CHANGE PASSWORD An input field for entering passwords will appear NEW PASSWORD Enter a new four digit password CONFIRM PASSWORD Enter the new password again The new password is saved Note down the new password The password is not reset when you restore the f...

Page 60: ...customisation options polls games social networks and other multimedia applications HbbTV applications can only be called up if the broadcast ing station transmits these signals and the TV is connect ed to the internet The scope and operation vary depend ing on the channel and station Whether a station offers HbbTV applications or not is shown via a brief on screen display The exact form and posit...

Page 61: ...n insert the card Please note only insert or remove the CI mod ule after you have disconnected the device from the power supply NOTICE Risk of damage The CI module or the television could be damaged if you attempt to insert the CI module by force The CI module must be inserted correctly it cannot be inserted if it is the wrong way round Connect the television to the power supply switch it on and w...

Page 62: ...re and update it The update takes a few minutes To prevent irreparable damage to the device do not interrupt the update process OSS Displays the licence information for open source software PRIVACY NOTICE You can accept the Smart TV data protection information here This is necessary if you intend to make use of the network In ternet services Read the data protection information carefully Accept th...

Page 63: ...ted recording with the red button under RE CORD LIST Select the recording you want from the RECORD LIST and press OK to play it The following options can only be selected when playing a recording Activate A B playback see section Timeshift function during PVR record ing Stop playback Pause playback Fast forward rewind Slow motion feature 2 4 8 16 32 x slower Set the time that playback is to start ...

Page 64: ... back starting from the time the recording began The recording continues to run in the back ground allowing the programme to be played back with a time delay The following options can only be selected when playing a recording Activate A B playback Stop playback Pause playback Fast forward rewind Slow motion feature 2 4 8 16 32 x slower Set the time that playback is to start Skip forwards backwards...

Page 65: ...ATELLITE NAME All channels that are transmitted by the selected satellite are listed Select a satellite and press OK to call up the list of all channels for the rele vant satellite TUNER MODE Press the yellow button to display the tuner modes ANTENNA CABLE and SAT ELLITE Select the desired mode and press OK All channels of the selected operat ing type are then shown ADD TO FAVORITES Select the cha...

Page 66: ...n quick succession 10 1 Accessing the media player Connect the USB data medium to the USB port on the side of the device or en sure that there is an AVS network connection Press the SOURCE button on the remote control or the device and then use the buttons to select the source MEDIA Press OK to confirm The connected USB or AVS media are displayed Select the desired USB or AVS medium and press OK t...

Page 67: ...options menu with the OK button If not used it is closed automatically after a few seconds Start pause the slide show for all photos You can also reach this using the button Rotates the selected image by 90 degrees anticlockwise clockwise Enlarges reduces the size of the displayed image Start stop background music The corresponding music files must there fore be located in the same folder as the i...

Page 68: ...y previous next track Select the playback mode NORMAL RANDOM 1 REPEAT SONG REPEAT PLAYLIST In addition to the current track all available music tracks are shown in a playback list Here you can select additional music tracks using the arrow buttons and start playback by pressing OK or Use the button to open the SETTINGS menu SOUND PRESET Select the sound mode STANDARD MUSIC MOVIE SPORT PERSONAL SPD...

Page 69: ...00 SATURATION Set the desired colour saturation 0 to 100 TINT Set the desired hue 0 to 100 SHARPNESS Set the desired image sharpness 0 to 100 SOUND PRESET Select the sound mode STANDARD MUSIC MOVIE SPORT PERSONAL SPDIF TYPE If a SPDIF connection is used select the SPDIF type here SPDIF DELAY Set a signal delay for the SPDIF connection 0 250 ms here AUDIO DELAY Set an audio signal delay 0 250 ms he...

Page 70: ...no programme information is displayed this does not mean that your Smart TV is faulty The following options are available PREV DAY The programme guide for the previous day is displayed This is only possible up to the current day Programmes in the past are not displayed here NEXT DAY The programme guide for the next day is displayed Blue button REMINDER You can set programme reminders here Press th...

Page 71: ...hen under MODE specify whether the recording is to be created ONCE EVERY DAY or WEEK LY Then press OK to save the programming settings The pro gramme list then opens where the programmed timer is dis played From the EPG you can open the programme list at any time with the yellow button Previously created recordings are listed under CHANNEL RECORD LIST if the appropriate USB storage is connected to...

Page 72: ...n when using certain services Registration may require the provision of your personal data and the selection of a unique and secret password Please check the privacy policy of the provider before hand MEDION shall not be liable if the HbbTV the portal or a service does not comply with the user s requirements nor does it guarantee that safe and error free use of such services can always occur witho...

Page 73: ...antenna is con nected properly The picture is not clear The reception might be poor Check if the antenna is connected properly The picture is too bright or too dark Check the contrast and brightness settings The picture is not sharp The reception might be poor Check if the antenna is connected properly Check the sharpness and noise reduction settings in the PICTURE menu There is a double triple pi...

Page 74: ...u need more help If the suggestions in the previous sections did not solve your problem please con tact us To make it easier for us to help you please have the following information to hand What external devices are connected What messages appear on the screen When operating the device at which step did the problem occur If you have a PC connected to the device How is your computer configured What...

Page 75: ...is very high number of transistors and the extremely complex manufacturing process used in this context Pixel defect class Defect type 1 Continuously lit pixel Defect type 2 Continuously black pixel Defect type 3 Defective sub pixel lit black 0 0 0 0 0 I 1 1 2 1 0 1 3 5 II 2 2 5 5 n 0 0 2xn 10 III 5 15 50 50 n 0 0 2xn 100 IV 50 150 500 500 n 0 0 2xn 1000 n 1 5 The permitted number of defects for e...

Page 76: ...the dust first or wipe the high gloss finish too vigorously you could scratch the high gloss finish Do not use solvents corrosive or gaseous cleaning agents Clean the display screen with a soft lint free cloth Take care to ensure that no water droplets remain on the Smart TV Water can cause permanent discolouration To avoid damage to the device water must not penetrate into the interior of the dev...

Page 77: ...e and take them to a separate col lection point for used batteries Contact your local waste disposal com pany or your local authority for more information on this subject Batteries Proper disposal of used batteries protects the environment and your personal health Do not dispose of used batteries with normal house hold rubbish Batteries must be disposed of correctly For this purpose retailers that...

Page 78: ...Pal B G D K I Secam L L Channel positions 199 ATV 6000 DTV Smart TV S15501 MD 31581 Device name S15501 MD 31581 Screen size 138 8 cm 55 LCD 16 9 display Power consumption max 145 Watt Power consumption in stand by mode 0 50 W Speaker output 2 x 10 W RMS Physical resolution 3 840 x 2 160 TV system Pal B G D K I Secam L L Channel positions 199 ATV 6000 DTV Channels VHF Band I III UHF BAND U HYPERBAN...

Page 79: ... optical Drives storage media Drives USB Common Interface Supported formats via USB 2 Photo BMP JPG JPEG PNG GIF Music MP3 FLAC OGG Film AVI MKV MP4 MPEG 1 2 4 MOV TS VOB Xvid 3GP Capacities USB max 2 TB NTFS FAT32 PVR recordings only possible with FAT32 Remote control Transmission type Infrared LED classification 1 Battery type 2 x 1 5V AAA 2 Dimensions ambient temperatures Permissible ambient te...

Page 80: ...kg Mounting on the wall Vesa standard hole spacing 400 x 200 mm3 3 18 Product data sheet In accordance with Regulation 1062 2010 Trademark MSN no 30026552 30026554 Model no MD 31580 MD 31581 Energy efficiency class A A Visible screen size diagonal approx 123 2 cm 49 138 8 cm 55 Average power consumption when switched on in watts 68 84 Annual power consumption kWh year 100 123 Standby power consump...

Page 81: ...re your personal data for a period of three years in order to fulfil your legal warranty rights You have the right to be informed of the personal data concerned as well as the right to rectification deletion restriction of processing the right to object to pro cessing as well as the right to data portability In case of access and cancellation rights restrictions apply according to S 34 and S 35 of...

Page 82: ... can also contact our Service team via our hotline or by post Opening times Hotline number UK Mon Fri 08 00 20 00 Sat Sun 10 00 16 00 0333 3213106 Hotline number Ireland 1 800 992508 Service address MEDION Electronics Ltd 120 Faraday Park Faraday Road Dorcan Swindon SN3 5JF Wiltshire United Kingdom You can download this and many other sets of operating instruc tions from our service portal at www ...

Page 83: ...y copyright Mechanical electronic and any other forms of reproduction are prohibited without the written permission of the manufacturer Copyright is owned by the company MEDION AG Am Zehnthof 77 45307 Essen Germany Please note that you cannot use the address above for returns Please always con tact our Customer Service team first ...

Page 84: ...r 66 Media portal 39 Menu Channel 45 Configuration 57 Lock 62 Picture 42 Sound 43 56 Mounting 22 Multimedia connections 33 O Operating safety 8 Operation 35 P Package contents 7 Pixel faults 75 Power supply 13 Connecting the power supply 24 Privacy statement 81 Programme guide 70 PVR recording 63 R Remote control 19 Repairs 12 S Safety information 8 Connection 13 Operating safety 8 Power supply 13...

Page 85: ...85 DE FR IT NL EN ...

Page 86: ......

Reviews: