background image

English

   - 19 -

14:9 Zoom

This option zooms to the 14:9 picture.

4:3

Use to view a normal picture (4:3 aspect ratio) as this 
is its original size.

Panoramic

This stretches the left and right sides of a normal 
picture (4:3 aspect ratio) to fi ll the screen, without 
making the picture appear unnatural.

The top and bottom of the picture are slightly cut off.

Cinema

This zooms up the wide picture (16:9 aspect ratio) to 
the full screen.

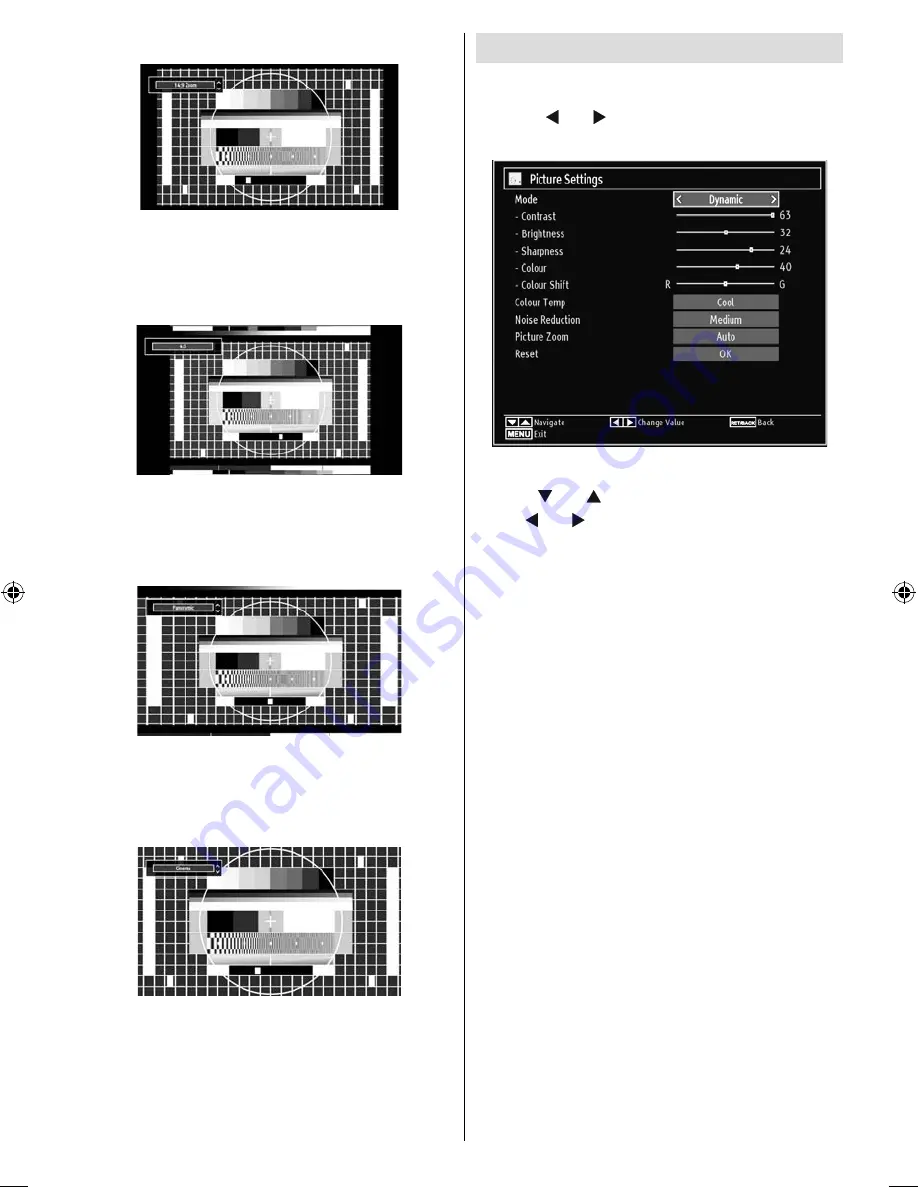
Confi guring Picture Settings

You can use different picture settings in detail.

Press 

“MENU”

 button and select the Picture icon 

by using “ ” or “ ” button. Press 

OK

 button to view 

Picture Settings menu.

Operating Picture Settings Menu Items

Press “

• 

” or “

” button to highlight a menu item.

Use “

• 

” or “ ” button to set an item.

Press 

• 

“MENU”

 button to exit.

Picture Settings Menu Items

Mode

:  For your viewing requirements, you can set 

the related mode option. Picture mode can be set 
to one of these options:  


Cinema

 ,

Game

  , 

Dynamic


and  

Natural

 . 

Contrast

: Sets the lightness and darkness values 

of the screen.

Brightness

: Sets the brightness value for the 

screen.

Sharpness

: Sets the sharpness value for the objects 

displayed on the screen.

Colour

: Sets the colour value, adjusting the colors.

Colour Shift:

 Adjust the desired colour tone.

Hue (NTSC only)

:  Adjusts the colour value.

Colour Temp

: Sets the desired colour tone.

Setting Cool option gives white colours a slight blue 
stress.

For normal colours, select Normal option.

Setting Warm option gives white colours a slight red 
stress.

Noise Reduction

: If the broadcast signal is weak and 

the picture is noisy, use 

Noise Reduction

 setting to 

reduce the noise amount. Noise Reduction can be set 
to one of these options: 

Low

Medium

High

 or 

Off

.

MB61_[GB]_5110UK_IDTV_GOLD12_32841W_10070119_50179520.indd   19

MB61_[GB]_5110UK_IDTV_GOLD12_32841W_10070119_50179520.indd   19

27.10.2010   15:04:30

27.10.2010   15:04:30

Summary of Contents for LIFE MD 30514

Page 1: ... Service Center Visonic S A c Miguel Faraday 6 Parque Empresarial La Carpetania N IV Km 13 E 28906 Getafe Madrid Espanha Hotline 808 202 789 Fax 34 91 460 4772 service portugal medion com www medion com portugal PT Medion Service Center Visonic S A c Miguel Faraday 6 Parque Empresarial La Carpetania N IV Km 13 E 28906 Getafe Madrid España Hotline 902196437 Fax 914604772 service spain medion com ww...

Page 2: ... Service List 14 Managing Stations Channel List 15 Operating the Channel List 15 Moving a Channel 15 Deleting a Channel 15 Renaming a Channel 15 Locking a Channel 15 Managing Stations Favourites 16 Button Functions 16 Managing Stations Sorting Channel List 16 On Screen Information 16 Media Playback Using Media Browser 16 Viewing Videos via USB 17 Viewing Photos via USB 17 Slideshow Options 17 Play...

Page 3: ...CAUTIONS Carefully keep the handbook as future reference When selling the device or giving it away absolutely give these direction for use Thank you for choosing this product This manual will guide you for the proper operation of your TV Before operating the TV please read this manual thoroughly Please do keep this manual in a safe place for future references This device is intended to receive and...

Page 4: ...ame sources such as lighted candles are placed on top of the TV Batteries should not be exposed to excessive heat such as sunshine fire or the like Lightning In case of storm and lightning or when going on holiday disconnect the power cord from the wall outlet Replacement Parts When replacement parts are required make sure that the service technician has used replacement parts which are specified ...

Page 5: ...tion below a certain frequency range galvanic isolator see EN 60728 11 The Standby On button doesn t separate this device completely from mains Moreover the device consumes power in the standby operation In order to separate the device completely from mains the mains plug has to be pulled from the mains socket Because of that the device should be set up in a way that an unobstructed access to main...

Page 6: ...in Power Save Mode When the TV is not in use please switch off or disconnect the TV from the mains plug This will also reduce energy consumption Disconnect power when going away for longer time Note that annually using the TV set in Power Save Mode has more power efficiency than disconnecting the TV from the mains plug instead of keeping stand by mode Therefore disconnect the TV from the mains plu...

Page 7: ...xit USB menu 19 Picture mode selection Changes picture mode 20 in Media Browser video mode Electronic Programme Guide 21 Sleep timer 22 Menu on off 23 OK Select Hold in TXT mode Channel List 24 Volume up down 25 Navigation buttons 26 AV Source 27 Previous programme 28 Blue buton 29 Yellow button Active channel list 30 No function 31 Subtitle on off TXT subtitle analogue TV 32 mode Subtitle in Medi...

Page 8: ...e Note To connect external device please use to supplied scart connection cable Component Video Inputs YPbPr 3 are used for connecting component video You can connect the component video and audio sockets with a device that has component output Connect the component video cables between the COMPONENT VIDEO INPUTS on on the TV and the component video outputs of your device While connecting be sure ...

Page 9: ... Slot is used for inserting a CI card A CI card allows you to view all the 1 channels that you subscribe to For more information see Conditional Access section Side USBs 2 Side HDMI Input is for connecting a device that has an HDMI socket 3 Headphone jack is used for connecting an external headphone to the system 4 Connect to the HEADPHONE jack to listen to the TV from headphones optional VideoInp...

Page 10: ...he USB inputs of the TV at the same time Note It is possible certain types of hard disk drives are not supported Side HDMI Connection You can use side HDMI input to connect a device that has an HDMI connector to your TV Use an appropriate HDMI cable to make such a connection Note that you should switch to the HDMI source to view the content from the connected device Power off both the TV and the d...

Page 11: ... inside Observe the correct polarity when inserting batteries and replace the battery cover Connecting to a DVD Player If you want to connect a DVD player to your LCD TV you can use connectors of the TV set DVD players may have different connectors Please refer to your DVD player s instruction book for additional information Power off both the TV and the device before making any connections Note C...

Page 12: ...ing DVB T in addition to digital teletext broadcasting together with the normal broadcasting there are also channels with just digital teletext broadcasting The aspect ratio picture shape when watching a channel with just digital teletext broadcasting is the same as the aspect ratio of the picture viewed previously When you press the button again the digital teletext screen will be displayed Analo...

Page 13: ...ons including Select Channel option INFO Event Details Displays the programmes in detail Green button Programme schedule will be listed Yellow button Display EPG data in accordane with timeline schedule Blue button Filter Views filtering options Red button Prev Time Slice Displays the programmes of previous time slice Green button Next Time Slice Displays the programmes of the next time slice Yell...

Page 14: ... the country you want to set and press button to highlight Teletext Language option Use or button to select desired Teletext Language Press button after setting Teletext Language option Scan Encrypted will be then highlighted You can set Scan Encrypted as Yes if you want to scan coded stations Afterwards select the desired Teletext Language Press OK button on the remote control to continue and the...

Page 15: ... the desired Search Type using or button Manual search options will change accordingly Use button to highlight an item and then press or button to set an option You can press MENU button to cancel Digital Manual Search In manual channel scan the number of the multiplex or frequency are entered manually and only that multiplex or frequency are searched for the channels After selecting search type a...

Page 16: ...you want to move the channel and press OK Press OK button to process Selected channel is now moved Deleting a Channel You can press GREEN button to tag untag all channels YELLOW button to tag untag channel Select the channel that you want to delete and select Delete option Press OK button to continue A warning screen will appear Select YES to delete select No to cancel Press OK button to continue ...

Page 17: ... displayed on the information banner The information banner gives information on the channel selected and the programmes on it The name of the channel is displayed along with its channel list number Hint Not all channels broadcast the programme data If the name and time of the programme are not available then information banner will be displayed with blanks If the selected channel is locked you mu...

Page 18: ... select Photos from the main options available image files will be filtered and listed on this screen Jump Numeric buttons Jump to selected file using the numeric buttons OK Views the selected picture in full screen Slideshow button Starts the slideshow using all images RED Sorts files by date GREEN Views images in thumbnails BLUE Switch between music photo video and all YELLOW Change view style S...

Page 19: ...mats Programmes can be watched in different picture formats depending on the transmission received You can change the aspect ratio image size of the TV for viewing the picture in different zoom modes Press SCREEN button repeatedly to change the image size Available zoom modes are listed below Auto When a WSS Wide Screen Signalling signal which shows the aspect ratio of the picture is included in t...

Page 20: ...ENU button to exit Picture Settings Menu Items Mode For your viewing requirements you can set the related mode option Picture mode can be set to one of these options Cinema Game Dynamic and Natural Contrast Sets the lightness and darkness values of the screen Brightness Sets the brightness value for the screen Sharpness Sets the sharpness value for the objects displayed on the screen Colour Sets t...

Page 21: ...e screen Dot Clock Dot Clock adjustments correct the interference that appear as vertical banding in dot intensive presentations like spreadsheets or paragraphs or text in smaller fonts Phase Depending on the resolution and scan frequency that you input to the TV set you may see a hazy or noisy picture on the screen In such a case you can use this item to get a clear picture by trial and error met...

Page 22: ...RTANT Insert or remove the CI module only when the TV is SWITCHED OFF In order to watch certain digital channels a conditional access module CAM can be necessary This module must be inserted in the CI slot of your TV Obtain the Conditional Access Module CAM and the viewing card by subscribing to a pay channel company then insert those to the TV using the following procedure Insert the CAM and then...

Page 23: ...ttings menu will function as described below Language Settings In the configuration menu highlight the Language Settings item by pressing or buttons Press OK and Language Settings submenu will be displayed on the screen Use or buttons to highlight the menu item that will be adjusted and then press or button to set Notes System Language determines the on screen menu language Audio Language is used ...

Page 24: ... button and select Settingsiconbyusing or button PressOKbutton to view Settings menu Use or button to highlight Timers and press OK to continue Setting Sleep Timer This setting is used for setting the TV to turn off after a certain time Highlight Sleep Timer by using or button Use or button to set The timer can be programmed between Off and 2 00 hours 120 minutes in steps of 30 minutes Setting Pro...

Page 25: ...able the selected source Changes are automatically stored Configuring Other Settings To view general configuration preferences select Other Settings in the Settings menu and press OK button Operation Press or buttons to select an item Use or button to set an option Press OK button to view a sub menu Menu Timeout Changes timeout duration for menu screens Scan Encrypted When this setting is on searc...

Page 26: ...tored channels No channels for this type have been found message will be displayed on the screen Standby Search optional Use or button to select Standby Search and then press or button to set this setting as On or Off If you change Standby Search to Off this function will be unavailable To use Standby search please make sure that you select Standby Search as On Other Features Displaying TV Informa...

Page 27: ... Please note that ghosting may occur while displaying a persistent image LCD TVs image persistence may disappear after a short time Try turning off the TV for a while To avoid this do not leave the screen in still picture for extended periods No Power If your TV system has no power please check the main power cable and connection to the mains socket outlet Poor Picture Have you selected the correc...

Page 28: ...MI Signal Compatibility Input Signal Types Source Supported Signals Available EXT 1 SCART 1 PAL 50 60 O NTSC 60 O RGB 50 O RGB 60 O EXT 2 SCART 2 PAL 50 60 O NTSC 60 O RGB 50 X RGB 60 X SIDE AV PAL 50 60 O NTSC 60 O YPbPr 480I 60Hz O 480P 60Hz O 576I 50Hz O 576P 50Hz O 720P 50Hz O 720P 60Hz O 1080I 50Hz O 1080I 60Hz O 1080P 50Hz O 1080P 60Hz O HDMI1 HDMI2 HDMI3 HDMI4 480I 60Hz O 480P 60Hz O 576I 5...

Page 29: ...480p 576i 576p 720p 1080i 1080p Appendix D Supported File Formats for USB Mode Supported Players Player Stream Video Decoder MSVD Audio Decoder MSAD Audio MP3 None MP3 Audio WAV AIFF None LPCM Windows Media optional WMA ASF VC1 WMA MPEG1 Program Stream MPEG 1 MPEG1 MP3 AC 3 and PCM MPEG2 Program Stream MPEG 2 MPEG2 MP3 AC 3 and PCM MPEG4 MPEG 4 H264 in MP4 container H264 and MPEG4 AAC AVI Xvid XVI...

Page 30: ... is found and downloaded successfully with next power up TV opens with new software version Note on reboot operation Reboot is the last step in software upgrade operation if download of new software is finished successfully During reboot TV makes final initializations In reboot sequence panel power is closed and front led indicates the activity with blinking Around 5 minutes later TV restarts with...

Page 31: ...1 6 Digital Reception DVB T Transmission Standards DVB T MPEG2 DVB T MPEG4 HD i DEMODULATION Symbol rate COFDM with 2K 8K FFT mode Modulation 16 QAM 64 QAM FEC for all DVB modes automatically found MHEG 5 ENGINE compliant with ISO IEC 13522 5 UK engine Profile UK only Object carousel support compliant with ISO IEC 135818 6 and UK DTT profile UK only Frequency range 474 850 MHz for UK models ii VID...

Reviews: