background image


spirodoc


SPIRODOC


cod. 980156 

 Rev 2.4   


EN 18/46 


User manual 

 
Scroll through the various items of the menu as explained in paragraph 2.1; once the 
item of interest is shown touch the corresponding item.  


2.6.1 

Doctor Mode 

In Doctor Mode the user has access to all the functions of the device for professional use, unlike Patient Mode which is restricted to a simplified use 
of the device. (Please view paragraph 3.6.2). 
The following items are those shown in the service menu when in Doctor Mode.  

 
Doctor/Patient 

This function allows to set one of the two modes: 


Patient mode 


Doctor mode 

The first one is set by the doctor when the device will be used by the patient for homecare use; the second mode instead allows full access to all the 
functions of the device when used directly by the doctor. 
Select the desired mode, press the OK icon, automatically the mode will be set and the device will return to the service menu. The service menu will 
show a different configuration according to which mode has been selected. 
For more information concerning device functioning in patient mode please view paragraph 3.6.2 
 

Change date/time 

Select the item by touching the display. 
When setting the date and time, the cursor _ indicates the data item which is being modified. Use the numbers shown to modify the data item of 
interest, move on to the next data item by touching OK.  Touch OK so that the new settings will take effect and to return to the service menu. To 
return to the service menu without modifying the item data touch 


LCD Settings 

This item allows to: 


Brightness and contrast setting of the display 
With  two  scales  which  go  from  0  to  31  it  is  possible  to  set  the  parameters  of  the  display  and  view  in  real  time  its  effect.  Once  the  best 
combination of brightness and contrast is obtained touch OK on the bottom right side of the display  


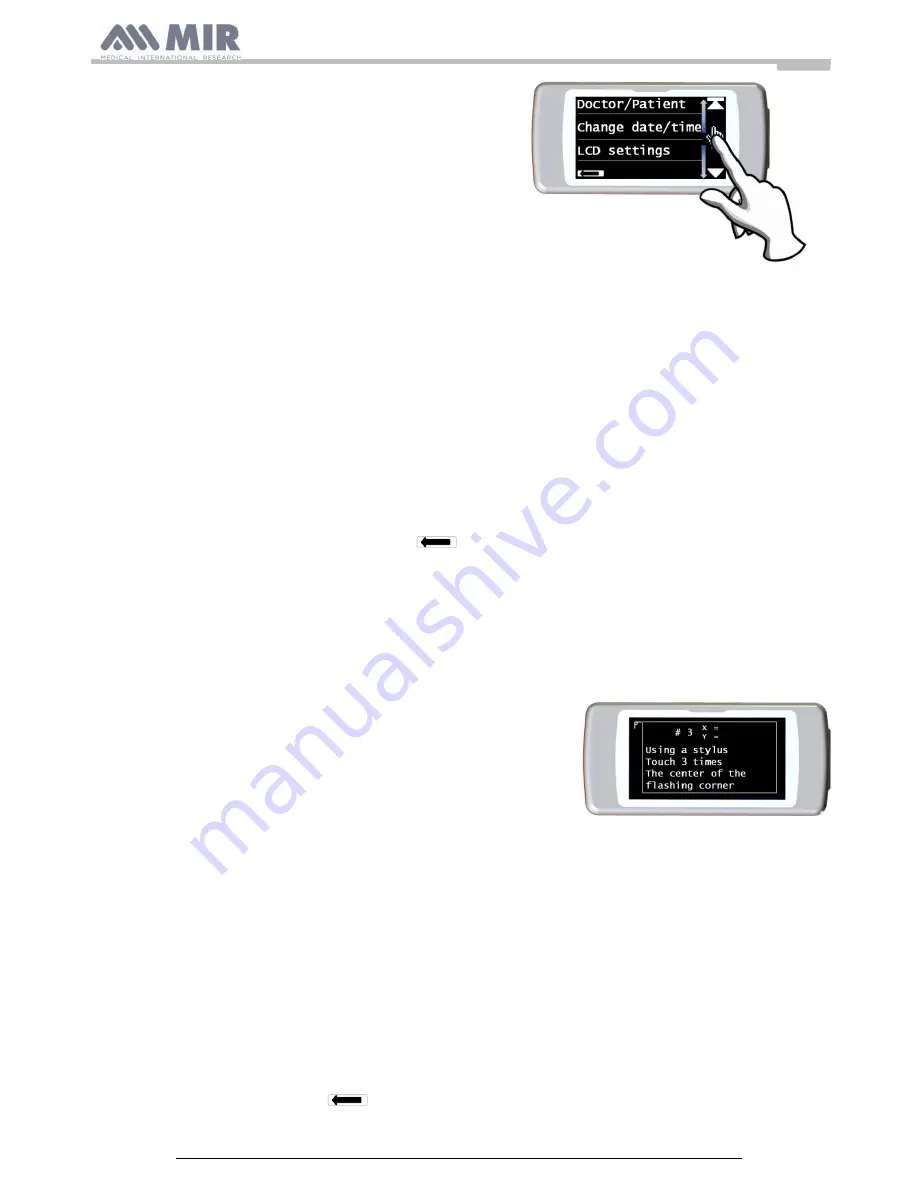
Calibrate the touch screen function  
This  function  is  used  to  check  the  proper  response  of  the  touch  screen;  the  device  initially  request  a  confirmation,  touching  OK  icon  the 
calibration begin 
 
There are four phases as follows: 


Touch three times the top left-hand point of the display 


Touch three times the top right-hand point 


Touch three times the bottom right hand point 


Touch three times the bottom right hand point 


The reference area is the one inside the flashing outline. 
This procedure will then be set up in function of the dimensions of the display. 


This procedure must be carried out using the tip of a touch-

screen “pointer” held vertically at 90 degrees to the display. 

if the calibration is made correctly then the device shows: 

Calibration is OK 


Otherwise the user is requested to repeat the calibration procedure. 
The procedure cannot be cancelled once started, so carry out the procedure correctly to return to the service menu.


Bluetooth Settings 
 

Once i

n the menu it is possible to to select the activation mode of the Bluetooth function. The “Activation” item allows to select  from the following 

options;”On request” and “always on”;in the first case the function is activated only when requested(for example to print a test),otherwise it remains 
off thus allowing to save energy; by selecting the option “Always on” this function is always activate and ready for use(for example to transfer data to 
a mobile phone.) 
Access this menu to search for active Bluetooth 

devices, touch the option “Search Device”; 

SPIRODOC 

will start to search for Bluetooth devices in 

the area; once one or more devices are found the display will list these devices with their respective names. By touching the device of interest it will 
be memorized as a printer, a phone, or as a PC 

– On line; select an option. 

In 

the “Bluetooth setting” menu any previously memorized devices can be viewed in the “printer” list,  “telephone” list or the “PC – On line” list. Next 

to  the  device  name  a  corresponding  icon  (telephone,printer  or  PC)  will  appear.  Any  device  from these  lists  can  be  set  as  the  default device  (the 
device that 

SPIRODOC

 will automatically connect to via Bluetooth) by entering in the lists, touching the display and selecting the device. A listed 

device can be eliminated from the list. (in this specific case the user will confirm the deletion with the OK icon.) 
So as not to make any modifications touch the 

 icon in the bottom left side 


Summary of Contents for spirodoc

Page 1: ...spirodoc SPIRODOC cod 980156 Rev 2 4 EN 1 46 User manual User manual rev 2 4 Issue date 10 04 2014 Approval date 10 04 2014...

Page 2: ...23 2 7 Patient Data 24 2 7 1 Inserting data of a new patient 24 2 7 2 Patient data modification 24 2 8 Visualization of memory data 24 2 8 1 Database research modality 24 2 8 2 Visualization of databa...

Page 3: ...mir spirometry com MIR accepts no responsibility for any loss or damage caused by the user of the device due to instructions contained in this Manual and or due to incorrect use of the product Please...

Page 4: ...e a spirometry test is made The user is responsible to assess both the mental and the physical condition of the patient in order to perform a proper test furthermore in the evaluation of test results...

Page 5: ...r the correct functioning and possibly cause damage The presence of any impurities such as hair sputum threads etc within the body of the turbine sensor may seriously compromise measurement accuracy 1...

Page 6: ...with the correct operation of the device For this reason certain minimum clearances a few meters should be observed when high frequency appliances such as a TV radio portable phone etc and other elec...

Page 7: ...rly aligned If the leads are inverted an inverse polarity connection may provoke acid leakage overheating smoke breakage and or fire Do not connect the battery pack leads to a wall socket or to the ca...

Page 8: ...tandard this product and its component parts are of type BF and therefore protected against the dangers of direct and indirect contact with electricity 1 5 4 Warning symbol for the USB To connect to o...

Page 9: ...ved receive an explanation of the ESD warning symbol and training in ESD precautionary procedures the electrostatic discharge is defined as an electric charge at rest It is the sudden flow of electric...

Page 10: ...or alternatively to the personal best values from the clinical history of the subject The personal best values can vary considerably from the predicted values which are taken from healthy subjects SPI...

Page 11: ...nt system Bi directional digital turbine Temperature sensor semiconductor 0 45 C Measurement principle Infrared interruption Volume range 10 L Flow range 16 L s Volume accuracy 3 or 50 mL Flow accurac...

Page 12: ...to administer to the patient O2 percentage of oxygen administered to the patient before test L min SPO2 Base SPO2 base value for the SPO2 and ODI tests BPM Base BPM base value for the SPO2 and ODI te...

Page 13: ...es SPO2 start 6MWT no SPO2 end 6MWT no BPM end 6MWT no SPO2 Base 6MWT no BPM start 6MWT no T Baseline 6MWT no T Walking 6MWT no T Recovery 6MWT no Distance 6MWT no T2 SPO2 T2 SPO2 6MWT yes T4 SPO2 T4...

Page 14: ...ecial alarm frequency in the case of either SpO2 or cardiac pulse going outside of the programmed levels of alarm Beep with special alarm frequency during oximetry measurement in the case of a low bat...

Page 15: ...llows access to all functions by simply touching the display The controls on the touch screen change dynamically based on the functions performed To access a specific function touch the corresponding...

Page 16: ...ith the symbol This image indicates that the battery pack is fully charged 6 indicators A drop of the battery pack charge is displayed with a reduction of the indicators 2 4 Main screen On the main sc...

Page 17: ...via Bluetooth connection To view the pletismographic curve in real time while performing an oximetry test To check the alarms and alarm thresholds during oximetry testing To check the alarms and alarm...

Page 18: ...egin There are four phases as follows Touch three times the top left hand point of the display Touch three times the top right hand point Touch three times the bottom right hand point Touch three time...

Page 19: ...a menu appears to set the day and time that the device will turn on and off If turn ON mode was previously enabled and the user turns on the device at a different time from that of the programmed tim...

Page 20: ...beep during oximetry testing WARNING The heart rate tone beep is always disabled during sleep oximetry testing please view paragraph 3 13 2 Default alarms This function allows to restore all default...

Page 21: ...alibration allows to insert new calculated values to perform a new calibration A password is required to access this option insert the following password by touching the numbers starting from left to...

Page 22: ...he item Configuration and insert the following password 1 2 2 3 3 3 The service menu will display the following items Doctor Patient Turn ON mode Patient data Oximetry setup Set questions Set symptoms...

Page 23: ...ot be accepted This means that the device is not capable of correcting such a large calibration error In this case Check the correct functioning of the SPIRODOC with a new turbine and or Clean the tur...

Page 24: ...ian Caucasian 100 Mexican American Oriental 100 Afro American Hong Kong Chinese 100 Other Giapanese 89 polinesian 90 North Indian 90 South Indian 87 Pakistani 90 African descendant 87 Aboriginal 85 Wh...

Page 25: ...t specific date Test session in Patient Mode refers to spirometry PRE tests and oximetry tests performed within a 20 minute time span A new session is activated upon turning on the device if the time...

Page 26: ...s can be seen on the screen to the right If a patient has instead performed a test in the current session and previous tests are archived the following screenshot is displayed 2 10 PC On line mode con...

Page 27: ...tory parameters FIVC FIV1 FIV1 PIF are not of interest The optional initial inspiration phase can also be performed before inserting the mouthpiece in the mouth After inspiring slowly and deeply the f...

Page 28: ...results from the PRE test as well as the relevant predicted values The following tests made by the patient show the following parameters Those values related to the test performed Those values related...

Page 29: ...s shown Blow out all air in lungs Between tests the SPIRODOC checks the repeatability of the following parameters PEF repeatable when the difference between the two largest PEF is 0 67 L s VC repeatab...

Page 30: ...message will appear Low battery level Touch the ESC icon to exit the test otherwise after a seconds will start the test In the event that a test is interrupted due to a complete battery discharge the...

Page 31: ...case the icon will be shown as to then return to the previous icon when the two minutes are over For information concerning the proper setup of this function please refer to paragraph 3 6 WARNING A t...

Page 32: ...6 minutes are up the device will automatically move on to the recovery stage and the timer will be reset to zero again Recovery stage The duration of this stage is entirely up to the doctor and it is...

Page 33: ...agraph 3 13 1 To perform this test touch the from the main screen and subsequently select the test with the icon After approximately 5 minutes from the beginning of the test the SPIRODOC will automati...

Page 34: ...The materials used for manufacturing the sensor are NATURAL LATEX PROTEIN FREE and are subject to biocompatibility tests WARNING The adult single patient sensor is ideal for patients weighing more th...

Page 35: ...ximetry test walk test sleep oximetry send data via Bluetooth WARNING Spirometry test results do not include any automatic interpretation compared with the predicted values as no patient anthropometri...

Page 36: ...Vista and Seven To avoid making any errors at this stage please read the Advanced section of the winspiroPRO User Manual carefully 3 4 Internal software upgrade SPIRODOC internal software can be upgr...

Page 37: ...ne is still malfunctioning please replace it with a new one WARNING Do not carry out any cleaning procedures when using disposable turbines a new disposable turbine must be used for every new patient...

Page 38: ...spiroPRO software For further information consult the winspiroPRO manual available on line within the software itself Spirometry test results are unreliable The turbine may contain dirt or foreign mat...

Page 39: ...irometer Oximeter Brandname MIR Medical International Research Device name spirodoc Class IIa Complies with the Essential Requirements of directive 93 42 EC concerning Medical Devices and its amendmen...

Page 40: ...ation If the product is utilised differently from the use described in the User s Manual If any alteration adjustment modification or repair has been carried out by personnel not authorised by the man...

Page 41: ...spirodoc SPIRODOC cod 980156 Rev 2 4 EN 41 46 User manual ANNEX 1OXIMETRY TEST REPORTS EXAMPLES...

Page 42: ...spirodoc SPIRODOC cod 980156 Rev 2 4 EN 42 46 User manual...

Page 43: ...spirodoc SPIRODOC cod 980156 Rev 2 4 EN 43 46 User manual...

Page 44: ...spirodoc SPIRODOC cod 980156 Rev 2 4 EN 44 46 User manual ANNEX 2SPIROMETRY TEST REPORT EXAMPLE...

Page 45: ...for input output lines Mains power quality should be that of a typical commercial or hospital environment Surge IEC 61000 4 5 1 kV differential mode 2 kV common mode Not Applicable Mains power quality...

Page 46: ...OC The SPIRODOC is intended for use in an electromagnetic environment in which radiated RF disturbances are controlled The customer or the user of the SPIRODOC can help prevent electromagnetic interfe...

Reviews: