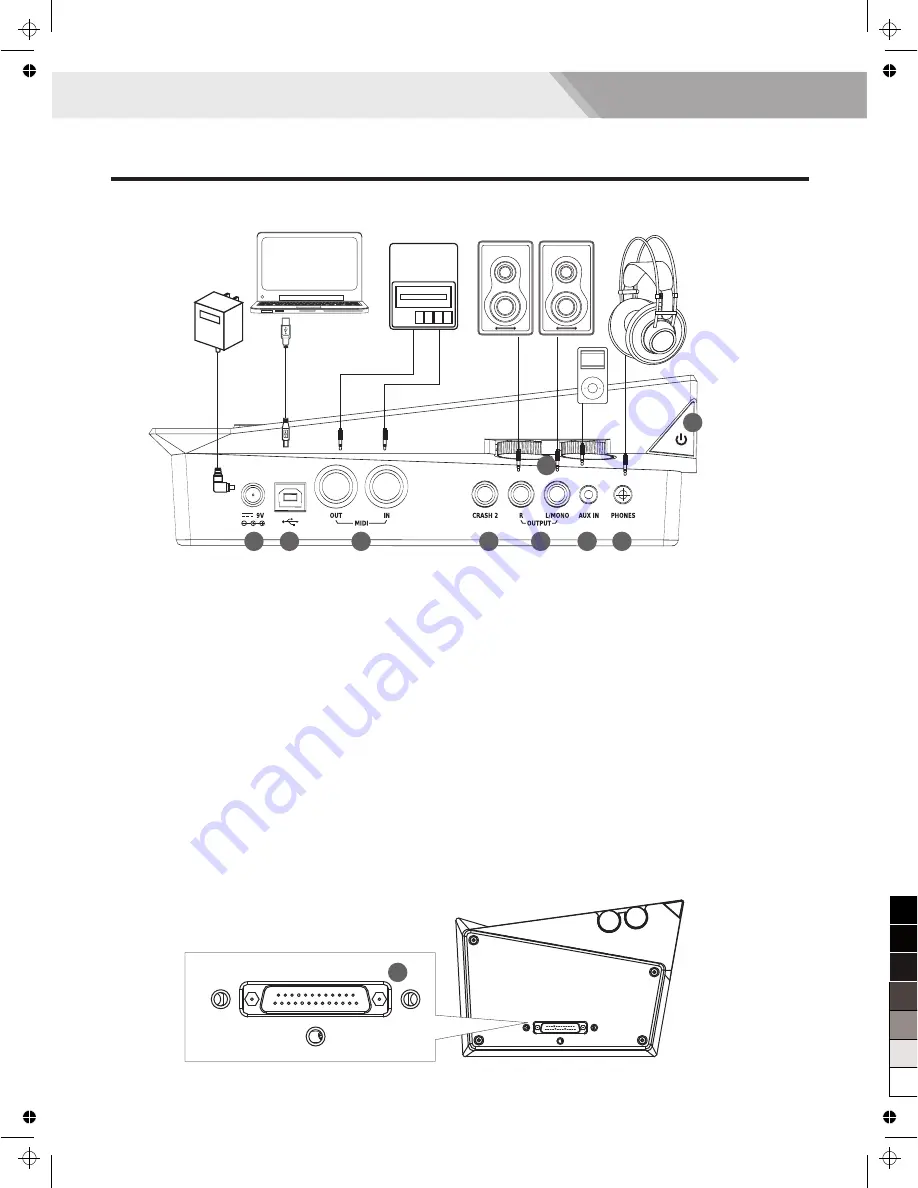
background image

15. DC IN jack

      Connect the AC adaptor here. Plug the AC adaptor cable 
      into the DC IN jack.

16. USB MIDI Terminal

      Use this when you want to connect a PC/laptop or USB 
      host device.

      Note:

      Only transmit MIDI data.

17. MIDI Terminal

      Use this to connect extra MIDI sequencer, transmit       
      MIDI data.
      

MIDI IN Connector:

 receive MIDI data; you can receive 

      MIDI data from an extra MIDI device or a PC/laptop.
      

MIDI OUT Connector: 

send MIDI data; you can send 

      MIDI data to an extra MIDI device or a PC/laptop.

18. CRASH 2 jack (1/4”)

      This allows you to connect additional Crash 2.

19.  

 jack (L/ MONO, R) (2×1/4” )

       For connecting to your audio system or amplifier, all 
       sounds from the module are output here.
       

L/ MONO jack:

 output sound in MONO.


 R and L/ MONO jacks:

 output sound in stereo. 

OUTPUT

15

16

17

18

19

20

21

23

22

20. AUX IN jack (1/8”)

      For connecting an extra audio player, for example, Mp3 
      and so on via a stereo plug. You can enjoy playing the 
      drum along with your favorite songs.

21. PHONES jack(1/8”)

      Connect stereo headphones here. Detecting all output 
      sounds. Plug the headphone cable into this jack, sound 
      will still be output from the OUTPUT jacks.

22. VOLUME knob


AUX IN:

 adjust the volume of extra audio.


MASTER:

 adjust the volume of headphone and output.

      Note:

      Before turning the module on, always be sure to turn the         
      volume down.

23. POWER button

      Press this button to power on / off the module.

24. TRIGGER INPUT CONNECTOR terminal

      Connect the included dedicated cable to this connector, 
      and use it to connect the pads and pedals.

24

Side Panel (Connecting)

6

MIDI Device

Note:

To prevent malfunction and equipment failure, alwaysturndown the volume, and turn off all the units before making any connections.

Panel & Display Description

0

5

25

75

95

100

AW_DD522_manual_G04_140310

2014

3

12

 13:11:57

Summary of Contents for DD522

Page 1: ...0 5 25 75 95 100 AW_DD522_manual_G04_140310 2014 3 12 13 11 56...

Page 2: ...the owner s manual In case the function could not resume please use the product in other location PRECAUTIONS PLEASE READ CAREFULLY BEFORE PROCEEDING Please keep this manual in a safe place for future...

Page 3: ...etronome 12 Select a Preset Drum Kit and Create a User Drum Kit About the Preset and User Drum Kit 13 Edit the Drum Kit Parameters 13 Edit the Voice Parameters 13 Save User Drum Kit 14 Playing Along w...

Page 4: ...al With different positions the pedal pressed down the voice of pad varied while you are striking the Hi Hat pad And this is similar to an acoustic drum Conveniently Design for Left hand Drummer Excha...

Page 5: ...to select a trigger pad such as snare kick and so on Panel Display Description 10 Button Gradually increasing or decreasing the value of settings 11 SHIFT Button Combined with SONG KIT PAGE PAGE STAR...

Page 6: ...22 20 AUX IN jack 1 8 For connecting an extra audio player for example Mp3 and so on via a stereo plug You can enjoy playing the drum along with your favorite songs 21 PHONES jack 1 8 Connect stereo...

Page 7: ...press on the PREVIEW button 3 Pad Name Display the current pad name 4 Parameter Name Display the parameter name such as PAN REVERB and so on or the name of song kit 5 Parameter Value Display the valu...

Page 8: ...1 The SNARE CRASH 1 CRASH 2 and RIDE are stereo output and other pads are mono output 2 Using the cables provided connect each Trigger input jack on the rear panel of the module and make sure each pa...

Page 9: ...utton 4 Turn the amplifier or audio system on or listen to the headphone 5 Striking the pads and adjust the volume by slowly turning the VOLUME knob module amplifier audio or headphone toward the righ...

Page 10: ...can individually change the pad voice 1 Press the VOICE button enter the voice menu The screen shows on the right 2 Hit the pad that you want to change its voice or you can use the combination buttons...

Page 11: ...y Both Ride and Crash cymbals have cymbal choke But hi hat don t have the cymbal choke Choking the crash ride edge with the hand immediately after hitting the crash ride mutes the crash ride sound Hi...

Page 12: ...he Page Page button to select the parameter you want to edit 3 Use the button to change the parameter value 4 Press the CLICK button again to stop the metronome and you will find the light goes out 12...

Page 13: ...it USER KIT001 quickly 2 Press the PAGE PAGE button to select the item that you want to edit Parameter KIT NAME VOLUME EQ HIGH EQ MID EQ LOW Value Preset User 1 30 1 5 0 16 12 12 12 12 12 12 Descripti...

Page 14: ...hat Splash 4 Press the button to adjust parameter value Preview pad voice Expect striking the pads you can also pressing the PREVIEW button to preview the instrument voice The force you pressed on the...

Page 15: ...drum volume Delete user song Press SAVE ENTER button to enter CONFIRM N then press to switch CONFIRM Y display and press SAVE ENTER to confirm 3 Use the button to adjust the value 4 Press the START ST...

Page 16: ...pad This can happen when two pads are installed on the same stand For example If you hit the snare pad and the tom 1 also sounds While striking the snare pad gradually increase the XTALK value for th...

Page 17: ...t to your left hand playing not that much trouble with our new design you can finish pad position in the condition of no changelings of cables Firstly changing the L R EXCH setting to L and following...

Page 18: ...cer are connected to the digital drum s internal sound generator Sounds are produced by the internal sound generator when the pads are struck OFF The pads and internal sequencer are disconnected from...

Page 19: ...an adjust these parameters below Record Parameter TIME SIGNATURE INTERVAL U_ SONG SONG KIT TEMPO DRUM OFF PRECOUNT Value 1 9 2 1 9 4 1 9 8 1 9 16 1 2 3 8 1 4 1 8 1 12 1 16 001 005 1 2 60 1 35 30 280 O...

Page 20: ...w medeli com hk 2 Connect to a computer 3 Download MIDI songs from a computer It is very easily to download MIDI songs to your module For more details please refer to PC help content Note Support SMF...

Page 21: ...This terminal transmits data from the digital drum to other MIDI devices USB Connection The USB connector allows you to connect the digital drum directly to your computer It can be connected without...

Page 22: ...volume of the click to 0 1 Adjust the song playback volume to matching the pad volume 1 Make sure the USB has correctly connected 2 Do the connect operation again Keep the computer on and then turn th...

Page 23: ...city About 6500 notes Tempo 30 280 Display Backlit with segment code LCD Connectors TRIGGER INPUT CONNECTOR PHONES AUX IN CRASH 2 R L MONO USB MIDI IN MIDI OUT Control Buttons Power on off Master Volu...

Page 24: ...8 29 30 PRESET KITACOUSTIC FUNK STANDARD BRUSH DANCE ROCK JAZZ 808 909 FUNKBAND FX MIX POWER LATIN MARIMBA PERCUSS METAL INDIAN AFRICAN ELECTRIC REGGAE ORCHESTR SONGO HIPHOP BIG BAND MAGIC LIVE HOUSE...

Page 25: ...Stick Techno Snare Stick Brush Swirl Acoustic Tom 1 Acoustic Tom 1 Rim Acoustic Tom 2 Acoustic Tom 2 Rim Acoustic Tom 3 Acoustic Tom 3 Rim Acoustic Tom 4 Acoustic Tom 4 Rim Acoustic Tom 5 Acoustic To...

Page 26: ...5 196 197 198 199 200 201 202 CRASH 203 204 205 206 207 208 209 210 211 212 213 214 215 216 217 218 219 220 221 222 223 224 225 226 227 228 229 230 231 232 233 234 235 236 237 238 239 240 241 242 243...

Page 27: ...INDIAN4 INDIAN5 INDIAN6 308 309 310 311 312 313 314 315 316 317 318 319 320 321 322 323 324 325 326 327 328 329 330 331 332 333 334 335 336 337 338 339 340 341 342 343 344 345 346 347 348 349 350 351...

Page 28: ...1 Reggae 2 Latin Rock New Age Tap 1 Atmosphere Tap 3 Polysynth Tap 5 Brass Tap 6 Fx Tap 8 Bass Tap 1 Bass Tap 3 Bass Tap 5 Swing Bass Tap 6 Bass Tap 8 Crystal Tap 1 Vibraphone Tap 3 Sawtooth Tap 5 Fu...

Page 29: ...ngo Mute Hi Conga Open Hi Conga Low Conga High Timbale Low Timbale High Agogo Low Agogo Cabasa Maracas Short Whistle Long Whistle Short Guiro Long Guiro Claves Hi Wood Block LowWood Block Mute Cuica O...

Page 30: ...ush Low Tom1 Brush Mid Tom2 Brush Mid Tom1 Brush Hi Tom2 Brush Hi Tom1 Orchestra Set bank 48 Closed Hi hat 2 Pedal Hi hat Open Hi hat 2 Ride Cymbal 1 Concert BD 2 Concert BD 1 Concert SD Castanets Con...

Page 31: ...GM Backing Instrument List 31 0 5 25 75 95 100 AW_DD522_manual_G04_140310 2014 3 12 13 12 03...

Page 32: ...MIDI Implementation Chart YES NO DD522 _G04 0 5 25 75 95 100 AW_DD522_manual_G04_140310 2014 3 12 13 12 04...

Reviews: