background image

3.1.2

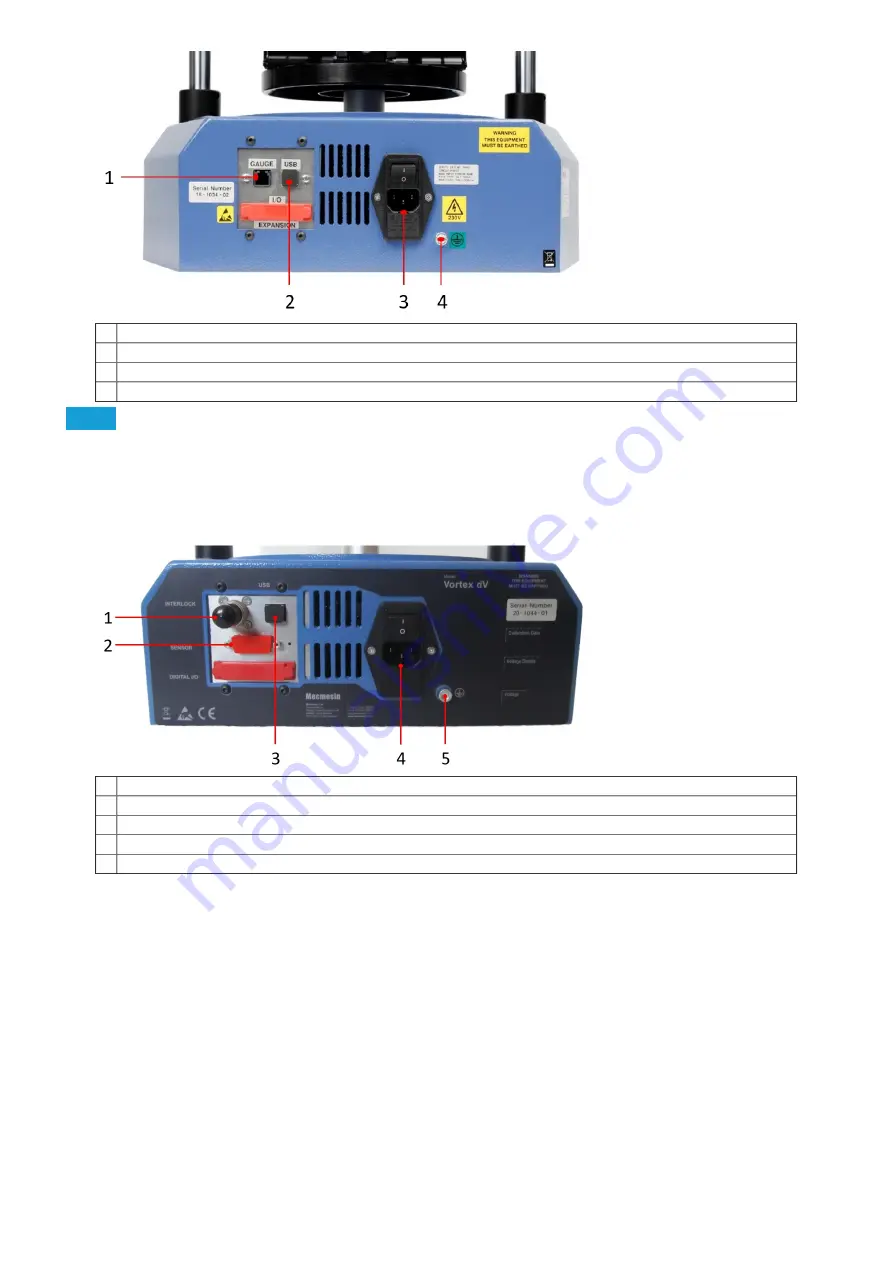
1

1

  AFTI (Advanced Force/Torque Indicator) input

2

2

  USB connection for PC control using VectorPro™ software

3

3

  Mains connection and Inlet Filter (contains voltage selector and fuse holder)

4

4

  System earth point

Interlock Enabled

These are very similar to the Mark 1 model stands, but now incorpoarte the new '

Sensor

Sensor

' and '

Interlock

Interlock

'

connections. These machines are produced from May 2020 and will have formatted serial numbers from 

20-XXXX-

20-XXXX-

05.

05.

These are identified by the rear panel shown below:

1

1

  '

Interlock

Interlock

' connection (interlock override plug shown fitted)

2

2

  '

Sensor

Sensor

' connection. 

3

3

  USB connection for PC control using VectorPro™ software

4

4

  Mains connection and Inlet Filter (contains voltage selector and fuse holder)

5

5

  System earth point


8

Summary of Contents for Vortex-dV

Page 1: ...Published on Mecmesin Support https help mecmesin com Home Vortex dV Motorised Torque Test Stand Operating Manual Support Product Vortex Vortex dV Revision ID 11670 Manual 431 468 1 ...

Page 2: ...1 Vortex dV Motorised Torque Test Stand Operating Manual 431 468 April 2020 2 ...

Page 3: ...llowing manuals may aid you in the use of your test stand Guide to Safe Use of Mains Powered Test Systems 431 398 Covers the initial setup installation and safety implications for intended use of any Mecmesin supplied mains powered equipment Advanced Force Gauge AFG Mk4 Operating Manual 431 213 Runs through the operation of Advanced Force Gauge in conjunction with Vortex dV test stands VectorPro U...

Page 4: ...on indicates a situation or condition that could cause the equipment to malfunction leading to possible damage Information The information icon indicates additional or supplementary information about the action activity or application 4 ...

Page 5: ...plied Accessories Initial Setup License Key Locating the Stand Mains Power Supply Fuse Specification Attaching the Torque Sensor Fitting the AFTI Torque Indicator Connecting the AFTI and the Vortex dV AFTI Communication Settings Connect the Test Stand to a PC VectorPro Users Only Cable Management Attaching Grips and Fixtures Test Stand States Front Panel Controls Emergency Stop Button Multi functi...

Page 6: ...ages Information Interlock Guarding Overview Operating a Vortex dV Test Stand Without a Guard Fitted Operating a Vortex dV Test Stand With an Interlocked Guard Guard Closed Guard Opened With a Test Running Vortex dV Without PC Control Vortex dV With VectorPro Lite Control Specification Dimensions Declaration of Conformity 6 ...

Page 7: ...Model of Vortex dV The Vortex dV has been through minimal design changes from it s inception However please see the sections below to assist in clearly identifying the exact model Mark 1 Vortex dV Mark 1 machines are the original motorised torque stands developed for use with the AFTI digital force torque indicator These are controlled by VectorPro Lite functionality as well as the stand alone ope...

Page 8: ...1 model stands but now incorpoarte the new Sensor and Interlock connections These machines are produced from May 2020 and will have formatted serial numbers from 20 XXXX 05 These are identified by the rear panel shown below 1 Interlock connection interlock override plug shown fitted 2 Sensor connection 3 USB connection for PC control using VectorPro software 4 Mains connection and Inlet Filter con...

Page 9: ...use suitable lifting equipment and follow safe handling guidelines when moving your Vortex dV system Parts Supplied Please see the table below for the list of parts supplied with the Vortex dV system Item Quantity Vortex dV test stand is supplied with a pre selected torque transducer 1 5 3 6 or 10 N m 1 AFTI gauge bracket for fitting an AFTI torque indicator to the column 1 Hex key for tightening ...

Page 10: ... illustrated in the image below shown within the red circle Fuse Specification A Vortex dV test stand uses two 2A Time delay T 5 x 20mm fuses If replacing a blown fuse only replace the fuse on the active side of the inlet filter with the fuse specified above or equivalent If you are in doubt please contact your local Mecmesin support agent for more information Attaching the Torque Sensor The torqu...

Page 11: ...axial load on the transducer Fitting the AFTI Torque Indicator The AFTI can be fitted to either the left or right hand of the test stand but it is important to ensure that the cable coming from the transducer points to the side that the gauge is mounted as this prevents any unnecessary kinking The fixing bracket can be easily fitted adjusted or removed and transferred to the opposite column using ...

Page 12: ...ket use the two supplied screws These pass through the bracket into the back of the gauge and are secured using a 4mm Hex key The angle the AFTI sits at can be adjusted by loosening the screw located on the side of the bracket 12 ...

Page 13: ... of the Vortex dV using the supplied cable part no 351 103 See Identifying the model of Voretx dV section for further connection details and images Note The gauge can also be run from the power supply provided rather than the internal batteries AFTI Communication Settings To achieve communication between your Vortex dV test system and your AFTI gauge you need to apply the correct settings within t...

Page 14: ... UNITS MENU ZERO DOWN RESET ENTER MAX ESC Press UNITS MENU once to continue to menu page 2 as shown in the image above Step 3 Scroll down using the ZERO DOWN button then press RESET ENTER to select the COMMS menu Step 4 14 ...

Page 15: ...Now press RESET ENTER on PORT Step 5 Set TX UNITS to ON press RESET ENTER to continue Step 6 15 ...

Page 16: ...Step 6 Set TX SIGN units to ON press RESET ENTER to continue Step 7 Set the baud rate to 115200 press RESET ENTER to continue 16 ...

Page 17: ...Step 8 Set CR LF press RESET ENTER to continue Step 9 Ensure the line delay is set to 0 press REST ENTER to continue 17 ...

Page 18: ...Step 10 Ensure the TX threshold is set to 0 press REST ENTER to continue Step 11 18 ...

Page 19: ... test stand to that computer Once the software is installed and the stand is connected the stand will show as connected This is shown in the image to the right Cable Management It is essential that no cables interfere with the controls or any moving parts Failure to do so could lead to injury or damage to the equipment Attaching Grips and Fixtures The most commonly used upper fixture used is the 1...

Page 20: ...ixing plates longer grip fingers mandrels and chucks Important Take care not to apply excess torque on the transducer when securing the fixtures Test Stand States The test stand can be in one of five states 1 Test readiness ready to start or complete 2 Testing test operation sequence is running 3 Stopped test interrupted or emergency stop pressed 4 Jog mode for jogging or positioning the crosshead...

Page 21: ...est do not restart a test ensure you remove any residual force using the test stand s jog controls Multi function Scroll Wheel Control Scroll Wheel Colours The lights surrounding the wheel illuminate in three colours indicating the status of the test stand Colour Status Indication Green Pulsating Ready to start a test Green Rotating Scrolling through menus Green Flashing Test completed Amber Stati...

Page 22: ...ntral scroll wheel button moves the test stand at its minimum speed this is useful when fitting specimens into grips for example Navigational Control The scroll wheel can also be used to navigate the menus When in a selection menu the scroll wheel cycles through the selections and their values This is an alternate navigational option to using the up and down arrow buttons Central Button The centra...

Page 23: ...Icons On screen icons vary depending on the current state of the test stand What functions the physical buttons perform at that point depends upon which menu is currently displayed Below are reference tables to help explain the icon definitions in relation to the test stand state Pre Test Icon Action No AFTI connected Start a test sequence Enable jog mode 23 ...

Page 24: ...the Play and Stop buttons will be displayed Stop test This will abort the current test running including the VectorPro software The status message is Test aborted and the Home and Exit buttons will be displayed Emergency stop button pushed Message Emergency Stop Release the emergency stop to regain control and remedy the situation before resuming testing Note there is no on screen icon for the eme...

Page 25: ...pressing the Stop button Exit to the test ready screen leaving the crosshead in its current position This icon is only visible after pressing the Stop button Jog Mode Icon Action Zero tare all system values Move the lower spindle in a clockwise direction at the set jog speed Move the lower spindle in a anti clockwise direction at the set jog speed Go back to the previous screen Settings Menu Icon ...

Page 26: ...ion or press the centre scroll wheel button Navigate up a menu selection or value or turn the wheel clockwise Navigate down a menu selection or value or turn the wheel anticlockwise Go back to the previous screen 26 ...

Page 27: ... Forces below the 25 limit will not activate the timeout and the stand will actively hold the load applied 1 to 59 minutes Clockwise Torque Limit Configure the clockwise torque limit while in jog mode 0 to 125 torque cell capacity Anticlockwise Torque Limit Configure the anticlockwise torque limit while in jog mode 0 to 125 torque cell capacity Tare AFTI Configure whether or not the AFTI is tared ...

Page 28: ... panel AFTI Control Test With an additional cable 351 092 or 351 103 a Mecmesin AFTI gauge can be used to set torque limits to control stand movement Torque setpoint action reverse stop are all set on the gauge under the STAND menu Here you can select the action when the limit is reached REVERSE or STOP and the type of control limit BREAK or LIMIT Please note for cyclic tests the front panel torqu...

Page 29: ...N m Cycle Count 10 The stand moves clockwise at 10 rev min until the applied torque is 2 N m from tared zero Once the limit torque is reached the stand moves anticlockwise at 20 rev min until a torque of 0 5 N m is reached this cycle repeats 10 times at which point the test stops Break Torque Cell Fitted 3 N m Clockwise Speed 2 rev min Anticlockwise Speed 30 rev min Start Direction Clockwise Test ...

Page 30: ...quence and Move to Start Vortex dV operations such as the half cycle consist of two datum points a clockwise angle and anticlockwise angle For operations with the primary movement being clockwise the following is true The Anticlockwise Angle is the start position for the test and the Clockwise Angle is the finishing position For operations with the primary movement being anticlockwise the followin...

Page 31: ...n confirmation you are returned to the settings menu in the language chosen Information This screen is used to display vital information relating to your Vortex dV and connected devices Here you can see hardware and firmware properties 31 ...

Page 32: ... stands will be supplied at an Interlock enabled level This means they are electrically and mechanically ready to use with a Mecmesin supplied guarding system All interlocked guarding for the Vortex dV is supplied as a PDV Product Design Variants This means they will be supplied as a additional item upon special request only Please contact your local Mecmesin sales representative or authorised dis...

Page 33: ...d energy can be present in the machine grips or sample under test and personal injury or damage can occur Allow the machine to complete the test sequence or stop the machine manually and safely remove any residual loading before attempting to open the guard and access the machine grips or sample under test Vortex dV Without PC Control When running a Vortex dV standalone without VectorPro Lite soft...

Page 34: ... mm 7 2 Maximum Headroom 505mm 19 9 448 mm 17 6 Weight 19 5 kg 48 lb Electrical Supply Voltage 230 V AC 50 Hz or 110 V AC 60 Hz Maximum Power Requirement 100W Torque Measurement Torque Accuracy 0 5 of full scale Torque Units mN m N m kgf cm lbf in ozf in as per AFTI units Environment Specification Operating Temperature 10 C 35 C 50 F 95 F Operating Relative Humidity Normal Industry and laboratory ...

Page 35: ...10 Dimensions Note Vortex dV Dimensions mm inch 35 ...

Page 36: ...ity for the Vortex dV click here Original instructions published in English language Mecmesin Ltd 2019 Patrick Collins Technical Director Mecmesin Contact us 44 0 1403 799979 info mecmesin com Newton House Spring Copse Business Park Slinfold West Sussex RH13 0SZ United Kingdom Mecmesin Ltd is a company registered in England and Wales company number 01302639 A PPT Holdings Company 36 ...

Reviews: