background image

NEED HELP:1-800-832-2966


21 


DC USAGE 


To connect 12 Volt batteries to the DC outlet: 

1.


Connect the red charging wire to the positive terminal of the battery and the black charging wire to the negative terminal of  the battery.  If charging in a 
vehicle, always disconnect the vehicle

s ground cable first.   

2.


Connect the plug end of the wire to the 12V DC outlet on this generator. 

3.


Start this generator. 

4.


When disconnecting, turn of the generator, and always disconnect the wires from this generator first to avoid the risk of a short circuit and spark. 


STOPPING THE GENERATOR 

To stop this generator: 

1.


Turn off all connected electrical devices and then unplug them. 

2.


Allow this generator to run for several more minutes with no electrical devices connected to help stabilize the temperature of this generator. 

3.


Turn off the engine switch. 


Turning Off Generators while in Parallel 

Function 


Summary of Contents for MM2000DFI

Page 1: ...uation that may occur We reserve the right to change this product at any time without prior notice IF THERE IS ANY QUESTION ABOUT A CONDITION BEING SAFE OR UNSAFE DO NOT OPERATE THIS PRODUCT DO NOT RETURN THIS GENERATOR TO THE RETAILER If you experience a problem have questions or need parts for this product please call Customer Service at 1 800 832 2966 Monday Friday 9 AM 6 PM Central Time A copy...

Page 2: ... smell the generator exhaust you are breathing CO But even if you cannot smell the exhaust you could be breathing CO CALIFORNIA PROPOSITION 65 WARNING This product or the exhaust from this product may contain chemicals known to the State of California to cause cancer birth defects or other reproductive harm For more information view OEHHA s Proposition 65 page https www p65warnings ca gov ...

Page 3: ...t Outlets Clean Sine Wave Power Output safe for Sensitive Electronics Model MM2000DFI This unit is a Dual Fuel Gasoline or Propane LPG powered Inverter generator FEATURES 2000 Surge 1600 Running Watts Output 120VAC Operation 3 0 HP Engine 4 Stroke 4650 RPM Displacement CC 79 7 Low Oil Shut Off UL Listed Electrical Components Engine Shut Off Switch Spark Plug Model Torch A7RTC or NGK CR7HSA 1 Gallo...

Page 4: ...Outlet 4 120V Outlets 1 120V RV Outlet Parallel Port Outlets Clean Sine Wave Power Output safe for Sensitive Electronics For all MECH MARVELS Generators in this Manual Recommended Fuel types Unleaded Gasoline Only with Octane rating of 87 or higher and no more than 10 Ethanol content Liquid Propane Gas commonly referred to as LP LPG and Propane High Altitude Use This generator is not recommended f...

Page 5: ...NERATOR 16 STARTING THE GENERATOR USING PROPANE 16 Switching from Gasoline to Propane 16 Switching from Propane to Gasoline 16 Subsequent Use of this Generator 17 USING THE GENERATOR 18 ECONOMY SMART THROTTLE SWITCH 20 AC PARALLEL TERMINALS 20 Turning Off Generators while in Parallel Function 21 DC USAGE 21 STOPPING THE GENERATOR 21 MAINTENANCE CARE 22 Recommended Maintenance Schedule 22 22 Cleani...

Page 6: ...dous situation which if not avoided will result in death or serious injury WARNING indicates a potentially hazardous situation which if not avoided could result in death or serious injury CAUTION indicates a potentially hazardous situation which if not avoided may result in minor or moderate injury CAUTION used without the safety alert symbol indicates a potentially hazardous situation which if no...

Page 7: ...ons to operate this generator High Temperatures This generator produces heat when in operation Temperatures near the exhaust can exceed 150 Fahrenheit 65 Celsius Do not touch hot surfaces Observe all warning placards on this generator denoting hot surfaces Allow this generator to cool for several minutes after use before touching the engine muffler or other areas that are hot during operation and ...

Page 8: ...al devices such as lights appliances or cell phones sparks from these sources can trigger an explosion or fire It can collect in low areas or travel along the ground where an ignition source may be present Pressure can also build up in the container due to heat and the container can rupture if the relief devices should fail to function Carbon Monoxide CO Carbon monoxide is a byproduct of combustio...

Page 9: ...NEED HELP 1 800 832 2966 9 In addition to the previously described safety information familiarize yourself with all safety and hazard notices on this generator ...

Page 10: ...66 Monday Friday 9 AM 6 PM Central Time for customer service DO NOT RETURN THIS GENERATOR TO THE RETAILER Item List Set of 2 DC connector wires for charging 12 Volt automotive type batteries Spark plug wrench Funnel for adding Oil T Handle Driver MM2000I DFI Sockets MM2000I DFI Phillips screwdriver MM2000I DFI 5 Ft Regulator Hose Kit Dual Fuel Units only YOU MUST USE THE SUPPLIED REGULATOR FOR SAF...

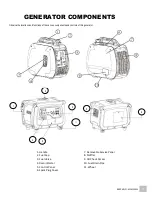
Page 11: ...ocations and functions of the various components and controls of this generator 1 Handle 7 Removable Service Panel 2 Fuel Cap 8 Muffler 3 Fuel Valve 9 Oil Check Access 4 Recoil Starter 10 Fuel Drain Pipe 5 Control Panel 11 Wheel 6 Spark Plug Cover 1 11 6 9 8 5 4 2 ...

Page 12: ...NEED HELP 1 800 832 2966 12 Control Panel Detail MM3000ISE Panel Shown ...

Page 13: ...generator contains no oil in the engine crankcase Add the correct quantity of oil before operating this generator for the first time When replenishing oil for subsequent use of this generator always ensure that this generator has the correct quantity of oil Model MM2000I DFI Oil Capacity 13 5 ounces Model MM3000ISE Oil Capacity 18 6 ounces Oil Type Recommended for All Models High Detergent Motor O...

Page 14: ...RCE Step 3 Ground the Generator Ground this generator by tightening the grounding nut against a grounding wire as illustrated in Figure 3 Number 6 AWG American Wire Gauge stranded copper wire is generally an acceptable grounding wire The other end of this grounding wire should be connected to a copper or brass grounding rod that is driven into the earth Grounding codes can vary by location Contact...

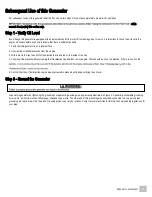
Page 15: ... CHOKE VALVE is at CHOKE CLOSED position The generator may be hard to start if CHOKE VALVE is at the RUN OPEN position Step 3 Ensure engine oil is full Step 4 Make sure GROUND TERMINAL is properly grounded Step 5 Check AC OUTPUTS and ensure no load is connected Disconnect all electrical loads from the generator set before starting the engine The generator may be hard to start if a load is connecte...

Page 16: ...ot connect any electrical devices to the generator prior to starting the engine 1 Make sure the fuel valve is in the OFF position 2 Make certain the propane hose is properly connected to the generator 3 Connect the regulator to the LPG fuel supply and open the LPG supply valve ENSURE THERE ARE NO LEAKS 4 Leave the unit un choked unless temperatures are below freezing 5 Turn the engine power switch...

Page 17: ...he oil off of the dipstick that is located on the inside of the cap 4 Fully insert the dipstick without screwing the filler dipstick cap and then remove again There should be oil on the dipstick If there is no oil on the g Add 5 Confirm that the oil filler dipstick cap is properly screwed in place when finished verifying the oil level Step 3 Ground the Generator Ground this generator by tightening...

Page 18: ...If the total wattage of the selected de vices exceeds the rated wattage of the generator DO NOT connect all of the devices Select a combination of the electrical devices that will have a total wattage less than or equal to the rated wattage for the generator SOME NOTES ABOUT POWER CORDS Long or thin cords can require more wattage from a generator to power an electrical device Figure 7 shows the re...

Page 19: ... 1500 0 sump pump 800 1200 television 27 inch color 500 0 electric water heater 40 gallon 4000 0 window air conditioner 10000 BTU 1200 1800 window fan 300 600 Figure 8 Estimated wattage requirements for common electrical devices Connect electrical devices to this generator according to the following procedure 1 Allow the engine to run for several minutes after it has been started 2 Confirm that th...

Page 20: ...r the left or right ports NOTE Do not connect disconnect cables while the generator is running The generator or the load may be damaged NOTE Only connect two identical Inverter Generators together using a Parallel Kit Before connecting an appliance to a generator make sure that the appliance is in good working order and that its electrical rating does not exceed that of the outlet Most appliances ...

Page 21: ...he 12V DC outlet on this generator 3 Start this generator 4 When disconnecting turn of the generator and always disconnect the wires from this generator first to avoid the risk of a short circuit and spark STOPPING THE GENERATOR To stop this generator 1 Turn off all connected electrical devices and then unplug them 2 Allow this generator to run for several more minutes with no electrical devices c...

Page 22: ...ecommended Maintenance Schedule Each Use Every Month or Each 20 Hrs Every 3 Months or Each 50 Hrs Every 6 Months or Each 100 Hrs Every Year or Each 300 Hrs Engine Oil Check Level X Change X First Use X Air Filter Check X Clean X Fuel Filter Clean X Spark Plug Check Clean X Spark Arrestor Clean X Valve Clearance Check Adjust X Fuel Lines Check Replace Check and Replace as needed every 2 years Clean...

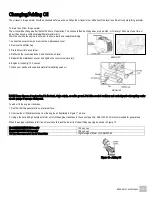
Page 23: ...the cover screw securely 6 Engine oil capacity 13 5 ounces 7 Wash your hands with soap and water after handling used oil NOTE Never dispose of used motor oil in the trash down a drain or on the ground Put oil in a sealed container and contact your local recycling center or auto garage to arrange oil disposal To add oil to the engine crankcase 1 Confirm that this generator is on a level surface 2 U...

Page 24: ...NEED HELP 1 800 832 2966 24 Recommended plug NGK CR7HSA 0 60 0 80mm 0 024 0 031in Fig 15A Fig 15B Fig 15C Fig 15D ...

Page 25: ...s cracked or chipped Clean the spark plug with a wire brush if it is to be reused 6 Measure the plug gap with a feeler gauge The gap should be 0 78 0 94mm 0 031 0 037 Correct as necessary by carefully bending the side electrode Fig 15C 7 Install the spark plug carefully by hand to avoid cross threading 8 After a new spark plug has been seated by hand it should be tightened 1 2 turn with a wrench t...

Page 26: ...gasoline into a suitable container by the fuel drain pipe c When all the fuel is drained tum the petcock to the OFF position and tighten the drain screw securely 3 Change the engine oil 4 Remove the spark plug and pour about a table spoon of clean engine oil into the cylinder Crank the engine several revolutions to distribute the oil the reinstall the spark plug 5 Reinstall the spark plug cap on t...

Page 27: ... 27 TROUBLESHOOTING 8 32 Be sure that there is no fuel spilled around the spark plug spilled fuel may ignite Does not spark Consult authorized service center Consult authorized service center See specifications in Maintenance ...

Page 28: ...C 8A 1 120VAC RV 1 5VDC USB 1 5VDC USB 1 12VDC 12A 1 5VDC USB Net Gross Weight 46 7 50 7lbs 47 2 52 7lbs 133 4 142 0lbs Noise Level 53dB 53dB 65dB Fuel Types Gasoline Gasoline Gasoline LPG 20lb cylinder Fuel Capacity 1gal 1gal 3 35gal Fuel Gauge Yes Yes Yes Oil Type SAE 10W 30 SAE 10W 30 SAE 10W 30 Oil Capacity 13 5 ounces 13 5 ounces 18 6 ounces Starter Type Recoil Recoil Recoil Electric AC Volt ...

Page 29: ...ny part that is proven to be defective in materials or workmanship under normal use during the 1 YEAR warranty period Warranty repairs or replacements will be made without charge for parts or labor Parts replaced during warranty repairs will be considered as part of the original product and will have the same warranty period as the original product This warranty gives you specific legal rights and...

Page 30: ...ove Any such part repaired or replaced under warranty will be warranted for the remaining warranty period 3 Any warranted part that is scheduled for replacement as required maintenance in your owner s manual is warranted for the period of time before the first scheduled replacement date for that part If the part fails before the first scheduled replacement the part will be repaired or replaced by ...

Page 31: ...pipe manifold b Air cleaner 3 Ignition system including a Spark plug b Ignition coil 4 Catalytic muffler assembly including a Muffler gasket b Exhaust manifold c Catalytic converter if available 5 Crankcase breather assembly including a Breather connection tube 6 Fuel tank evaporative emissions control system including a Purge valves b Carbon canister c Canister mounting brackets d Fuel cap e Fuel...
Reviews: