background image

ASSEMBLE YOUR TRIPOD

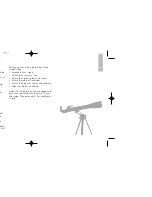
The tripod is the basic support for your
telescope. Its height may be adjusted so 
that you can view comfortably.

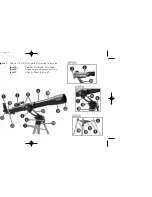
Note: Number in brackets, e.g., (3), refer 
to Fig. 1.

1. Spread the legs out evenly apart.
2. Set the height of your tripod unlock the

leg lock (20).

3. Slide leg (19) in or out to the desired

length

4. Tighten the leg

lock (20) to
relock the leg
lock.

5. Repeat for the

other two legs.

ATTACH THE
ACCESSORY TRAY

The tray helps stabilize the tripod and is also
a convenient holder of eyepieces and other
Meade accessories, such as the Barlow lens. 
1. Place the accessory tray (17) over the

center of the leg brace supports (8).

2. Rotate the tray so it fits onto the central

lock. See Inset B.

3. Rotate the tray, locking the corners of the

tray in place on the leg brace supports.

ATTACH THE OPTICAL TUBE TO THE MOUNT

The optical tube gathers distant light which
is focused in the eyepiece.
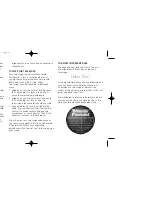
1. Remove the two lock knobs (11) from the

optical tube.

2. Slide the altitude rod into the hole in the

altitude adjustment control . Tighten to a
firm feel. See Fig. 2.

3. Place the optical tube (4) onto the

mounting bracket Fig. 2.

4. Thread a lock knob (11) onto each of the

mounting screws and tighten to a firm
feel. See Fig. 2.

ATTACH THE RED DOT VIEWFINDER

An eyepiece (1) has a narrow field of
view. A viewfinder (2) has a wider
field of view, which makes it easier to
locate objects. The red dot viewfinder
has a red dot to make it easier to line up
more precisely with a target.
1. Note the red dot viewfinder (2) has a

quick release mounting bracket (18).

2. Slide the red dot viewfinder (2) into the

mounting bracket as shown on Fig. 3.

Note:

To

detach the
bracket press
the bracket
quick release
button and
slide the
bracket out.

ATTACH THE DIAGONAL MIRROR AND
EYEPIECE

The diagonal mirror reflects the light from
the optical tube to a more comfortable
viewing position.
1. Slide the diagonal mirror (13) into the

focuser drawtube(15).

3

Inset B

Fig. 2

Fig. 3

Telestar RB-70.qxd  10/15/08  3:23 PM  Page 5

Summary of Contents for TELESTAR RB-70

Page 1: ...N MANUAL fracting Telescope RB 70 M Page 1...

Page 2: ...M Page 2...

Page 3: ...tripod Attach the accessory tray Attach the optical tube to the mount Attach the red dot viewfinder Attach the diagonal mirror and eyepiece Align the red dot viewfinder Study the the picture on the ne...

Page 4: ...igure 1 Telestar 70 RB Altazimuth Refracting Telescope Inset A Red Dot Viewfinder Assembly Inset B Tripod Legs and Accessory Tray Inset C Altaz or Azimuth Mount Inset C Inset B Inset A M Page 4...

Page 5: ...See Fig 2 ATTACH THE RED DOT VIEWFINDER An eyepiece 1 has a narrow field of view A viewfinder 2 has a wider field of view which makes it easier to locate objects The red dot viewfinder has a red dot t...

Page 6: ...to make smooth and precise movements as you follow or track an object as it moves in the eyepiece You will enjoy your telescope even more as you learn more about it But don t be scared off by difficu...

Page 7: ...y when you wish to move the telescope in very small fine control steps Observe the Moon When you feel comfortable with the viewfinder the eyepieces the locks and the adjustment controls you will be re...

Page 8: ...tem Our Sun by the way is a single yellow dwarf star It is average as far as stars go and is a middle aged star f on e e s r er Beyond the planets are clouds of comets icy planetoids and other debris...

Page 9: ...ace of Saturn its ring structure will steal your breath away You will probably be able to see a black opening in the rings known as the Cassini band Saturn is not the only planet that has rings but it...

Page 10: ...with your scope Nebula means cloud Most nebulas are clouds of gas The two easiest to see in the Northern Hemisphere are the Orion nebula during the winter and the Triffid nebula during the summer Thes...

Page 11: ...s the power of your telescope See Fig 6 Meade offers a complete line of eyepieces for your telescope Most astronomers have four or five low power and high power eyepieces to view different objects and...

Page 12: ...rve Planets and other objects viewed low on the horizon often lack sharp ness the same object when observed higher in the sky will appear sharper and of g a n ent tar have greater contrast Try reducin...

Page 13: ...az Other mounting configurations are available for other telescopes such as equatorial mounting USE THE SPECIFICATIONS TO CALCULATE THE MAGNIFICATION OF YOUR EYEPIECE The power of a telescope is how...

Page 14: ...aintenance Follow these guidelines to keep your telescope in the best condition Avoid cleaning the telescope s lenses A little dust on the front surface of the telescope s correcting lens will not cau...

Page 15: ...or eries n a of an re 13 TY ies l nd M Page 15...

Page 16: ...med or where depreciation of the product is due to normal wear and tear Meade specifically disclaims special indirect or consequential damages or lost profit which may result from a breach of this war...

Page 17: ...ENT GOOD POOR DRAWING OF IMAGE SAVE ORIGINAL BE SURE TO MAKE COPIES RVATION LOG M Page 17...

Page 18: ...ENT GOOD POOR DRAWING OF IMAGE RVATION LOG M Page 18...

Page 19: ...M Page 19...

Page 20: ...www meade com Meade Instruments Corporation 6001 Oak Canyon Irvine California 92618 0 626 3233 M Page 20...

Reviews: