background image

13

4.

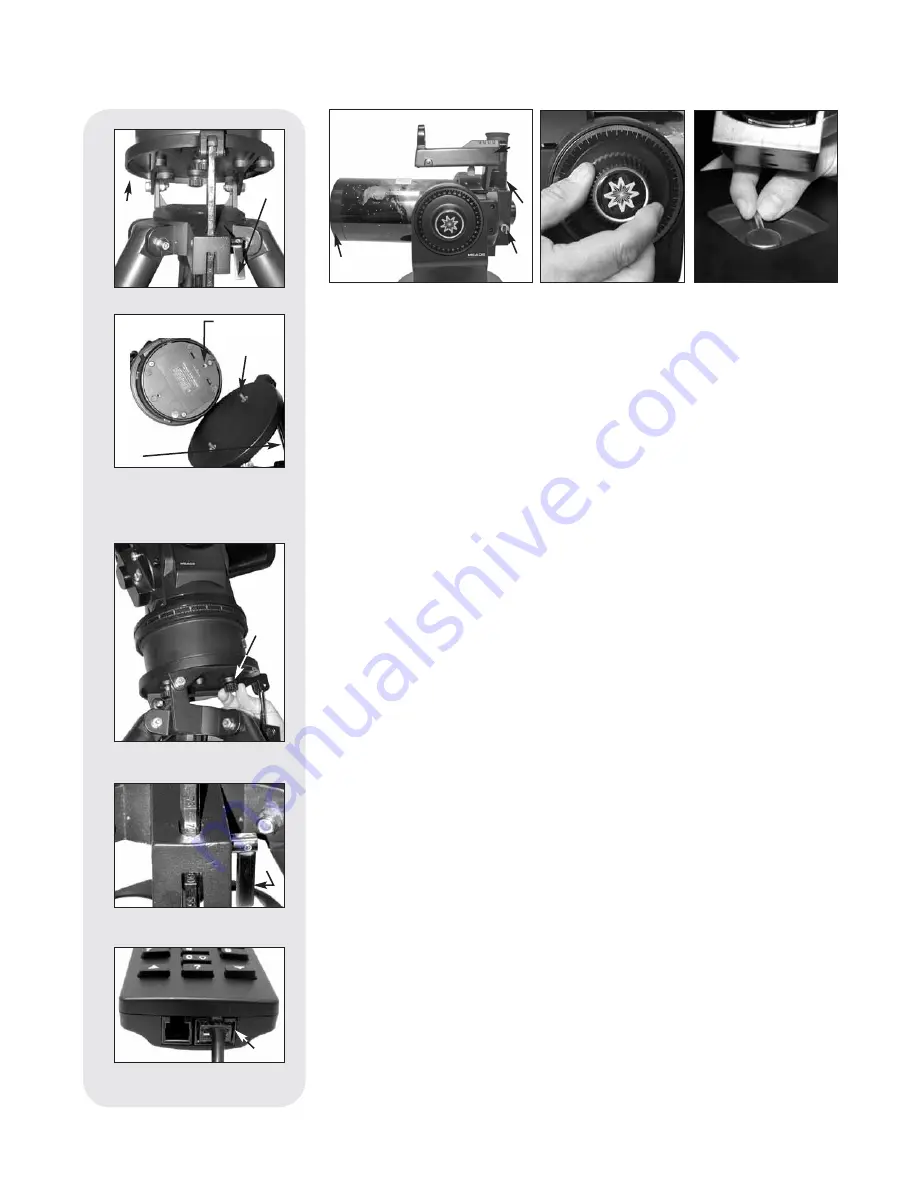
Place the 26mm eyepiece (12, Fig. 15) into the eyepiece holder on the 
telescope and tighten the attachment thumbscrew (13, Fig. 15, not visible in
photo
) to a "firm feel" only. Make sure that the flip-mirror control (14, Fig. 15) is in
the “up” position, as shown in the above photo. See page 8, for more information.
Remove the dust cover (15, Fig. 15) from the end of the telescope tube.

5.

Make sure that the computer control panel power switch (A, Fig. 2) is in the OFF
position. Remove the AutoStar handbox and the coiled cord from the packing
materials. Plug one end of the cord into the HBX port (C, Fig. 2)and the other
end of the coiled cord into the coiled cord port at the bottom of AutoStar hand-
box, as shown above.

6.

Tighten (to a "firm feel" only, do not overtighten) the vertical lock (Fig. 16) and the
horizontal lock (Fig. 17).  

Using SmartFinder

As with most astronomical telescopes, an eyepieces presents a narrow field of view
to the observer. As a result it is sometimes difficult to locate objects just using your
eyepiece. The SmartFinder has a projected red dot that helps you to locate objects
as you move your telescope. 

To turn on SmartFinder’s red dot (continuous, without blinking):

1. Press and hold MODE for two seconds. R.A and Dec. coordinates display.
2. Keep pressing the Scroll Down key until “Finder Set: Set” displays. 
3. Press ENTER. “Finder Set: Intensity” displays.
4. Press the Scroll Down key.  “Finder: Blink On” displays.
5. Press ENTER. A time value, in seconds, displays. For example, “00.5” may 

display. “00.5” is the amount of time, in seconds, that the red dot will blink

“on.”    

(For this example, you may select or enter any value except “00.0.”) Press 
ENTER.

6. Press the Scroll Down key.  “Finder: Blink Off” displays. 
7. Press ENTER. Use the Number keys to enter “00.0” or press the Scroll Down   

key until “00.0” displays. “00.0” is the amount of time in seconds that the 
red dot will remain “off.” This value, along with the value you chose in the 
“Finder: Blink On” menu, allows the red dot to remain on without blinking. 
“00.0” means there is no “off” time, so the dot will remain on continuously, 
without blinking.

8. Use these menus to set other blink rates. For example, If you select “00.1” in 

the Blink Off menu, and “00.2” in the Blink On menu, the red dot will blink on 
for .2 seconds and then blink off for .1 second, and then repeat the cycle until 

you change the values again.

9. Press and hold MODE to exit this function. 

Aligning SmartFinder

In order for the SmartFinder to be useful, it must first be aligned with the main tele-
scope, so that both the SmartFinder and the main telescope are pointing at 
precisely the same location. To align the SmartFinder:

1. Point the main telescope at some well-defined distant (perhaps a mile away) land

object, such as a telephone pole or sign. Center the object, as precisely as

Fig. 12: 

Attach telescope to 

tripod.

Fig. 11: 

High latitude leg

mounting hole and 
corresponding attachment
knob.

Fig. 10: 

Loosen control latch .

Fig. 15: 

Insert eyepiece.

Fig. 16: 

Tighten vertical

lock.

Fig. 17: 

Tighten horizontal

lock.

Fig. 13: 

Level tilt-plate.

Fig. 14: 

Handbox HBX port.

Premium ETX_without 105.qxd  1/27/09  12:33 PM  Page 13

Summary of Contents for ETX series AutoStar

Page 1: ...Instruction Manual ETX Premier Edition Telescope Series AutoStar LNT SmartFinder ...

Page 2: ......

Page 3: ...o Track a Star When Polar Mounted 51 Polar Alignment Modes Locating Celestial Pole 52 Setting Circles 53 Appendix B Latitude Chart 54 Appendix C Training the Drive 55 Appendix D Changing the LNT Module Battery 56 Appendix E Basic Astronomy 57 CONTENTS WARNING Never use a Meade ETX PE Telescope to look at the Sun Looking at or near the Sun will cause instant and irreversible damage to your eye Eye ...

Page 4: ...ube Remove the ETX telescope from its packaging and place it on a sturdy surface Place the ETX on its side and remove the battery compartment cover A from the under side of the drive base Insert eight user supplied AA size batteries into the battery compartment B oriented as shown in the battery compartment Replace the cover and return the telescope to an upright position if you wish to attach the...

Page 5: ...ite options in the Setup menu to change this information See pages 27 and 29 for more information Sight along the side of the telescope s main tube to locate an object If you wish to learn how to align the telescope s SmartFinder see page 13 Use the telescope s focus knob L to bring the object into focus If you wish to learn more about observing with AutoStar and other features of your telescope s...

Page 6: ...ob 9 Horizontal R A Lock 10 Computer Control Panel A ON OFF Switch B Auxiliary Ports 2 C Handbox Port D 12v E LED 11 Base Housing 12 Battery Compartment bottom of base 13 Right Ascension R A Horizontal Setting Circle 14 Flip Mirror Control Knobs 15 Photo Port 16 Declination Dec Vertical Setting Circle 17 SmartFinder Alignment Screws 18 LNT Module 19 Dust Cap 1 5 17 17 2 6 10 10 A B B C D E 11 12 9...

Page 7: ... clockwise to a firm feel only prevents the telescope from being moved manually and engages the vertical motor drive clutch for AutoStar operation When polar aligned the vertical lock serves as the Declination or Dec lock Note The vertical lock knob is a knurled knob located on the fork arm to the right of the focus knob 8 Fig 1b Mounted beneath the knob is a cir cular scale without numbers Do not...

Page 8: ...ig 3b light proceeds straight out the photo port for photography See PHOTOGRAPHY page 39 Note The flip mirror control is in the up position when the control is vertical perpendicular to the telescope tube To place the flip mirror in the down position turn the control until it is horizontal 1 Photo Port Attach any 35mm camera with a removable lens to this port using an optional 64ST T Adapter or at...

Page 9: ...he year Download the latest satellite data guided tours and software revisions directly from the Meade website www meade com and share software with other AutoStar enthusiasts Requires optional 505 AstroFinder Cable Connector Kit See OPTIONAL ACCESSORIES page 42 Access a glossary of astronomical terms Calculate which eyepiece to use for optimum viewing of a celestial object AutoStar provides contr...

Page 10: ...ity displays 4 Press the Scroll Down key h Finder Blink On displays 5 Press ENTER b A time value in seconds displays For example 00 5 may display 00 5 one half second is the amount of time in seconds that the red dot will blink on 6 Use the Number keys g and the Arrow keys f to change the time value For example you may wish to change the amount of time the red dot stays on to 10 2 seconds Press 1 ...

Page 11: ...access details of AutoStar functions in the Help feature The Help system is essentially an on screen instruction manual If you have a question about an AutoStar operation e g INITIALIZATION ALIGN MENT etc press the key and follow the directions that scroll on the second line When satisfied with the Help provided press MODE to return to the original screen and continue with the chosen procedure j R...

Page 12: ...Tripod Step a Spread the tripod 1 Fig 6 legs apart to a fully open position Step b Slide the spreader tray 2 Fig 7 onto the central threaded rod Fig 8 Step c Thread the tension knob 3 Fig 7 onto the threaded rod Tighten the tension knob to a firm feel Step d Adjust the height of the tripod by loosening the leg lock knobs 4 Fig 9 and adjusting the height of the inner leg extensions Then retighten t...

Page 13: ...s ENTER A time value in seconds displays For example 00 5 may display 00 5 is the amount of time in seconds that the red dot will blink on For this example you may select or enter any value except 00 0 Press ENTER 6 Press the Scroll Down key Finder Blink Off displays 7 Press ENTER Use the Number keys to enter 00 0 or press the Scroll Down key until 00 0 displays 00 0 is the amount of time in secon...

Page 14: ... the ETX models the focal length is compressed by the telescope s secondary mirror so that a long focal length is housed in the short ETX optical tube For example the ETX 90PE s focal length is 1250mm or about 49 This means that if the ETX 90PE were a classical refracting type of telescope the optical tube would be more than four feet long instead of the ETX 90PE s compact 11 tube length Eyepiece ...

Page 15: ...ON position A copyright message lights on AutoStar s LCD display followed by a warning not to look at the Sun Press the AutoStar key prompted by the message when you are done reading See page 9 to 11 for more information about AutoStar s keys 4 A Getting Started message displays Press ENTER to skip this message 5 AutoStar then displays Location Option 1 Zipcode 2 City This option allows you to cho...

Page 16: ...ods and adds a depth to the view No shadows are seen during a full Moon making the overly bright surface appear flat and rather uninteresting Try using a neutral density Moon filter when observing the Moon Not only does it cut down the Moon s bright glare but it also enhances contrast providing a more dramatic image To Track an Object Automatically As the Earth rotates beneath the night sky the st...

Page 17: ...etecting these positions This make take a minute or two 6 Once the level tilt and North are detected the telescope will Go To 2 alignment stars The telescope will go to these stars in order to orient itself to the sky Once it has done this it will be able to point to any of the more than 30 000 stars in its data base Automatic Alignment Selecting Star and Slewing display Finally when it is close t...

Page 18: ...ar to align upon 7 The telescope now slews to the second alignment star AutoStar displays Center Brightest Star Press ENTER displays Use the Arrow keys to center the alignment star in the eyepiece When the second alignment star is centered press ENTER 8 Alignment successful displays If Alignment Unsuccessful displays perform the procedure over again 9 After you align the telescope Press 0 for Tour...

Page 19: ...osition 4 The AutoStar screen displays a copyright message followed by a short beep Then AutoStar takes a few moments to start up the system 5 A message displays that warns not to look at the Sun At the end of this message press the key prompted by AutoStar to signify that the message has been read and understood 6 The Getting Started menu displays a scrolling message Press ENTER 2 Fig 4 to bypass...

Page 20: ...into AutoStar are traveled each press of the MODE key moves up a level until the top level Select Item is reached Once Select Item displays press MODE to return to the topmost level Select Item Object AutoStar Navigation Exercise To demonstrate how the AutoStar menu structure works the following exercise calculates Sunset time so an evening observing session can be planned Note To perform an accur...

Page 21: ...l Down key once to display the Sunset option in the Event menu 5 Press the ENTER key to choose the Sunset option and move down another level 6 AutoStar calculates the Sunset time based on the current date time and location AutoStar then displays the results of the calculation 7 Press MODE once to start moving back up through the AutoStar levels The first level up is the Event menu 8 Press MODE aga...

Page 22: ... Z Timer Set Start Stop Alarm Set On Off Eyepiece Calc Field of View Magnification Suggest Display Options Sun Warning Getting Started Brightness Adj Contrast Adj Beep Battery Alarm Landmark Survey Sleep Scope Park Scope Cord Wrap Align Easy One Star Two Star Date Time Daylight Saving Telescope Telescope Model Focal Length Az RA Ratio Alt Dec Ratio Mount Az RA Percent Alt Dec Percent Train Drive T...

Page 23: ...use the Scroll keys to scroll through the constellation list 2 Press ENTER to select a constellation and to display the coordinates of the con stellation Press one of the Scroll keys and information about the constellation will scroll across the display screen 3 Press GO TO to display the list of stars in the constellation Use the Scroll keys to scroll through the list of stars in the constellatio...

Page 24: ...ate and time of the next Full New 1st Quarter and 3rd Quarter Moon Meteor Showers provides information on upcoming meteor showers such as the Perseids the Leonids etc Also lists the dates of the showers and when they reach maximum Note Meteors are fast moving objects that cover large areas of the sky and are usually best observed with the naked eye Solar Eclipse lists upcoming Solar Eclipses inclu...

Page 25: ...Star beeps Press ENTER to deactivate the alarm Eyepiece Calc calculates information about an eyepiece for the specific telescope to which AutoStar is connected Field of View Scroll through a list of available eyepieces When an eyepiece is selected the field of view is calculated Magnification Scroll through a list of available eyepieces When an eyepiece is selected the magnification is calculated ...

Page 26: ...ich follows the AM and PM options Daylight Saving is used to enable or disable Daylight Savings time Note Daylight Savings Time may be referred to by different names in various areas of the world Check local time to verify Telescope accesses the several options including Model Allows you to select the telescope model connected to AutoStar Focal Length Displays the focal length of the selected tele...

Page 27: ... the telescope For example you might begin to track the satellite at 15 altitude instead of 5 See OBSERVING SATELLITES page 30 for more information about satellites Calibrate Motor If the telescope motors appear to have a problem use this option to retest the motors before performing a Reset This option is also used if an AutoStar unit is moved between telescopes to match AutoStar to the new tel e...

Page 28: ... to another AutoStar Statistics provides basic statistical data about AutoStar including Characters Free Shows how much room is available in user defined object memory Version Shows the current version of the AutoStar software Reset completely resets AutoStar Most values entered into the menus revert to factory defaults AutoStar requires initialization again after a Reset before proceeding with ob...

Page 29: ...lable on most maps 1 Using the Add option choose a site on the list that is closest to your observing site and press ENTER so that the site is added to your observing sites list Choosing a site already on the list as opposed to using the Custom feature makes it easier to edit as the Time Zone value may not need to be changed 2 Scroll to Site Edit and press ENTER Edit Name displays Press ENTER 3 Th...

Page 30: ...Object Select displays Press the Scroll Down key once User Object Add displays Press ENTER 5 Name displays on the top line and a blinking cursor on the second line Use the Arrow keys as previously described to enter the name of the object you wish to add to the database When you are finished press ENTER 6 Right Asc 00 00 0 displays Use the Number keys to enter the digits for the Right Ascension co...

Page 31: ...Star If orbital parameters are more than one month old the satellite pass may not happen at the time predicted by AutoStar Downloading requires the optional 505 AstroFinder Software and Cable Connector Kit See OPTIONAL ACCESSORIES page 42 Note Satellite observing is an exciting challenge Most satellites are in low orbit travelling at approximately 17 500 mph When visible they move quickly across t...

Page 32: ...ELL PLANET MOON SATELLITE ASTEROID COMET LUNAR ECLIPSE METEOR SHOWER DEEP SKY CONSTELLATION STAR LANDMARK DEFINE PICK ONE PICK END AUTO SLEW ON OFF END Description String Description of an object Must be surrounded by quotation marks If the description is longer than one line each line must end with a quotation mark and a hard return Begin the next description line with a quotation mark If quotati...

Page 33: ... the user with a description of the selected planet from its database For example PLANET Pluto MOON This command accesses information about the Moon from the AutoStar database SATELLITE name Enter SATELLITE and then the name of the desired satellite in quotes AutoStar displays information about the satellite from its database For example SATELLITE Intl Space Stn ASTEROID name Enter ASTEROID and th...

Page 34: ... clusters visible at this time PICK END AUTO SLEW ON AUTO SLEW OFF With AUTO SLEW ON enabled in the tour AutoStar automatically slews the telescope to objects first before displaying the text description This feature is useful when designing tours in which observing certain objects is required For example an astronomy professor may require his students to observe six objects four of which AutoStar...

Page 35: ... to add more landmarks repeat steps 5 through 7 To Select a landmark from the database 1 Make sure the telescope is located and aligned exactly as when the desired landmark was entered into memory 2 Display the Landmark Select menu option Press ENTER 3 Use the Scroll keys to scroll through the list of objects you have previously entered When the desired object displays press ENTER to select the ob...

Page 36: ... necessary tighten the telescope s vertical lock 6 Fig 1b Unlock the horizontal lock 9 Fig 1a This will allow you to rotate the telescope tube and fork arm assembly Grasp the telescope by a fork arm and rotate the telescope counterclockwise until it stops Fig 29a Turn the telescope clockwise about a quarter of a turn Fig 29b until a fork arm is directly over the computer control panel Fig 29c Re l...

Page 37: ...t PEC Train from the Smart Drive menu in the Setup Telescope menu and press ENTER Want to learn more about Parking your telescope See page 26 ETX TIPS Observing Considerations Try to pick an observing site away from street and house lights and car headlights While this is not always possible the darker the site the better Give your eyes about ten minutes to adjust to the darkness before observing ...

Page 38: ... mins and a value displays Using the Number keys enter a size in arc minutes AutoStar will search for objects up to this size and no larger Press ENTER 5 Edit Parameters Largest mins displays again Press the Scroll Down key Edit Parameters Smallest mins displays Enter the value for the smallest size of an object that AutoStar will search for in the database Continue with Brightest Faintest and Min...

Page 39: ...izes only the short section of the 64 T Adapter to permit close coupling of a camera body to the telescope In this format vignetting will occur the photographic image will appear on film with a slight darkening at the corners of the 35mm frame see Fig 32a Format 2 Camera Body T Mount Sections 1 and 2 of the 64 T Adapter see Fig 30 ETX 90PE 1450mm at f 16 ETX 125PE 2310mm at f 18 Format 2 utilizes ...

Page 40: ...y through an ETX model is sensitive to heat waves rising from the Earth s surface Long distance photography is best accomplished in the early morning hours before the earth has had time to build up heat 6 Photography of the Moon and planets through an ETX model can be especially gratifying but points 1 through 4 should be particularly noted in this case Lunar or planetary photography requires that...

Page 41: ... The AutoStar Suite with Meade LPI Lunar Planetary Imager or Meade Deep Sky Imager turns your Meade ETX telescope AutoStar and PC into even more powerful and easy to use astronomical instrument LPI Fig 34 and Deep Sky Imager Fig 33 combine the power of an electronic astronomical imager with the simplicity of a web cam Check out the following imag er features Achieve great results the first time ou...

Page 42: ...the widest obtainable fields of view at high powers and are well suited for observing the Moon and planets other eyepieces are available in this series Powers obtained with each eyepiece are shown in the following table 126 2x Barlow Lens An amplifying lens the multi coated 126 2x Barlow Fig 36 doubles the power of all eyepieces with which it is used Insert the 126 into the telescope s eyepiece ho...

Page 43: ...uter Controller 887 Advanced Field Tripod for the ETX 125PE For extra stability in sensitive appli cations of the ETX 125PE even at the highest magnifications the fixed height 887 Tripod permits either altazimuth or equatorial orientation of the telescope for astro nomical or terrestrial observing The 887 includes an equatorial wedge for polar align ment The tripod s 2 diameter steel legs collapse...

Page 44: ...tainly scratch the mirror surface Note When cleaning the inside surface of the correcting lens leave the lens mounted in its metal cell throughout the process Do not remove the lens from its metal housing or optical alignment of the lens will be lost necessitating a return of the telescope to the Meade factory 5 If your ETX model is used outdoors on a humid night telescope surfaces may accumulate ...

Page 45: ...or light on the telescope does not come on or there is no response when pressing the AutoStar Arrow keys Verify that the Computer Control panel power switch A Fig 2 is in the ON position Verify that the AutoStar coil cord is firmly connected to the HBX port C Fig 2 If using internal power batteries verify that the batteries are installed correctly and that they have sufficient charge see HOW TO AS...

Page 46: ...o pass without notice The optics within the telescope need time to adjust to the outside ambient temperature to provide the sharpest image To cool down the optics set the telescope outside for 10 to 15 minutes before observing begins Telescope moves off a terrestrial object while observing Verify that the vertical and horizontal locks are tight see TELESCOPE FEATURES page 6 Telescope does not move...

Page 47: ... dia 27 9mm 1 1 9 6 Telescope mounting fork type double tine Setting circle diameters Dec 3 5 R A 7 SmartFinder Red dot projected onto finder s lens LNT Module High accuracy temperature compensated oscillator updatable using Meade s optional ATUM accessory Input voltage 12 volts DC Motor Drive System DC servo motors with encoders both axes Bearings Altitude UHMW polyethylene Azimuth PTFE Materials...

Page 48: ...ction dia 39 4mm 1 6 9 6 Telescope mounting fork type double tine Setting circle diameters Dec 4 3 R A 9 SmartFinder Red dot projected onto finder s lens LNT Module High accuracy temperature compensated oscillator updatable using Meade s optional ATUM accessory Input voltage 12 volts DC Motor Drive System DC servo motors with encoders both axes Bearings Altitude ball bearings Azimuth ball bearings...

Page 49: ...relating to astronomy Try the following key word searches NASA Hubble HST astronomy Messier satellite nebula black hole variable stars etc Check Meade s website for the latest product and technical information You can download the latest software revisions links to other astronomical sites coordinates of celestial objects and the latest satellite tracking information for your AutoStar handbox See ...

Page 50: ... on a 24 hour clock similar to how Earth s time zones are determined by longitude lines The zero line was arbitrarily chosen to pass through the constellation Pegasus a sort of cosmic Greenwich merid ian R A coordinates range from 0hr 0min 0sec to 23hr 59min 59sec There are 24 primary lines of R A located at 15 degree intervals along the celestial equator Objects located further and further East o...

Page 51: ...tripod head Retighten the latch 6 If you have not already done so orient the tripod leg see Step 3 and 5 Fig 48 so that it is pointing due North if the location of Polaris the North Star is known point the telescope directly at Polaris Observers located in the Earth s Southern Hemisphere must point the telescope due South 7 The telescope is now equatorially mounted the tripod must not be moved or ...

Page 52: ... AutoStar based on the date time and location First choose Polar from the Setup Telescope Mount menu The rest of the procedure is identical to the Alt Az AUTOMATIC ALIGNMENT page 17 One Star Polar Alignment Polar One Star Alignment requires some knowledge of the night sky AutoStar provides a database of bright stars and one star from this database is chosen by the observer for alignment Polaris is...

Page 53: ...aligned It is advisable that the motor drive be turned on and that a low power eyepiece e g a 26mm eyepiece be employed Then use the following procedure 1 Identify the celestial coordinates R A and Dec of a bright easy to find object such as a bright star Avoid using Polaris or any object near Polaris Coordinates of bright stars are listed in astronomy magazines text books or star charts Center th...

Page 54: ...w York New York 41 N Oklahoma City Oklahoma 35 N Ottawa Ontario 45 N Philadelphia Pennsylvania 40 N Phoenix Arizona 33 N Portland Oregon 46 N Salt Lake City Utah 41 N San Antonio Texas 29 N San Diego California 33 N San Francisco California 38 N Seattle Washington 47 N Washington District of Columbia 39 N EUROPE City Country Latitude Amsterdam Netherlands 52 N Athens Greece 38 N Bern Switzerland 4...

Page 55: ...stronomy If you are interested in pursuing further studies in astronomy a few topics are suggested below that are worth reading up on some of the topics are easy and some are quite challenging Try looking up some of these in the AutoStar glossary Also included below is a small sampling of books magazines and organizations that you might find helpful Topics 1 How is a star born How does a solar sys...

Page 56: ... and slide the spring between between the top and bottom sections The spring should line up with the mounting holes for the side long bolt Slide the long bolt through the side hole then through the spring and finally through the bottom of the LNT Module and tighten to a firm feel 9 Next you will need to recalibrate the LNT Module sensors Select Calibrate Sensors from the Setup Telescope menu A scr...

Page 57: ...nd metal but something far more a window of incredible discovery AutoStar Glossary Be sure to make use of AutoStar s Glossary feature The Glossary menu provides an alphabetical listing of definitions and descriptions of common astronomical terms Access directly through the Glossary menu or through hypertext words embedded in AutoStar See GLOSSARY MENU page 24 for more information The Moon The Moon...

Page 58: ...pears as a small round disk with rings extending out from either side In 1610 Galileo the first person to observe Saturn through a telescope did not understand that what he was seeing were rings Instead he believed that Saturn had ears Saturn s rings are composed of billions of ice particles The major division in Saturn s rings called the Cassini Division is generally visible through all three ETX...

Page 59: ......

Page 60: ...product or part a Return Goods Authorization RGA number must be obtained from Meade by writing or calling 800 626 3233 Each returned part or product must include a written statement detailing the nature of the claimed defect as well as the owner s name address and phone number This warranty is not valid in cases where the product has been abused or mishandled where unauthorized repairs have been a...

Reviews: