- 3 -
- 4 -
15
16
17
18
19
20
21
22
23
24
25
26
27
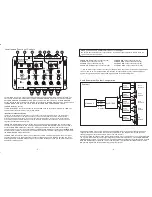
Location and Function of Controls
15 LOW BOOST control: Frequencies around 40Hz can be boosted at the maximum of 10dB. You
can choose whether the low boost works towards SUB WOOFER output only or it works towards
both SUB WOOFER and REAR outputs. When you want to make it work only for SUB WOOFER
output, set the switch located on the left side of the control to the SUB ONLY position. Set the switch
to SUB & REAR when you make it work towards both SUB WOOFER and REAR outputs.
16 REAR MID CUT control
*Q factor of resonant circuits
In general, Q represents the sharpness of a resonant circuit filter. The lower the Q, the more slowly
the signal level changes as the applied frequency is moved away from resonance. As contrasted
with this, the higher the Q, The more quickly the signal level changes. In this unit, the Q represents a
mid cut frequency bandwidth. When you set the Q switch to a higher value position, the narrower the
frequency bandwidth will be selected.
17 FRONT MID CUT control: Frequencies around 180Hz can be cut at the maximum of 10dB. You
can also select Q factor value (1,3,6) with Q switch.
18 SUB WOOFER INPUT selector : When you connect the head unit with the sub woofer output
connector, set the selector to ON. The input signal from the SUB WOOFER input connector flows
out to the SUB WOOFER output connector. When you use the unit without sub woofer output
connector (when your unit is connected to only FRONT and REAR input connectors of the
MLX-1000
),
set the selector to OFF. In this case, the summation of the front and rear input signals is output from
the SUB WOOFER output connector.
19 FRONT INPUT selector : When you set this selector t ON, the input signal from the Front input
connectors flows out to the Front output connector. When you set it to the OFF position, the Front
output signal is to be the REAR input signal. If your head unit has only one pre amplifier output, set
he selector to OFF position.
When you do not use Sub-Woofer Input or Front Input
Be sure to set the Sub woofer Input selector or the Front Input selector to OFF. Otherwise,
the unit may not function well.
20 SUB WOOFER input connectors (L/R)
21 REAR input connectors (L/R)
22 FRONT input connectors (L/R)
23 SUB WOOFER output connectors (L/R)
*** Pre amplifier output connection that your head unit has, the number of the power amplifier you
can use, and so on. For details on the combination of input selectors, refer to the examples of
system configuration shown in the following pages and to the block diagram.
MLX-1000
24 REAR MID output connectors (L/R)
25 REAR HIGH output connectors (L/R)
26 FRONT MID output connectors (L/R)
27 FRONT HIGH output connectors (L/R)
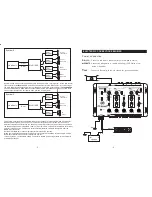
Head unit
Front
Rear
Sub-
woofer
Front
tweeters
Rear
tweeters
Front
woofers
Rear
woofers
Sub
woofers
System 1
Some Example of System Configuration
This example shows the system which has five power amplifiers, two pairs of tweeters and mid
ranges mounted in the front and rear, and two sub woofers. The head unit employed here has
three pre amplifier output connectors (front, rear, sub woofer).
Even if your head unit has only two pre amplifier outputs (front, rear), however, you can incorporate
the unit into this system. When incorporating two pre amplifier outputs unit, set the SUB WOOFER
INPUT selector to the OFF position. You will get the summation of the front and rear signals from the
SUB WOOFER output of the MLX 1000. In the of system 1, set the FRONT INPUT selector to the
ON position regardless of the number of pre amplifier output.


