background image

13

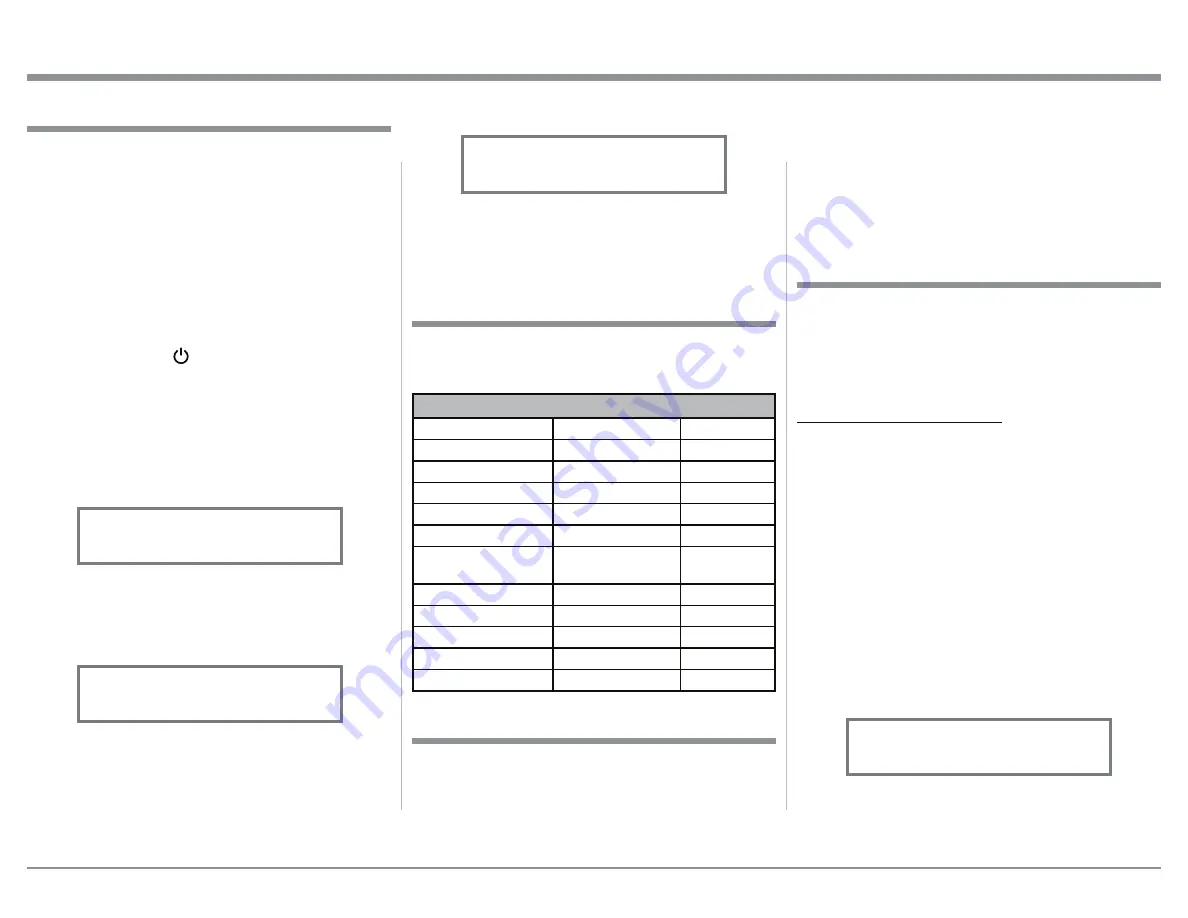
7RH[LWIURPWKH6(7830RGHSUHVVDQGKROGLQ

the INPUT Control and the Front Panel Display 
will revert back to its normal display. Refer to 
figure 1.

<RXU0F,QWRVK&KDVEHHQIDFWRU\FRQILJXUHGIRU

default operating settings that will allow immediate 
enjoyment of superb audio without the need for fur-
ther adjustments. If you wish to make changes to the 

IDFWRU\GHIDXOWVHWWLQJVD6HWXS)HDWXUHLVSURYLGHGWR

customize the operating settings using the Front Panel 
Information Display. Refer to the C47 Front Panel Il-
lustration on the previous page while performing the 
following steps.

Note: If the C47 is currently On, proceed to step 2.

3UHVVWKH67$1'%<213XVKEXWWRQRQWKH)URQW

3DQHORUSUHVVWKH3RZHU213XVKEXWWRQRQ

the Remote Control to switch On the C47. The 
C47 will go through a brief startup initialization 
with the Front Panel Information Display indicat-
ing the last used source and volume setting. This is 
followed by the volume setting indication starting 
at zero and then increasing to the last used volume 
setting. Refer to figure 1.

2. Press and hold in the INPUT Control until the 

Front Panel Information Display indicates “C47, 

9BBB61$(+BBBB´RUKLJKHU)LUPZDUH
YHUVLRQ5HIHUWRILJXUH

5RWDWHWKH,1387&RQWUROWRVHOHFWWKHQH[W6HWXS

0RGH0HQXLWHP³6(783,QSXWV+ROG,1

-

3875HIHUWRILJXUH&RQWLQXHWRURWDWHWKH
,1387&21752/WRYLHZWKHRWKHU6(783
0RGH2SWLRQV

The C47 functionality is controlled by internal soft-
ware that is know as Firmware. The Version of the 
Firmware in the C47 can be identified at any time by 

XWLOL]LQJWKH6HWXS0RGH

How to Operate the Setup Mode

7KH'HIDXOW6HWWLQJV&KDUWEHORZLQGLFDWHVWKH)XQF

-

WLRQ1DPH'HIDXOW6HWWLQJDQGWKH3DJH1XPEHUIRU

additional information.

Default Settings

Firmware Version

Default Settings

Function Name

Setting

Page No.

C47

V_._ _ - _._

13

,13876

On / Rename

13

2873876 

6ZLWFKHG

15

TRIGGER 1

Output 1

16

TRIGGER 2

Output 2

16

'$7$32576
WKUX

All Data

16

3$667+58

OFF

17

565DWH

115200 Baud

17

Remote Control Codes

Normal

17

,56HQVRU

Enabled

17

3RZHU0RGH

Enabled

17

Setup

Figure 2

   C47     V1.00

   S/N:  AEH____

Figure 1

  INPUT: BAL 1

        15%

The C47 provides the ability to switch unused IN-

38762IIRUEDFN2QLIWKH\KDYHEHHQSUHYLRXVO\
VZLWFKHG2II7KHGHIDXOW,13871DPHVFDQEH

changed to match the name of the component con-
nected to it or any other custom name desired (within 

&KDUDFWHUV
,13876:,7&+('212))
,QWKHIROORZLQJH[DPSOHWKH81%$/,QSXWZLOOEH

switched Off.

Note: When an INPUT is swiched Off, its name will 

no longer appear on the Front Panel Informa-
tion Display when using the INPUT Control 
(Front Panel or Remote Control).

1. Press and hold in the INPUT Control to enter the 

6(78302'(5HIHUWRILJXUH

5RWDWHWKH,1387&RQWUROXQWLO³6(783,QSXWV

+ROG,1387DSSHDUVRQWKH,QIRUPDWLRQ'LVSOD\

Refer to figure 3.

3UHVVDQGKROGLQWKH,1387&RQWUROXQWLO³6(7

-

UP:  _______, On / Rename” appears on the 
Display. If necessary rotate the INPUT Control to 

VHOHFWWKH81%$/,QSXW5HIHUWRILJXUH

7RVZLWFKWKH81%$/,QSXW2IIURWDWHWKH

92/80(&RQWUROXQWLOWKHGLVSOD\LQGLFDWHV

Input Settings

1. Press and hold in the INPUT Control to enter 

6HWXS0RGH

2. Referring to the Front Panel Information Display-

the number after the character “V” is the Firm-
ware number. Refer to figure 2.

7RH[LWWKH6HWXS0RGHSUHVVWKH,1387&RQWURO

Figure 3

 SETUP: Inputs

    (Hold INPUT)

Figure 4

 SETUP:  UNBAL 3

   On / Rename

Summary of Contents for C47

Page 1: ...McIntosh Laboratory Inc 2 Chambers Street Binghamton New York 13903 2699 Phone 607 723 3512 www mcintoshlabs com C47 Audio Preamplifier Owner s Manual ...

Page 2: ...hen the apparatus has been dam aged in any way such as power supply cord or plug is damaged liquid has been spilled or objects have fallen into the apparatus the apparatus has been exposed to rain or moisture does not operate normally or has been dropped 15 Do not expose this equipment to dripping or splashing DQG HQVXUH WKDW QR REMHFWV OOHG ZLWK OLTXLGV VXFK DV vases are placed on the equipment 1...

Page 3: ... SXUFKDVH GDWH DQG 0F QWRVK HDOHU name are important to you for possible insurance claim or future service The spaces below have been provided for you to record that information 6HULDO 1XPEHU _______________________________ Purchase Date _______________________________ Dealer Name ________________________________ 6DIHW QVWUXFWLRQV 2 7KDQN RX DQG 3OHDVH 7DNH D 0RPHQW 3 7HFKQLFDO VVLVWDQFH DQG XVWRP...

Page 4: ...is active and communication is occurring between them 3 Balanced and Unbalanced Inputs and Outputs can be mixed For example you may connect signal sources to Unbalanced Inputs and send signals from the Balanced Outputs You can also use Bal anced and Unbalanced Outputs simultaneously connected to different Power Amplifiers 4 The C47 internal Digital to Analog Converter LUFXLWU LV GHVLJQHG WR GHFRGH...

Page 5: ...OHG WWHQXDWRU 6 VWHP ZLWK DQ 2SWL cal Encoder Rotary Control This assures a 0 1dB tracking accuracy between channels There are 214 individual 0 5dB volume level steps with no noise as the volume level is changed 9DULDEOH 5DWH 9ROXPH DQG DODQFH RQWUROV The C47 Preamplifier s Volume and Balance Control Circuitry provides an ideal rate of change with control rotation 7RQH RQWUROV The Bass and Treble ...

Page 6: ...al information on the next page pertaining to installing the C47 into cabinets 17 1 2 44 4cm 13 1 4 33 7cm 17 1 8 43 5cm 3 16 0 48cm 13 16 2 1cm 10 9 16 26 8cm 14 1 2 36 8cm 2 5 1cm 1 15 16 4 9cm Front View of the C47 Rear View of the C47 Side View of the C47 6 15 2cm 5 3 8 13 7cm 4 5 8 11 8cm 4 13 16 12 22cm 16 1 2 41 9cm ...

Page 7: ...can be a definite asset in maintaining all the system components at the coolest possible operating temperature A custom cabinet installation should provide the following minimum spacing dimensions for cool operation OORZ DW OHDVW LQFKHV FP DERYH WKH WRS LQFKHV FP EHORZ WKH ERWWRP DQG LQFK FP on each side of the Preamplifier so that airflow is not REVWUXFWHG OORZ LQFKHV FP GHSWK EHKLQG WKH IURQW SD...

Page 8: ...cated on the separate folded sheets Mc1A 1B and Mc2A are an example of a typical audio system Your system may vary from this however the actual components would be connected in a similar manner For additional information refer to Connector and Cable Information on page 4 Notes 1 The C47 allows renaming of the Audio Inputs Names as indicated on the Front Panel Infor mation Display Example UNBAL 1 m...

Page 9: ...QDO 6HQVRU RU DGGLWLRQDO information refer to General Information note 8 on page 4 Audio Connections RQQHFW DQ XGLR DEOH IURP WKH 81 1 1387 7XQHU DFNV WR WKH 7XQHU Unbalanced Output Jacks 15 Using the DIN Cable Twisted Pair cable sup SOLHG ZLWK D 0 7 7UDQVSRUW IURP WKH 0 7 7 8 2 1387 FRQQHFWRU WR WKH 6 CD Transport DIN Output connector RQQHFW DQ 5 XGLR DEOH IURP WKH 1 1387 FRQQHFWRUV WR WKH 0HGLD ...

Page 10: ... QWRVK 0RGHOV GLVSOD LQJ instructions on a video screen Press to change broadcast bands on a FRQQHFWHG 7XQHU 6HOHFW FHUWDLQ IXQFWLRQV RQ D YDULHW RI 0F QWRVK 0RGHOV 6HOHFW WKH 9 WR LVVXH D UHPRWH control command to LUHFW DFFHVV WR VWRUHG 7XQHU 35 6 76 ZKHQ XVHG ZLWK WKH QXPHULF 3XVK EXWWRQV WKUX Press the Trim Push button and then the 9 2 1 3XVK EXWWRQ WR VHOHFW DQG adjust various functions INFO i...

Page 11: ...itional information on assigning the Data Ports refer to How to Setup on page 16 Trim 3UHVV WKH 75 0 3XVK EXWWRQ XQWLO WKH GHVLUHG 7ULP IXQFWLRQ DODQFH 7ULP HYHO HWF DSSHDUV RQ WKH URQW 3DQHO LVSOD WKHQ SUHVV WKH 9 8S RU Down Push button to adjust the Trim setting Note Press the TRIM Push button to recall the last Trim function selected For additional information on using the Trim Functions refer ...

Page 12: ...Q PXWHV WKH DXGLR IURP WKH RXG speakers and Headphones INPUT Control used to select a source for listening and recording The control LV DOVR XVHG WR HQWHU WKH 75 0 RU 6 783 0RGHV DQG VHOHFW WKH YDULRXV IXQFWLRQV OUTPUT 1 and 2 Push buttons with indicators switch the Preamplifier Outputs 1 and 2 On or Off 1 250 7 21 63 LQGLFDWHV WKH 6RXUFHV 9ROXPH RWKHU XGLR 6HWWLQJV 2SHUDWLRQDO XQFWLRQV DQG 6HWXS ...

Page 13: ...H How to Operate the Setup Mode 7KH HIDXOW 6HWWLQJV KDUW EHORZ LQGLFDWHV WKH XQF WLRQ 1DPH HIDXOW 6HWWLQJ DQG WKH 3DJH 1XPEHU IRU additional information Default Settings Firmware Version Default Settings Function Name Setting Page No C47 V_ _ _ _ _ 13 13876 On Rename 13 2873876 6ZLWFKHG 15 TRIGGER 1 Output 1 16 TRIGGER 2 Output 2 16 7 32576 WKUX All Data 16 3 667 58 OFF 17 56 5DWH 115200 Baud 17 R...

Page 14: ...DWH WKH 92 80 RQWURO XQWLO WKH GLVSOD LQGLFDWHV 6 783 81 2Q 5HQDPH 5HIHU WR ILJXUH RQ page 13 LW WKH 6 783 0RGH E VHYHUDO SUHVVHV RI WKH INPUT Control 5 1 0 1387 Q WKH IROORZLQJ H DPSOH WKH 1 QSXW ZLOO EH UHQDPHG WR PDWFK XS ZLWK WKH FRPSR QHQW FRQQHFWHG UHIHU WR SDJH VWHS 7KH HIDXOW QSXW 1DPHV 81 2 HWF DV LQGLFDWHG RQ WKH URQW 3DQHO LV play can be customized to a different name up to ten FKDUDFWH...

Page 15: ...JH 5RWDWH WKH 1387 RQWURO XQWLO 6 783 2XW SXWV ROG 1387 DSSHDUV RQ WKH QIRUPDWLRQ Display Refer to figure 21 3 Press and hold in the INPUT Control until 6 783 287387 6ZLWFKHG DSSHDUV RQ WKH Display Refer to figure 22 5RWDWH WKH 92 80 867 RQWURO WR FKDQJH IURP WKH 6ZLWFKHG VHWWLQJ WR 8QVZLWFKHG Refer to figure 23 5 In a similar manner perform steps 3 and 4 to change the OUTPUT 2 setting Refer to fi...

Page 16: ...Refer to figure 31 5 In a similar manner perform steps 3 and 4 to change the Trigger 2 setting from OUTPUT 2 to 0DLQ 5HIHU WR ILJXUH DQG ILJXUH Figure 29 SETUP Triggers Hold INPUT Figure 31 SETUP TRIGGER 1 Main Figure 30 SETUP TRIGGER 1 Output 1 Figure 32 SETUP TRIGGER 2 Output 2 Figure 33 SETUP TRIGGER 2 Input Figure 34 SETUP TRIGGER 2 Bal 1 OFF Figure 35 SETUP TRIGGER 2 Bal 1 ON Data Ports DWD 3...

Page 17: ... RQ SDJH 5RWDWH WKH 1387 RQWURO XQWLO 6 783 56 115200 Baud appears on the Information Dis play Refer to figure 41 5RWDWH WKH 92 80 867 RQWURO WR VHOHFW WKH GHVLUHG DXG 5DWH 6SHHG LW WKH 6 783 0RGH E VHYHUDO SUHVVHV RI WKH INPUT Control Setup con t Comm Port Baud Rate SETUP Passthru BAL 2 Figure 40 SETUP Passthru Off Figure 39 Passthru Figure 41 SETUP RS232 115200 Baud Remote Control Codes The Remo...

Page 18: ... H WHUQDO 5 6HQVRU LV FRQQHFWHG 7R GH DFWLYDWH WKH URQW 3DQHO 5 6HQVRU perform the following steps 1 Press and hold in the INPUT Control to enter the 6 783 02 5HIHU WR ILJXUH RQ SDJH 5RWDWH WKH 1387 RQWURO XQWLO 6 783 URQW IR Enabled appears on the Information Dis play Refer to figure 44 5RWDWH WKH 92 80 867 RQWURO WR VHOHFW Disabled Refer to figure 45 LW WKH 6 783 0RGH E VHYHUDO SUHVVHV RI WKH IN...

Page 19: ...19 Notes ...

Page 20: ...ast used volume setting Refer to figures 60 61 62 and 63 To switch OFF the C47 press WKH 67 1 21 3XVK EXWWRQ RQ WKH URQW 3DQHO RU the OFF Push button on the Remote Control Note For an explanation of the Remote Control Push button functions refer to pages 10 and 11 Source Selection Rotate the INPUT Control to select the desired source or press the INPUT UpS or DownT Push button on the Remote Contro...

Page 21: ...H WKH YROXPH level of the low frequencies The Front Panel Display indicates the Bass changes in steps from 12dB to 12dB After approximately VHFRQGV WKH LVSOD UHWXUQV WR LQGLFDWH WKH 6RXUFH 6HOHFWLRQ DQG 9ROXPH HYHO WKH HIW KDQQHO UHIHU WR ILJXUH The Front Panel Display indicates the Balance changes are from 0 to 50dB After approximately 4 seconds WKH QIRUPDWLRQ LVSOD UHWXUQV WR LQGLFDWH WKH 6RXUFH...

Page 22: ...XUUHQWO VHOHFWHG QSXW 6RXUFH 7KH above the TONE Push button will be illuminated When the Tone Controls are Disabled the previous settings for Treble and Bass are bypassed from the signal path To deactivate Tone Controls perform the following 6HOHFW WKH GHVLUHG QSXW 6RXUFH 3UHVV WKH 75 0 3XVK EXWWRQ RQ WKH 5HPRWH RQ WURO XQWLO 721 21752 6 QDEOHG DSSHDUV on the Front Panel Display Refer to figure 76...

Page 23: ...Push button will illuminate To E SDVV WKH 721 21752 5 8 75 IRU WKH FXUUHQWO VHOHFWHG QSXW 6RXUFH SUHVV WKH 721 3XVK EXWWRQ 7KH DERYH WKH 48 5 3XVK EXWWRQ will extinguish Refer to figure 60 The C47 remembers for each selected Input whether the Tone Control Circuitry is active or bypassed Note The audio signal present at the FIXED OUT Jacks is unaffected by the Equalizer Circuitry Output 1 and 2 Pre...

Page 24: ...s com us Support Pages Manuals aspx Under PRODUCT CATEGORY select Pre DPSOLILHUV WKHQ XQGHU 02 180 5 VHOHFW OLFN RQ 6 5 WKHQ VHOHFW 0F QWRVK 86 XGLR LQGRZV ULYH Y DQG GRZQORDG the PC Windows Driver Follow the instructions below WR LQVWDOO WKH 0F QWRVK ULYHU Purpose 7R QVWDOO WKH 0F QWRVK 86 XGLR LQGRZV ULYHU IRU XVH ZLWK 0F QWRVK 3URGXFWV ZLWK DQ 86 LJLWDO Audio Input Requirements 1 A PC Computer ...

Page 25: ...0 USB Connection RQQHFW WKH 86 DEOH ZLWK 7 SH WR Type B connectors between the PC Computer and the 0F QWRVK 3URGXFW ZLWK WKH 86 LJLWDO XGLR QSXW Q FRQ ZLOO DSSHDU 2Q 6FUHHQ LQGLFDWLQJ LQGRZV has found new hardware Refer to figure 101 Upon completion of installing the driver figure 102 will appear Windows Sound Settings RU SURSHU RSHUDWLRQ RI WKH 0F QWRVK 3URGXFW YLD WKH RPSXWHU 86 RQQHFWLRQ LW LV ...

Page 26: ...D LVF IRU WKH LQFRPLQJ 6 LJLWDO XGLR 6LJQDO 7KH 6DPSOLQJ 5DWH DQG WKH LW 5DWH DUH GHWHUPLQHG E the original recording the Application Output Format ZKHQ DYDLODEOH DQG WKH 0F QWRVK RQWURO 3DQHO 6HWWLQJV Note In general when the original music is recorded at a higher Sampling Rate the result is usually more detail in the music However this higher rate results in consuming larger amounts of stor age ...

Page 27: ...27 How to Operate the C47 con t 7R VZLWFK WKH EDFN 2Q SUHVV WKH 67 1 ON Push button Note This can be performed with the C47 On or in the Standby Mode ...

Page 28: ...28 ...

Page 29: ...29 Photos ...

Page 30: ... ohms Balanced HDGSKRQH RDG PSHGDQFH 100 ohms to 600 ohms Digital Input Sample Rates 2SWLFDO 3 0 LW LW N WR N RD LDO 3 0 LW LW N WR N 0 7 3 0 6 LW LW N WR N 86 3 0 LW LW LW N WR N DXD DXD352 8kHz DXD384kHz 6 6 6 6 Power Control and Trigger Output 12VDC 25mA Power Requirements Field AC Voltage conversion of the C47 is not pos sible The C47 is factory configured for one of the following AC Voltages ...

Page 31: ...ipping damage Use the original shipping carton and interior parts only if they are all in good serviceable condition If D VKLSSLQJ FDUWRQ RU DQ RI WKH LQWHULRU SDUW V DUH QHHGHG SOHDVH FDOO RU ZULWH XVWRPHU 6HUYLFH HSDUW PHQW RI 0F QWRVK DERUDWRU 5HIHU WR SDJH 3OHDVH VHH WKH 3DUW LVW IRU WKH FRUUHFW SDUW QXPEHUV 4XDQWLW Part Number Description 6KLSSLQJ FDUWRQ RQO 4 033837 End cap 1 033836 Inside c...

Page 32: ...ucts is the policy of McIntosh Laboratory Incorporated who reserve the right to improve design without notice Printed in the U S A McIntosh Laboratory Inc 2 Chambers Street Binghamton NY 13903 www mcintoshlabs com McIntosh Part No 04157700 ...

Page 33: ...McIntosh Laboratory Inc 2 Chambers Street Binghamton New York 13903 2699 Phone 607 723 3512 www mcintoshlabs com HR085 Learning Guide ...

Page 34: ... Codes for the HR085 Remote Con trol This Alternate Control Code is to be used when there are two McIntosh Models A V Control Center Integrated Amplifier or Preamplifier in the same location at the same time This will prevent the HR085 Remote Control from adversely affecting the opera tion of the units Refer to figure 1 when performing the steps below Note Refer to the Setup Section of the Owner s...

Page 35: ... for about 4 seconds and the LED will flash twice This indicates the HR085 Remote Control is in the Programming Mode Immediately press the following number Push buttons 9 1 0 0 4 Press and hold in one of the Push buttons on the Other Brand Remote 5 One or more of the DEVICE LEDs on the HR085 All of the Push buttons on the HR085 Remote Control except for the DEVICE Push button may be used to store ...

Page 36: ...lize the Normal Remote Control Codes a few models utilize the Al ternate Remote Control Codes To change the HR085 from Normal page 1 to Alternate page 2 Control Codes perform the following step 1 Press and hold the SELECT and number 2 Push buttons simultaneously for about 8 seconds until the Device Select LED flashes twice To change the HR085 back to the Normal Control Codes perform the following ...

Page 37: ...93H 21 14H 94H 9 D A 14H 94H PRESET REC MONITOR 14H 94H 22 15H 95H SETUP MM 15H 95H 23 16H 96H 0 MC 16H 96H 24 17H 97H AM AUX 17H 97H PWROFF AUX 17H 97H FM AUX Note 1 17H 97H 25 LEFT 18H 98H 26 UP 19H 99H 27 RIGHT 1AH 9AH 28 DOWN 1BH 9BH 29 SELECT 1CH 9CH 30 1DH 9DH INFO INFO 1DH 9DH INFO INFO 1DH 9DH INFO INFO 1DH 9DH 31 1EH 9EH GUIDE DISP 1EH 9EH GUIDE DISP 1EH 9EH GUIDE DISP 1EH 9EH 32 1FH 9FH ...

Page 38: ...ucts is the policy of McIntosh Laboratory Incorporated who reserve the right to improve design without notice Printed in the U S A McIntosh Laboratory Inc 2 Chambers Street Binghamton NY 13903 www mcintoshlabs com McIntosh Part No 04161301 ...

Page 39: ... of SACDs when paired with the McIntosh MCT450 SACD CDTransport Headphone Crossfeed Director HXD brings lifelike depth and spatiality to your music for your personal listening enjoyment HomeTheater PassThrough allows for seamless integration into your existing multi channel home theater system Incorporates classic McIntosh design cues including a black glass front panel knobs illuminated logo and ...

Page 40: ...he C47 Stereo Preamplifier Your Authorized Dealer can provide additional information on other McIntosh product combinations To learn more please call us at 1 800 538 6576 35103900 Frequency Response 0 0 5dB from 20Hz to 20kHz 0 3 0dB from 10Hz to 100kHz Total Harmonic Distortion 0 003 maximum from 20Hz to 20kHz Signal to Noise Ratio High Level 100dB Rated OutputVoltage Balanced 5 Vrms Unbalanced 2...

Page 41: ...ss or phone number shown on the back of this warranty Please note that this is the only Warranty which McIntosh provides for your Product and that no one including your dealer has any authority to either modify or expand upon this Warranty If your dealer has offered or made any warranties or representations concerning the Product which differ from those contained in this Warranty they are strictly...

Page 42: ...damages so the foregoing exclusions may not apply to you Parts and Occurrences that are not Covered by the Warranty This Warranty does not cover any of the following a glass panels cabinetry trim or other appearance items except where they are defective at the time of original sale and the Product is delivered for UHSDLU ZLWKLQ WKH UVW WKLUW GD V WKHUHDIWHU E EDWWHULHV RU GDPDJH WR WKH 3URGXFW FDX...

Reviews: