background image

14

Input Trim Level

Various Source Components can have slightly different vol-
ume levels. This could result in the readjustment of the C46
Volume Control when changing Inputs. The C46 allows the
adjustment of input volume levels for each source. The
Tuner and CD Inputs are used in the following example.

Notes: The Trim range of adjustment in volume level is ± 6dB

and is retained in permanent memory until a change is
made. The Tuner Input Volume Level can serve as a
reference or choose another Input. The reference Input
Source should be set to a Trim Level of 0.0. The Tape/
VCR Output Levels are uneffected by any changes in
the Trim Settings.

1. Rotate the LISTEN Control to select the Tuner Input

and adjust the VOLUME Control to the desired listen-
ing level.

2. Press the SETUP Push-button to access the Setup

Mode.

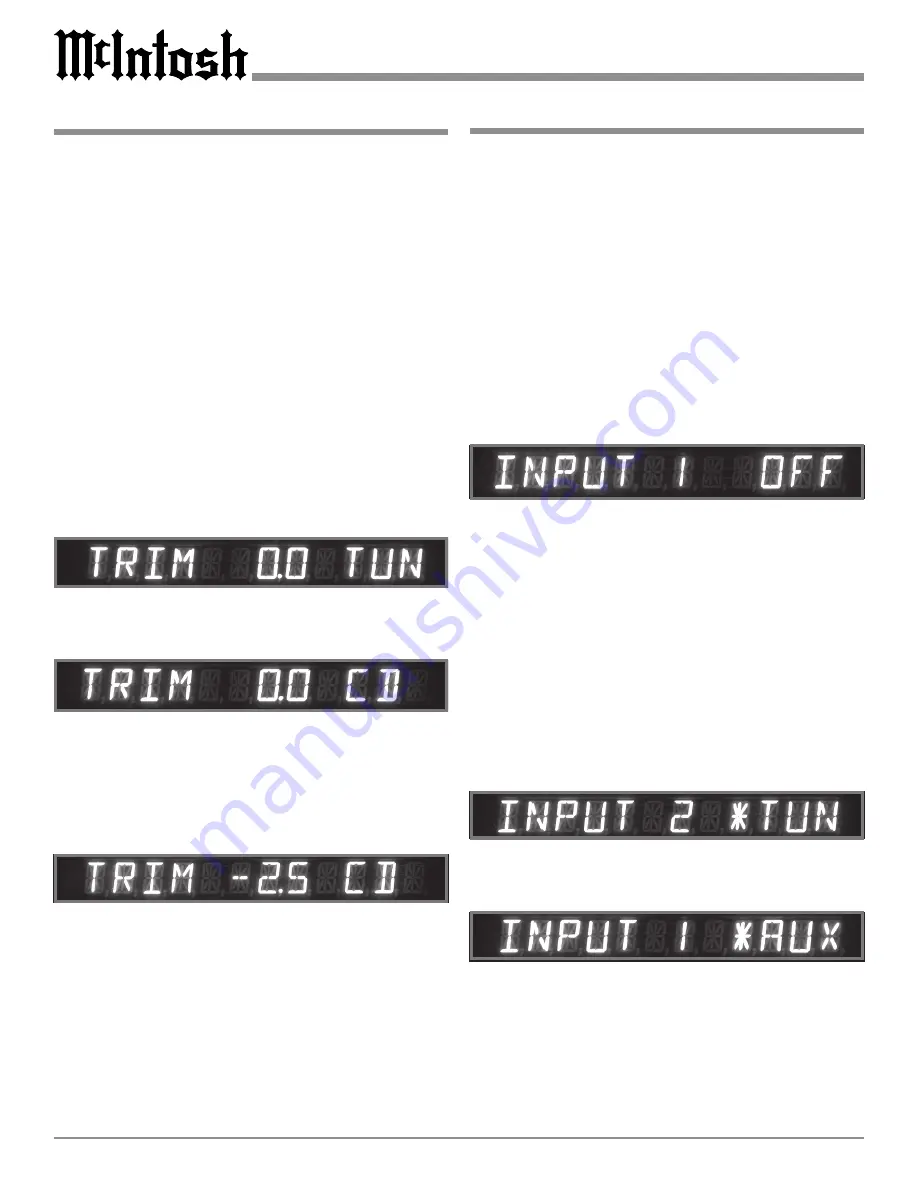
3. Rotate the BALANCE (Menu) Control until the words

TRIM  0.0  TUN appears. Refer to figure 7.

Note: If the Tuner Trim Level is not 0.0 then rotate the

VOLUME Control until it is.

4. Rotate the LISTEN Control until the words TRIM  0.0

CD appears. Refer to figure 8.

5. Rotate the VOLUME Control or the Remote Control

Trim Level Push-buttons, until the Volume Level of the
CD Input is the same as the Tuner Volume Level. Refer
to figure 11. Figure 9 indicates a 2.5dB decrease in the
CD Level.

6. Repeat steps 3, 4 and 5 until all the Inputs with sources

connected to the C46 have the same relative volume lev-
els when switching between inputs.

7. Press the SETUP Push-button to exit the Setup Mode.

Note: A chart has been provided, on page 21 to record

changes made from the default settings.

Re-Title Inputs

The C46 has Audio Inputs numbered 1 thru 8. These inputs
already have assigned titles that will allow for immediate
hookup, operation and enjoyment.

If these starting assignments do not match up with com-

ponents in your system, they may be reassigned from the
default settings. The following example will illustrate how
to rename the AUX Input to PHONO. After completing the
steps below and input number 1 (AUX) is selected, the
Front Panel Alphanumeric Display will now indicate
PHONO.

Notes: 1. Unused Inputs may be switched Off so they will not

be available from the Front Panel, the Remote
Control or the Keypad. This is accomplished by
rotating the LISTEN Control counterclockwise,
instead of clockwise, to chose another Input Title in
the steps below. Refer to figure 10.

2. Additional Input Titles include TP2 (TAPE 2), LV, TV,

VCR2; and are available for all the Inputs except the
AUX Input. The AUX Input Titles include TAPE 2, LV,
TV and PH (PHONO). When an Input with a default
Title is changed, the Title will become available for
reassignment to another Input by rotating the LISTEN
Control counterclockwise. This allows for the
reorienting of adjacent Titles as the LISTEN or
RECORD Control are rotated.

1. Press the SETUP Push-button to access the Setup

Mode.

2. Rotate the BALANCE (Menu) Control until the words

INPUT 2 

Ã

 TUN appears. Refer to figure 11.

Note: The 

Ã

 Symbol indicates the default Input Title.

3. Rotate the RECORD Control until the words INPUT 1

Ã

 AUX appears. Refer to figure 12.

4. Rotate the LISTEN Control clockwise until the Front

Panel Alphanumeric Display indicates INPUT 1 PH ap-
pears. Refer to figure 13.

Figure 8

Figure 9

Figure 7

Figure 10

Figure 12

Figure 11

Summary of Contents for C46

Page 1: ...C46 Owner s Manual McIntosh Laboratory Inc 2 Chambers Street Binghamton New York 13903 2699 Phone 607 723 3512 FAX 607 724 0549 Audio Control Center ...

Page 2: ...A polarized plug has two blades with one wider than the other A grounding type plug has two blades and a third grounding prong The wide blade or the third prong are provided for your safety If the provided plug does not fit into your outlet consult an electrician for replacement of the obsolete outlet 10 Protect the power cord from being walked on or pinched particularly at plugs convenience recep...

Page 3: ...3515 Fax 607 723 1917 If at any time you have questions about your McIntosh product contact your McIntosh Dealer who is familiar with your McIntosh equipment and any other brands that may be part of your system If you or your Dealer wish additional help concerning a suspected problem you can receive tech nical assistance for all McIntosh products at McIntosh Laboratory Inc 2 Chambers Street Bingha...

Page 4: ...tching to components that do not have Power Control Connections See your McIntosh Dealer for additional information 7 Sound Intensity is measured in units called Decibels and dB is the abbreviation 8 The Number 1 Input of the C46 allows for connection of either a High Level Source such as a second Tuner or a Low Level Source such as a turntable with a moving magnet cartridge The slide switch locat...

Page 5: ...uts can have their Input Title reassigned to match the sources in the system Two Signal Processor Loops Separate front panel switched Signal Processor Loops are provided for the listen and record circuits Precision Parts Only the finest precision 1 tolerance resistors are used throughout Low Distortion Distortion levels of all types are less than 0 002 Music is amplified with total transparency an...

Page 6: ...mation on the next page pertaining to installing the C46 into cabinets Dimensions 17 1 2 44 45cm 4 5 8 11 75cm 6 15 24cm 17 43 18cm 18 3 8 46 67cm 3 16 0 48cm 4 13 16 12 22cm 14 35 56cm 1 2 54cm 13 1 4 33 65cm 17 43 18cm 5 8 1 59cm Front View of the C46 Rear View of the C46 Side View of the C46 5 3 8 13 69cm 13 16 2 06cm ...

Page 7: ...t a quiet running ventilation fan can be a definite asset in main taining all the system compo nents at the coolest possible operating tem perature A custom cabinet installa tion should pro vide the follow ing minimum spacing dimen sions for cool operation Allow at least 2 inches 5 08cm above the top 2 inches 5 08cm below Installation 4 7 8 12 38cm 17 1 16 43 34cm Cutout Opening for Custom Mountin...

Page 8: ...Mode RECORD PROCESSOR FROM and TO allows an ex ternal signal proces sor to be connected for use in the Record Mode CD balanced INPUTS ac cept high level program source signals TAPE VCR SAT DVD CD2 and TUNER INPUTS accept high level program source signals TAPE and VCR OUTPUTS contain record out signals AUX accepts high level program source signals PH accepts signals from a Moving Magnet phono cartr...

Page 9: ...e Power Control In on the McIntosh CD Player 2 Connect a Control Cable from the McIntosh CD Player Power Control Out Jack to the Power Control In Jack on the McIntosh Tuner 3 Connect a Control Cable from the McIntosh Tuner Power Control Out Jack to the Power Control Jack on the optional McIntosh Power Control unit 4 Connect a Control Cable from the C46 MAIN POWER CONTROL Jack to the Power Control ...

Page 10: ...ch towards the PH Input jacks 5 Connect an Audio Cable from the C46 TAPE OUT McIntoshAM FM Tuner McIntosh CD Player Tape Deck in out ToAC Outlet PUTS to the Record Inputs of a Tape Recorder and from the C46 TAPE INPUTS to a Tape Recorder Out puts 6 Connect an Audio Cable from the C46 LISTEN PRO CESSOR TO to the Inputs of a Signal Processor and from the C46 LISTEN PROCESSOR FROM to the Signal Proce...

Page 11: ...he Loudspeakers in the Main Listening Room This can be accomplished by connecting the Main Power Amplifier to the C46 OUTPUTS 1 instead of the MAIN OUTPUTS so they can be switched Off by the Front Panel OUTPUTS 1 Push button 2 Connect a Control Cable from the C46 POWER CON TROL 2 Jack to the Power Control In of a McIntosh Right Loudspeaker 4 ohms Left Loudspeaker 4 ohms McIntosh PowerAmplifier Key...

Page 12: ...hat are available to record from and is used for setup functions DISPLAY indicates the Sources Volume Bal ance Levels Operational Functions and Setup Mode Settings LISTEN control selects the program signals that are listened to and unbalanced outputs VOLUME control adjusts the listening volume level and is used for setup func tions REC MONITOR Push button switches the RECORD Output signals to the ...

Page 13: ... Display Options There are two choices for displaying the Input Names on Front Panel Alphanumeric Display TEXT FULL or TEXT SHORT The TEXT FULL Mode displays the Volume Set ting together with the name of the Listen Input Selected Re fer to figure 3 The TEXT SHORT Mode displays the name of Record Input Selected the Volume Setting and the name of the Listen Input Selected Refer to figure 4 1 Press t...

Page 14: ...ge 21 to record changes made from the default settings Re Title Inputs The C46 has Audio Inputs numbered 1 thru 8 These inputs already have assigned titles that will allow for immediate hookup operation and enjoyment If these starting assignments do not match up with com ponents in your system they may be reassigned from the default settings The following example will illustrate how to rename the ...

Page 15: ... Setup Mode 2 Rotate the Front Panel BALANCE Menu Control un til the words REMOTE NORM appears 3 Rotate the Front Panel LISTEN Control until the Front Panel Alphanumeric Display indicates REMOTE ALT Refer to figure 17 4 Press the SETUP Push button to exit the Setup Mode Firmware Version The C46 functionality is controlled by internal software that is know as Firmware The Version of the Firmware in...

Page 16: ...use with other McIntosh Products Press MODE to switch between Stereo or Mono Modes Selects Switched Output 1 AM Tuner Operating Func tions and Disc Selection on certain McIntosh CD Players Selects On Screen Func tions for McIntosh DVD Players and certain CD Players Press TRIM and then the LEVEL Push but tons to select and ad just various functions Selects the FF Fast For ward or REWind Mode on Dis...

Page 17: ...rder Numbered Push buttons Press Push buttons 0 through 9 to access tuner station pre sets or CD tracks discs Disc and Track Use the DISC and TRACK Push buttons when a CD player or changer is being used TunerPush buttons Press the AM or FM Push button to select the desired broadcast band Press and release the Channel UpS or DownTPush button to move from station to station Press and hold a Channel ...

Page 18: ...from 0 to 100 Refer to fig ure 22 To change the Volume Display refer to page 15 How to Operate the C46 Mute Press the MUTE Push button to mute audio in all Listen Outputs and the Front Panel Alphanumeric Display will in dicate MUTE in place of the actual volume setting Refer to figure 23 Balance Control Adjust the BALANCE Control as needed to achieve ap proximately equal listening volume levels in...

Page 19: ... Setup Mode of the C46 This allows for customizing the Front Panel Al phanumeric Display Indications and the functioning of the C46 Refer to page 13 for additional information Output 1 and 2 Press OUTPUT 1 or 2 Push buttons to send audio to sepa rate power amplifiers connected to the rear panel OUT PUTS 1 or 2 It also activates the POWER CONTROL 1 2 Sockets on the rear panel of the C46 You can pre...

Page 20: ...desired source The recording process will not be affected and will continue Reset of Microprocessors In the event that the controls of the C46 stop functioning Figure 28 switch the POWER Switch to the Off Position and wait about three minutes Press the POWER Switch to the ON position and press the STANDBY ON Push button This will reset the C46 microprocessors Note The above condition is usually ca...

Page 21: ...otes Input Source Settings Input Number Default Title New Title Trim 1 AUX 2 TUNER 3 CD 4 CD2 5 DVD 6 SAT 7 VCR 8 TAPE The Chart below is for recording any changes made to the C46 Input Titles Refer to page 14 Setup Re Title Input Chart ...

Page 22: ...for rated output High Level 450mV for rated output Unbalanced 900mV for rated output Balanced Maximum Input Signal Phono 50mV High Level 5V Unbalanced 5V Balanced Voltage Gain Phono to Tape Out 40dB High Level to Tape Out 0dB High Level to Main Out 15dB PowerRequirements 100 Volts 50 60Hz 50 watts 110 Volts 50 60Hz 50 watts 120 Volts 50 60Hz 50 watts 220 Volts 50 60Hz 50 watts 230 Volts 50 60Hz 50...

Page 23: ...the original shipping carton and interior parts only if they are all in good serviceable condition If a shipping car ton or any of the interior part s are needed please call or write Customer Service Department of McIntosh Labora tory Please see the Part List for the correct part numbers Quantity Part Number Description 1 033838 Shipping carton only 4 033837 End cap 1 033836 Inside carton only 1 0...

Page 24: ...cIntosh Laboratory Inc 2 Chambers Street Binghamton NY 13903 The continuous improvement of its products is the policy of McIntosh Laboratory Incorporated who reserve the right to improve design without notice Printed in the U S A ...

Reviews: