background image


Microphone jack: Connect the included microphone here to join in your 
performance. 


Using a microphone may cause some noise such as hissing or feedback. Please 
keep the microphone at a reasonable distance from the speakers. It is 
recommended to unplug the microphone when not in use to avoid background 
noise. 
 

6. Basic operation 

Press the [POWER ON / OFF] button. The LED display turns on and displays the 
current tempo "120". 
 
Light key function: This keyboard is equipped with a light key function. The light 
function is activated by default. Press [KEY LIGHTING] to enable or disable the light 
function. 
 
Volume Adjustment / Master Volume: Press [MASTER VOL +] or [MASTER VOL -] 
to increase or decrease the overall volume. Press [MASTER VOL +] and [MASTER 
VOL -] simultaneously to restore the default value. 
The overall volume setting also affects the accompaniment volume. 


Volume Adjustment / Accompaniment Volume: Press [ACCOM VOL +] or [ACCOM 
VOL -] to increase or decrease the accompaniment volume. Press [ACCOM VOL +] 
and [ACCOM VOL -] simultaneously to restore the default value. 
 
Select voice / timbre: Turning on the keyboard activates the voice selection function 
automatically. If you are in a different state, press the [TIMBRE] button to activate 
the voice selection function. The display shows "tnE". The voice is set to "000" by 
default and can now be changed by pressing the corresponding number buttons or 
by pressing the "+" / "-" buttons. 
 
Percussion Mode: Press [ Keyboard Percussion] to turn the keyboard into a 
percussion keyboard. In this mode, each key of the keyboard now corresponds to a 
percussion instrument. Press the [Keyboard Percussion] button again to disable the 
keyboard percussion function.


Summary of Contents for LK 6120 MIC

Page 1: ...LK 6120 MIC User Manual Version 09 2019...

Page 2: ...Performance Preparation 2 Battery mode 2 Operation via power supply 2 4 Audio output and headphone jack 2 Audio Out 2 Headphone jack 2 5 Audio input and microphone connection 2 Audio input 2 Micropho...

Page 3: ...hord 5 9 Memory function 6 10 Effects 6 Transpose function 6 Sustain function 6 Vibrato function 6 Split function 6 11 Recording function 6 12 Rhythm programming 7 13 Learning function with illuminate...

Page 4: ...een supervised or instructed in the operation of the device by a person responsible for their safety and who have proven to be able to handle the device Children should be supervised to ensure that th...

Page 5: ...ch as vases glasses or bottles on top of the instrument Do not place small objects on it that could slip in such as hairpins sewing needles or coins Do not place burning candles on the instrument Prec...

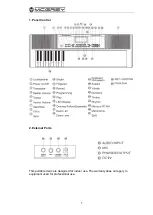
Page 6: ...1 1 Panel Control 2 External Ports This portable device is designed for indoor use The warranty does not apply to equipment used for professional use...

Page 7: ...dio output and headphone jack Audio Out Turn off the keyboard and the external audio device Connect one end of an audio cable optional to the PHONES OUTPUT connector on the back of the keyboard and th...

Page 8: ...MASTER VOL simultaneously to restore the default value The overall volume setting also affects the accompaniment volume Volume Adjustment Accompaniment Volume Press ACCOM VOL or ACCOM VOL to increase...

Page 9: ...e rhythm accompaniment Fill In After the accompaniment rhythm has been activated press FILL IN to play a rhythm variation If you hold down FILL IN this variation will continue repeatedly Stop rhythm D...

Page 10: ...vated press FINGERED After Fin is displayed on the screen you can play a full chord on the keys in the chord section of the keyboard If you press FINGERED again OFF will be displayed on the screen and...

Page 11: ...f semitone steps Press Transpose and Transpose at the same time to return to C tuning 00 Sustain function Press Sustain SUS will appear in the display and the sustain effect will be activated Press th...

Page 12: ...rcussion Pressing PLAY again to stop playback will display Prg on the screen and re enable the programming function You can now program a new rhythm or press the PLAY button again to restart the playb...

Page 13: ...correct notes and does not respond to the wrong notes Press Start Stop or Follow to deactivate this training function Press Ensemble to activate the ensemble function and then press the button to sele...

Page 14: ...9 APPENDIX Timbre...

Page 15: ...10 Rhythm...

Page 16: ...d appearances are subject to change without notice All information was correct at time of printing Musikhaus Kirstein GmbH does not guarantee for the accuracy or completeness of any description photog...

Reviews: