background image

20

2. 

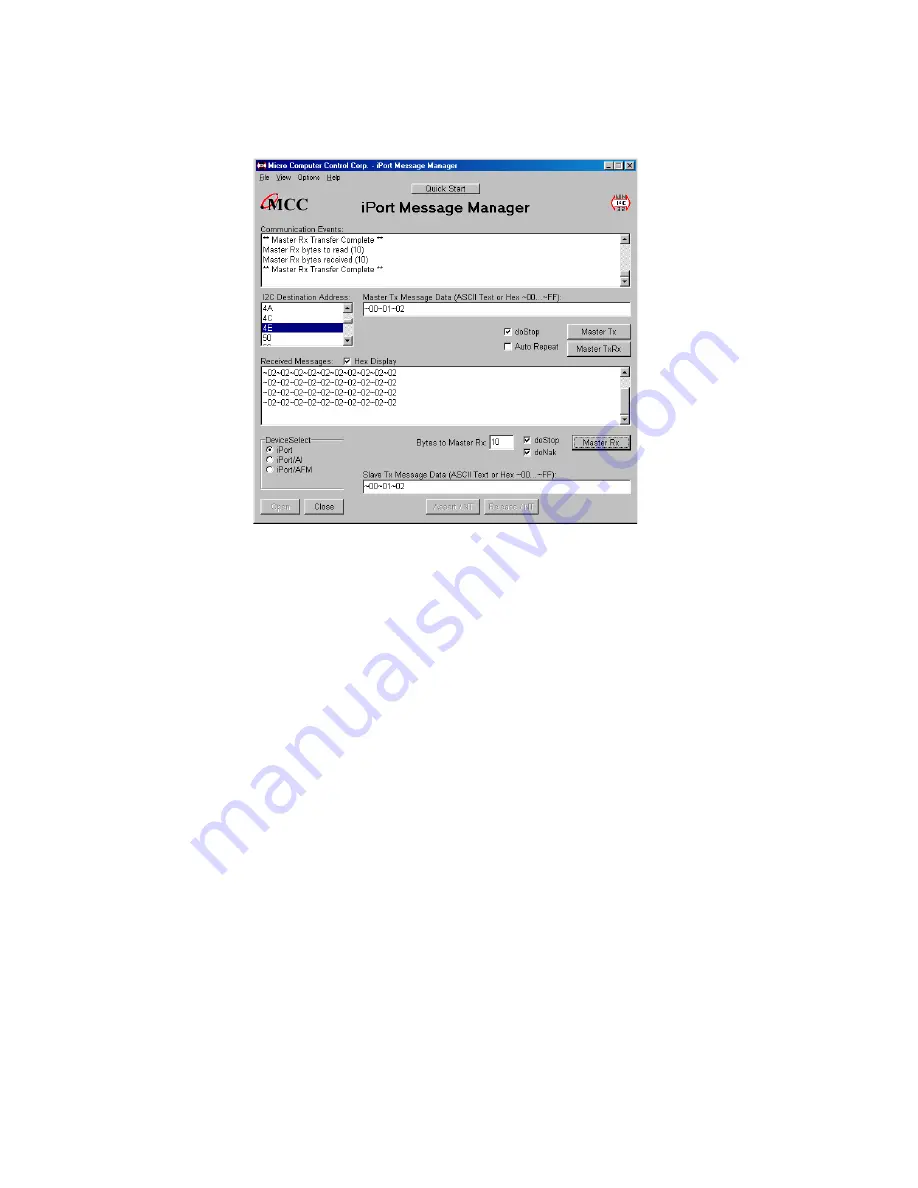
To Master Receive Data

On the main screen, use the I

2

C Destination Address list control to set the

slave address of the device you want to communicate with.

Main Application Screen

On the lower part of the main screen, set the Bytes to MasterRx edit box to
the number of bytes you want to read. For example: Set this to 1 to read a
single byte. Click on the Master RX button to receive the message. Data
received from the slave is displayed in the Received Messages text box on
the main screen. The Communications Events window should report “Master
RX Transfer Complete”. If this message does not appear, check the slave
device address, connections, and power.

If you get a “Slave Not Acknowledging” message in the Communications
Events window, this could mean you have the wrong address in the I

2

C

Destination Address, or the device is not answering to its address.

You have the option to Auto Repeat a transmitted message upon completion
by checking the Auto Repeat box. Also, you may uncheck the DoStop check
box to perform repeated starts. Another option you have is to do “DoNak”
(iPort Only), which allows you to Ack or Nak the last byte coming from a
Slave Transmitter. Some Slave Transmitter Devices require a Nak on the
final byte going across the bus.

Summary of Contents for MIIC-201

Page 1: ...User s Guide Windows to I2 C Bus Host Adapter with iPort Utility Pack Software www mcc us com...

Page 2: ...across an I2 C Bus This user s guide describes the installation and operation of the iPort MIIC 201 Windows to I2 C Host Adapter and iPort Utility Pack Software for Windows MCC products are licensed...

Page 3: ...r 3 DB 25 Serial Port Pinout 3 DB 9 Serial Port Pinout 3 5VDC Power Jack 4 I2 C Interface Connector 4 Hardware Configuration 5 Pull up Resistors 5 Connecting to a 3 3v System 5 Connecting to an SMBus...

Page 4: ...Set up 17 Diagnostic Set up 18 Sending Messages 19 Master Operations 19 To Master Transmit Data 19 To Master Receive Data 20 Slave Operations 21 To Slave Transmit a message 21 To Slave Receive a mess...

Page 5: ...Part 1 Model MIIC 201 Windows to I2 C Bus Host Adapter...

Page 6: ...receiving I2 C messages between the PC and one or more I2 C devices across an I2 C Bus Product Features Turn your Windows Based PC s Serial Port into an I2 C Port Get on the I2 C Bus in Seconds Suppo...

Page 7: ...c Linked Library a programmer s guide and sample programs This package is needed if you are developing a custom Windows software application for the iPort adapter Packing Slip This package includes th...

Page 8: ...e iPort to the Host Computer DB 25 Pin 4 Request to Send from the Host Computer to iPort DB 25 Pin 5 Clear to Send from the iPort to the Host Computer DB 25 Pin 7 Ground between Host Computer and iPor...

Page 9: ...includes a four wire positive locking modular connector see Appendix A for more info on these parts for interfacing to an external I2 C Bus Lines provided include I2 C Clock SCL Data SDA Ground and 5V...

Page 10: ...to see a Logical 1 Connecting to an SMBus System 1 Shut off iPort internal pull ups See Pull up Resistor section 2 Use external SMBus rated approx 15k ohm pull up resistors Hardware Set Up 1 Attach yo...

Page 11: ...6 Part 2 iPort Utility Pack for Windows V5...

Page 12: ...age Center that help a user get started sending and receiving I2 C Bus messages quickly iPort Message Center The iPort Message Center operates with all versions of the iPort I2 C Bus Host Adapter With...

Page 13: ...essage Manager operates with all versions of the iPort I2 C Bus Host Adapter Using this program you can perform all four 4 modes of I2 C Bus messages activity including Master Transmit Master Receive...

Page 14: ...st Adapter with ASCII Interface 3 iPort AFM MIIC 203 RS 232 to I2 C Bus Host Adapter with ASCII Fast Mode Interface b Windows 95 or higher c 1 free RS 232 Serial Port 3 Software Installation Windows 9...

Page 15: ...sending I2 C messages between the PC and one or more I2 C devices across an I2 C Bus The iPort Message Center is designed to be a simple application for experimenting with I2 C messages It provides m...

Page 16: ...must take the following steps 1 Start Programs iPort Utility Pack iPort Message Center 2 Select which device you are operating with by choosing the corresponding image Opening Screen or the correct c...

Page 17: ...s to 0xFE 6 To open an existing message list click File Open List on the menu bar To enter or edit a message List open the I2 C Message Editor screen by double clicking on a message row in the spreads...

Page 18: ...o repeat upon completion or send on INT assert low iPort AFM only Once the link has opened successfully you are now an active I2 C node Messages are entered into the message spreadsheet and are transm...

Page 19: ...to 1 Set the device s I2 C Slave address General Call Enable and other operating parameters 2 Master Transmit ASCII text or Hex 00 FF data to a specified I2 C Slave Receiver device 3 Master Receive d...

Page 20: ...e Select which device you are operating with by choosing the corresponding image Opening Screen or the correct checkbox on the main application The Main Application screen is opened by selecting an im...

Page 21: ...Select the PC ComPort attached to your iPort and the baud rate then click OK The Communications Events window on the Main Screen should report I2 C Open Successful If this message does not appear che...

Page 22: ...cast an I2 C message to multiple devices 3 I2 C Bus Master Bit Rate iPort iPort AFM The speed of the Bus will run 100KHz is standard mode 400kHz is fast mode Use other rates if you are having trouble...

Page 23: ...to troubleshoot communication problems 2 Log File Name iPort log file name if enabled 3 Log File Size Lines iPort log file length if enabled 4 Set the Destination Slave Address On the main screen use...

Page 24: ...button to send the message The Communications Events window on the main screen should report Master TX Complete If this message does not appear check the slave device address connections and power Ex...

Page 25: ...indow should report Master RX Transfer Complete If this message does not appear check the slave device address connections and power If you get a Slave Not Acknowledging message in the Communications...

Page 26: ...mitted when a Slave Transmit Request is received from a Master device To Slave Receive a message Data bytes received from a Master Transmitter are automatically displayed in the Received Message windo...

Page 27: ...nates the Purchaser s license Life Support Applications MCC Products are not designed for use in life support appliances devices or systems where the malfunction of a MCC Product can reasonably be exp...

Page 28: ...re even if MCC has been advised of the possibility of such damages or for any claim by any other party In no event will MCC s liability of damages to the Purchaser or any other person ever exceed the...

Page 29: ...ors for ACCESS bus AMP Part 4 943197 1 Plugs Molex SEMCONN ACCESS bus Plug Molex Part 15 83 1564 AMP SDL Shielded Data Link Plug for ACCESS bus Bush Amp Part 520851 1 Ferrule Amp Part 520433 1 SDL She...

Reviews: